How to use retry functionality in Microsoft Graph net SDK v5

A few months back I wrote a blockpost for how to use WithShouldRetry of the Microsoft Graph GraphServiceClient. This was a valid way to use the retry functionality for v4 of the SDK.

Well Microsoft updated there SDK to version 5 which uses the Kiota generator. If you want to know how to upgrade from v4 to v5 you can read all about it in the upgrade v4 to v5 documentation.

In v5 you don’t have fluent helper as WithMaxRetry or WithShouldRetry. I couldn’t find any documentation about it so I asked StackOverflow. Luckily I was not the only one. With some help, I found a way to maximize the retry functionality.

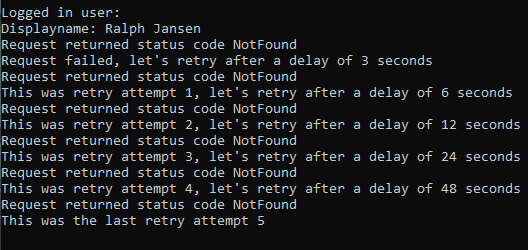
See a simple sample below that will try to get a random user and retries if it can’t be found. It won’t retry if the call is Unauthorized.

// using Microsoft.Kiota.Abstractions;
// using Microsoft.Kiota.Http.HttpClientLibrary.Middleware.Options;

// Use random Guid for user that doesn't exist to force retry
string userId = Guid.NewGuid().ToString();

const int MaxRetry = 5; // So number of call are MaxRetry + 1 (1 is the original call)

RetryHandlerOption retryHandlerOption = new RetryHandlerOption()
{
    MaxRetry = MaxRetry,
    ShouldRetry = (delay, attempt, httpResponse) =>
    {
        Console.WriteLine($"Request returned status code {httpResponse.StatusCode}");

        // Add more status codes here or change your if statement...
        if (httpResponse.StatusCode == System.Net.HttpStatusCode.Unauthorized)
            return false;

        double delayInSeconds = CalculateDelay(httpResponse, attempt, delay);

        if (attempt == 0)
            Console.WriteLine($"Request failed, let's retry after a delay of {delayInSeconds} seconds");
        else if (attempt == MaxRetry)
        {
            Console.WriteLine($"This was the last retry attempt {attempt}");
            return false;
        }
        else
            Console.WriteLine($"This was retry attempt {attempt}, let's retry after a delay of {delayInSeconds} seconds");

        return true;
    }
};

var requestOptions = new List<IRequestOption>
{
    retryHandlerOption,
};

User? user = await graphClient
    .Users[userId]
    .GetAsync(requestConfiguration => requestConfiguration.Options = requestOptions);


/// <summary>
/// This is reverse engineered from:
/// https://github.com/microsoftgraph/msgraph-sdk-dotnet-core/blob/dev2/src/Microsoft.Graph.Core/Requests/Middleware/RetryHandler.cs#L164
/// </summary>
/// <param name="response"></param>
/// <param name="retryCount"></param>
/// <param name="delay"></param>
/// <returns></returns>
private static double CalculateDelay(HttpResponseMessage response, int retryCount, int delay)
{
    HttpHeaders headers = response.Headers;
    double delayInSeconds = delay;
    if (headers.TryGetValues(RetryAfter, out var values))
    {
        var retryAfter = values.First();
        if (int.TryParse(retryAfter, out var delaySeconds))
        {
            delayInSeconds = delaySeconds;
        }
    }
    else
    {
        var mPow = Math.Pow(2, retryCount);
        delayInSeconds = mPow * delay;
    }

    const int
        MaxDelay = 180; // From github code https://github.com/microsoftgraph/msgraph-sdk-dotnet-core/blob/2e43863e349b4b3ebe2e166c26e3afcc4a974365/src/Microsoft.Graph.Core/Requests/Middleware/Options/RetryHandlerOption.cs#L18
    delayInSeconds = Math.Min(delayInSeconds, MaxDelay);

    return delayInSeconds;
}

How to use WithShouldRetry of the Microsoft Graph GraphServiceClient

Update! See for v5 of the Microsoft Graph SDK the following blogpost.

I had some difficulty in to understand how WithShouldRetry method works of the Microsoft Graph .NET SDK. And I was not the only one because I saw several StackOverflow posts and an important issue about the retry. There is no documentation about this, so I thought it’s better to update a sample application that I have were I can test Microsoft Graph calls in C# with the dotnet SDK.

The sample application contains the method DisplayUserInfoAsync. This method is just printing the information of a user by his identifier. The complete class is defined at the bottom of this blogpost, but the important part is this:

User user = await graphClient.Users[userId]
.Request()
.WithMaxRetry(MaxRetry)
.WithShouldRetry((delay, attempt, httpResponse) =>
{
    Console.WriteLine($"Request returned status code {httpResponse.StatusCode}");

    // Add more status codes here or change your if statement...
    if (httpResponse.StatusCode == System.Net.HttpStatusCode.Unauthorized)
        return false;

    double delayInSeconds = CalculateDelay(httpResponse, attempt, delay);

    if (attempt == 0)
        Console.WriteLine($"Request failed, let's retry after a delay of {delayInSeconds} seconds");
    else if (attempt == MaxRetry)
        Console.WriteLine($"This was the last retry attempt {attempt}");
    else
        Console.WriteLine($"This was retry attempt {attempt}, let's retry after a delay of {delayInSeconds} seconds");

    return true;
})
.GetAsync();

It uses the WithMaxRetry and WithShouldRetry options to manipulate the retry mechanism of the standard RetryHandler of the SDK. The official documentation of this retry handler can be found here. The retry handler uses by default the default RetryHandlerOptions. With the above methods you have more control on how they work.

So, in my sample application it works as follows. I do a call to a user that doesn’t exist. This will result in a 404 not found result. Because I want more information about the number of retries, I log this to the console. The CalculateDelay method is the same code as in the RetryHandler of the SDK but it gives me more details in the log messages.

This results in the following console log if I try to search for a non-existing user with a max retry of 5 (default is 3).

Because this user really doesn’t exist, it will end up throwing a “tooManyRetries” code in the “Microsoft.Graph.ServiceException”.

Hopefully this will help people in how to use these methods and hopefully Microsoft will create some official documentation about this.

Complete code or check the sample application:

using Microsoft.Graph;
using MicrosoftGraphWithMsi.Helpers;
using System.Net.Http.Headers;

namespace MicrosoftGraphWithMsi.Graph
{
    internal static class Users
    {
        private const string RETRY_AFTER = "Retry-After";

        internal static async Task DisplayLoggedInUserInfoAsync(GraphServiceClient graphClient, bool writeJsonObjectsToOutput = true)
        {
            User user = await graphClient.Me
                            .Request()
                            .GetAsync();

            Console.WriteLine("Logged in user:");
            PrintUserInformation(user, writeJsonObjectsToOutput);
        }

        internal static async Task DisplayUserInfoAsync(GraphServiceClient graphClient, string userId, bool writeJsonObjectsToOutput = true)
        {
            const int MaxRetry = 5; // So number of call are (MaxRetry + 1)

            User user = await graphClient.Users[userId]
                            .Request()
                            .WithMaxRetry(MaxRetry)
                            .WithShouldRetry((delay, attempt, httpResponse) =>
                            {
                                Console.WriteLine($"Request returned status code {httpResponse.StatusCode}");

                                // Add more status codes here or change your if statement...
                                if (httpResponse.StatusCode == System.Net.HttpStatusCode.Unauthorized)
                                    return false;

                                double delayInSeconds = CalculateDelay(httpResponse, attempt, delay);

                                if (attempt == 0)
                                    Console.WriteLine($"Request failed, let's retry after a delay of {delayInSeconds} seconds");
                                else if (attempt == MaxRetry)
                                    Console.WriteLine($"This was the last retry attempt {attempt}");
                                else
                                    Console.WriteLine($"This was retry attempt {attempt}, let's retry after a delay of {delayInSeconds} seconds");

                                return true;
                            })
                            .GetAsync();

            Console.WriteLine("User information:");
            PrintUserInformation(user, writeJsonObjectsToOutput);
        }

        /// <summary>
        /// This is reverse engineerd from:
        /// https://github.com/microsoftgraph/msgraph-sdk-dotnet-core/blob/dev/src/Microsoft.Graph.Core/Requests/Middleware/RetryHandler.cs#L164
        /// </summary>
        /// <param name="response"></param>
        /// <param name="retry_count"></param>
        /// <param name="delay"></param>
        /// <returns></returns>
        internal static double CalculateDelay(HttpResponseMessage response, int retry_count, int delay)
        {
            HttpHeaders headers = response.Headers;
            double delayInSeconds = delay;
            if (headers.TryGetValues(RETRY_AFTER, out IEnumerable<string> values))
            {
                string retry_after = values.First();
                if (int.TryParse(retry_after, out int delay_seconds))
                {
                    delayInSeconds = delay_seconds;
                }
            }
            else
            {
                var m_pow = Math.Pow(2, retry_count);
                delayInSeconds = m_pow * delay;
            }

            const int MAX_DELAY = 180; // From github code https://github.com/microsoftgraph/msgraph-sdk-dotnet-core/blob/2e43863e349b4b3ebe2e166c26e3afcc4a974365/src/Microsoft.Graph.Core/Requests/Middleware/Options/RetryHandlerOption.cs#L18
            delayInSeconds = Math.Min(delayInSeconds, MAX_DELAY);

            return delayInSeconds;
        }


        private static void PrintUserInformation(User user, bool writeJsonObjectsToOutput)
        {
            Console.WriteLine($"Displayname: {user.DisplayName}");

            if (writeJsonObjectsToOutput)
            {
                Console.WriteLine();
                Console.WriteLine("User in JSON:");
                string json = user.ToFormattedJson();
                Console.WriteLine(json);
            }
        }
    }
}

Add CORS to Azure function app service with Azure CLI

Adding CORS to an Azure function app sounds easy but when you run it in a pipeline it is a bit more difficult. If you already added the origin to the list, a new entry is added when you run the pipeline for a second time. See this bug report for more information.

Here is a script to check if an origin is already added. If not, add it and otherwise skip the origin.

$FunctionAppName = "foo"
$ResourceGroupName = "bar"

# Configure CORS for Function App
Write-Host "Set CORS in function app"
$allowedOrigins = "https://dev.azure.com","https://localhost:3000"

foreach ($item in $allowedOrigins) {
    Write-Host "Check if allowedorigin '$item' is already set"
    $missesOrigin = az functionapp cors show --name "$FunctionAppName" --resource-group $ResourceGroupName --query "contains(to_string(length(allowedOrigins[?contains(@, '$item')])),'0')"
    if ($missesOrigin -eq "true") {
        Write-Host "Add allowedorigin '$item'"
        az functionapp cors add -n "$FunctionAppName" --allowed-origins $item
    }
    else {
        Write-Host "Allowedorigin '$item' already set"
    }
}

Bluetooth missing on XPS 15 after reboot

Normally I’m not really posting these kind of blogs but I really needed to help other people because I faced this problem for two times now and both times it took me really days to find a solution that worked for me.

I have a Dell XPS 15 from 2016. Still an awesome machine with the specs that I have. The only thing that was (strange enough) sometimes horrible, was de wifi connection. The speed was not correct and sometimes there wasn’t any connection possible. A colleague of me had the same laptop (same year) and he had the exact problem. So sometimes we had no wifi on the department but the rest of team had. So time for a fix.

Intel® Wireless-AC 9260 160MHz

After some resource I bought the Intel® Wireless-AC 9260 160MHz wifi module. Followed some tutorials on the internet and youtube to build it in and started the device.

Note: First download the drivers for wifi and bluetooth before replacing the Wifi module.

Were is my Bluetooth?

The installation of the WiFi module is not really and issue. You install it, maybe do a reboot to be sure and voila is it working. Bluetooth is a whole different story. In the beginning everything is looking fine. But after one but sometimes more reboots, the Bluetooth is gone. When you go to device manager, you will see an alert by your Intel module. The only thing that is working, is uninstall the driver and scan for new devices. After that, everything is working fine again. But after a new reboot you have to do the same thing all over again.

On the internet you find a lot of people with same problem. Even taping of the last pin of the WiFi module (not something that I want to try). A combination of the solutions (because not every solution was about exactly the same module or new drivers came out etc) worked for me.

So, what worked for me?

Just to make things clear, I have a XPS 15 from 2016 (9550) and I’m using the latest drivers of Intel (December 2019) 21.60.0.4.

  1. Download the Intel® Driver & Support Assistant or go to this site
  2. This will scan for Intel hardware on your machine. I installed every update that was available (please wait with WiFi and Bluetooth).
  3. Download the drivers for WiFi and Bluetooth
  4. Uninstall the drivers via device manager for your Bluetooth and check the checkbox for deleting the drivers of your pc.
  5. Now, first install the Bluetooth driver and after that, install the WiFi driver. If you do this the other way around, the drivers aren’t working correctly and he will keep saying that there is an update for your WiFi. I had this tip from the Dell support desk forum from a dell employee.
  6. Reboot your pc. Maybe Bluetooth is working (it did for me a sometimes but after a day or two the problems started again).
  7. So i digged further and found a couple of times the solution to disable “Secure boot” in the bios. And that makes sense when you read the documentation of Secure boot on the Microsoft site. I quote “Secure boot is a security standard developed by members of the PC industry to help make sure that a device boots using only software that is trusted by the Original Equipment Manufacturer (OEM)“. That is the problem that I have. After a reboot the driver (software) is gone/not working because it is a driver for a different module than Dell put in the original laptop.
  8. Remove WIDCOMM Bluetooth Software

Rebooted the pc and voila everything was working. Now after a week I have no problems anymore and I can enjoy my Bluetooth mouse and headset without reinstalling the Bluetooth driver.

Some thoughts

I think we need to be careful with new updates. It works now so why change the drivers? Also updates of the bios can give problems. If there is a bios update of Dell, the secure boot option will properly be enabled again which will interfere with your module again.

Hopefully this blog post will help someone. It will do for me when I will do a clean install of my device in the future.

Manage custom user attributes in Azure B2C

Azure B2C has the capability to manage custom user attributes. Those attributes are custom extension on the Azure AD profile in the background. But how do they work and how can you access them with the Graph API?

Accesstoken

First you need an accesstoken. The get an access token, read my previous post with an introduction to Azure B2C with the Graph API or how to find users in Azure B2C with the Graph API.

Create a Custom User Attribute

In this sample, we are going to create a custom attribute called “GlobalAdmin”. It’s just a boolean for simplicity.

You can get the details of the user with the ObjectId using the url:
https://graph.windows.net/{{tenant}}.onmicrosoft.com/users/fdabad31-92bf-43f7-8370-53c280ef042b?api-version=1.6
When the attribute is new, you won’t find the attribute on the user. Not even with the default value (in our case false because of the boolean).

Set a Custom User Attribute

To set the custom created user attribute we need to know where the custom attribute is coming from. An B2C user attribute is an extension to the Azure AD. Just as you would do with the regular Azure AD. You can imagine that if there is a big Azure AD and there are many applications connected to it. So Microsoft decided that an extension belongs to an application.

In our case, B2C it self is an application on top of the Azure AD. So Azure B2C has an application (app registration) in your Azure AD tenant. You can see this, when you navigate to the Azure AD blade in the Azure portal and go to the app registrations. When you click on the “All applications” you will see the default “b2c-extensions-app” application. You can also navigate to new preview blade in B2C it self.

You need the “ApplicationId” (ClientId) of that “b2c-extensions-app”. So open it, and copy it. Do not change anything on this application otherwise your Azure B2C can be broken!

We have all the information that we need, so let’s set the custom attribute. Create a new postman request and use the same url as getting the user detail information with the ObjectId. Set the type of request to “Patch” and add a header “Content-Type” with the value “application/json”.

But in the body the fields (attributes) you want to set. Let’t practice with the “displayName” of the user using the following body:

{
    "displayName": "Ralph Jansen2"
}

Hit send and the return code will be a 204 No Content. When you get the user, you will see the updated value. It can take about 15 seconds before the update is propagated over the whole world.

Now that is working, let’s update the custom user attribute “GlobalAdmin”. The attribute belongs to an application. In our case the applicationid is “08b93729-c048-4e64-8fba-48a4e98fdb98”. An Azure B2C user attribute extension will have the syntax “extension_b2cApplicationIdWithoutDashes_attributeName”. So this will result in “extension_08b93729c0484e648fba48a4e98fdb98_GlobalAdmin” in our case. So let’s put it in the body with the value true (because our attribute is a boolean) and hit send.

Get a Custom User Attribute

Let’s see the result by getting the user details again with the ObjectId. You will see the new attribute on the user (can take again a few seconds).

Find users in Azure B2C with graph api

Searching a user in Azure B2C with the graph api can be difficult. You need to know which field you need to get the right information. The documentation (if any) is always behind. Hopefully this post will help someone that needs to get some user information from Azure B2C.

Accesstoken

You need an access token to query the B2C tenant. To get an accesstoken, follow my other blog that gives an introduction to Azure B2C.

Getting users

Above you see an example for getting all the users from your B2C tenant. Below you see a list for other queries that are more advanced. Change the tenant name.

Get all users
https://graph.windows.net/{{tenant}}.onmicrosoft.com/users?api-version=1.6

Get User by displayName
https://graph.windows.net/{{tenant}}.onmicrosoft.com/users?api-version=1.6&$filter=displayName eq ‘Ralph Jansen’

Get User by objectId
https://graph.windows.net/{{tenant}}.onmicrosoft.com/users/fdabad31-92bf-43f7-8370-53c280ef042b?api-version=1.6

Get User by otherMails, userPrincipalName, mail
https://graph.windows.net/{{tenant}}.onmicrosoft.com/users?api-version=1.6&$filter=(otherMails/any(x:x eq ‘info@sample.com’) or userPrincipalName eq ‘info@sample.com’ or mail eq ‘info@sample.com’)

Introduction for Azure B2C with graph api

Working with B2C can be difficult. The user interface is changing a lot and is always behind the normal Azure AD user interface. Using the graph api is helpfull in some situation. But how to get started? Hopefully this will help someone.

Accesstoken

First you need an accesstoken for the “old graph”. The Azure AD still works the best with the old Azure AD graph. Since Azure B2C is an implementation of the Azure AD, we are using that old graph.

First navigate to your B2C instance (do not go to Azure Active directory) in the Azure portal and create a new application with the app registration preview blade.

Create a new secret for the application under the menu item “Certificates & secrets”.

Copy the clientid (see Overview screen) and secret for later.

In this example we are going to use the accesstoken to manage users in Azure B2C. So we need permissions to do this. Add the permissions to the application. Make sure you add the permissions to the old Azure Active Directory graph!

Make sure you grant permissions and you selected application permissions (not delegated).

Postman

Open postman to generate a new accesstoken (for in example a Collection of requests) to manage B2C. We are using client credentials because we are managing B2C in name of the application.

You get the “Access Token URL” from here:
https://login.microsoftonline.com/{{TenantId}}/oauth2/token

Create a new request for getting all users

Azure Remote debugging manually in Visual Studio 2017

Often I have (small) pieces of software in Azure. This can be for testing of for real production situation. When you write you code, everything can work perfectly locally and you get strange errors when deployed to Azure. A handy tool is remote debugging where you can connect your Visual Studio Environment to your Azure app.

In this post I will explain how the Remote debugging is setup and what happens under water when you normally just click on “Attach Debugger” in the “Cloud Explorer” of Visual Studio (2017). The sample project is a .NET Core 2.1 Azure Function App.

Enable Remote Debugging

Before we start a debugging session to our Azure Function app we need to enable the functionality.

  1. Navigate in the Azure portal to your function app
  2. Go to the “Application settings”
  3. Under “Debugging” set Remote Debugging to On and set
    Remote Visual Studio version to 2017.

Publish Debug version of application

A Debug version of you application is needed in Azure to connect the breakpoints. Set the “Configuration” in Visual Studio to Debug and publish your application to your function app.

Attach debugger to Function App

In the Cloud Explorer in Visual Studio you can navigate to your Function App and select Attach Debugger.

Many times, this won’t work or you get an error. In example:

The breakpoint will not currently be hit. No symbols have been loaded for this document 

You can work around this by attaching the debugger manually in Visual Studio. Follow these steps:

  • Go to the Debug menu and select Attach to Process…
  • Enter the url + port number of your function app in the Connection target field like this: appkeyrotatortest.azurewebsites.net:4022
  • You can find the right port number in this document. In my example it is the port number for Visual Studio 2017. For 2019 it is 4024.
  • When prompt to authenticate, you can do this with the publish profile of your Function App. Download the publish profile by hitting the Get publish profile button in the Azure portal. Use the userName and userPWD of the publish profile.
  • Because it is a .NET Core application, we need to set Attach to to Managed (CoreCLR) code. You can do this with the select button. This isn’t done automatically because of an issue.
  • Last thing is to select the w3wp.exe process and hit Attach.
  • Let Visual Studio download all the files needed en you can debug your application as if you’re working locally.

Apply same validation rules on different classes with FluentValidation

In this blog post I will explain how to apply the same validation rules on the same properties in different classes with FluentValidation. This post will continue on the previous one where I explained how to create Custom Validators for your properties.

So in the previous example we had the Person class with a PersonValidator class. Let’s say you have some pages in your application to create and edit instances of that Person class. In order to create those pages, we use separate ViewModels for those pages. So let’s say you have a PersonCreateViewModel and a PersonEditViewModel. In this way, you have 3 classes with the same validation rules, because in example the property FirstName is the same in all those classes. If the validation rules of the FirstName changes (in example the MaxLength changes) you have to change the rules on 3 different places. If you forget to change it on one place a new bug is introduced.

Reuse validators for property

In order to reuse the validators we are going to extend the static CustomValidators class from our previous post. Again we are creating an extension method but now for the FirstName property. We put all the validation rules that we have for this FirstName in this custom validator. The end result will than be the following:

public static IRuleBuilderOptions&lt;T, string&gt; FirstNameValidation&lt;T&gt;(this IRuleBuilder&lt;T, string&gt; rule)
{
    return rule
        .NotEmpty()
        .NotNull()
        .MaximumLength(30)
        .NotStartWithWhiteSpace()
        .NotEndWithWhiteSpace();
}

We can now change the PersonValidator (and PersonCreateViewModel and PersonEditViewModel) to use the power of the new FirstNameValidation extension method. The end result will than be the following:

public class PersonValidator : AbstractValidator&lt;Person&gt;
{
    public PersonValidator()
    {        
        RuleFor(e =&gt; e.FirstName).FirstNameValidation();
        RuleFor(e =&gt; e.LastName).LastNameValidation();
    }
}

The PersonValidator class is now smaller and easier to read. The cool thing as well is that you can combine your custom FirstNameValidation extension method with your other extension methods as well. So when you have in example slightly different validation rules for your create and edit viewmodels you can use in example the FirstNameValidation method for the generic rules and add the specific rules in the particular validator class. See the following example where the edit viewmodel has extra validation rules:

public class PersonCreateViewModelValidator : AbstractValidator&lt;PersonCreateViewModel&gt;
{
    public PersonValidator()
    {        
        RuleFor(e =&gt; e.FirstName).FirstNameValidation();
        RuleFor(e =&gt; e.LastName).LastNameValidation();
    }
}

public class PersonEditViewModelValidator : AbstractValidator&lt;PersonEditViewModel&gt;
{
    public PersonValidator()
    {        
        RuleFor(e =&gt; e.FirstName).FirstNameValidation().NotContainWhiteSpace();
        RuleFor(e =&gt; e.LastName).LastNameValidation();
    }
}

Conclusion

Reusing validators saves you a lot of time and duplicate code. This will eventually result in less bugs. Nice is as well that your validator classes like the PersonValidator class is easier to read because it isn’t that long.

Creating custom validators with FluentValidation

This blog post will explain how creating custom validators with FluentValidation. A while back I wrote a blog post about how to start with FluentValidation in your project. In this post we will continue on that foundation.

Let’s say in example you have the class Person.

public class Person {
    public int Id { get; set; }     
    public string FirstName { get; set; }     
    public string LastName { get; set; }     
    public DateTime BirthDay { get; set; } 
}

You need to validate that Person class. So let’s say, you want to validate the FirstName and LastName property. Those properties are similar to each other because both are name and a string so both could have the same (custom) validators. 

So let’s create a PersonValidator class which of course will validate the Person class.

public class PersonValidator : AbstractValidator<Person>
{     
    public PersonValidator()  
    {                 
        RuleFor(e => e.FirstName).NotEmpty().MaximumLength(30);
        RuleFor(e => e.LastName).NotEmpty().MaximumLength(30);
    } 
}

Custom Validator

Now, you want to extend the basic validators. So let’s say you want a validator that the name must not start with a whitespace. You can validate this on multiple ways but the most logical way is to create a custom validator once and use that validator on multiple places.

Here is the validator for checking whitespaces in the begin or end of a string.

public static class CustomValidators 
{     
    public static IRuleBuilderOptions<T, string> NotStartWithWhiteSpace<T>(this IRuleBuilder<T, string> ruleBuilder)     
    {         
        return ruleBuilder.Must(m => m != null && !m.StartsWith(" ")).WithMessage("'{PropertyName}' should not start with whitespace");     
    }     
        
    public static IRuleBuilderOptions<T, string> NotEndWithWhiteSpace<T>(this IRuleBuilder<T, string> ruleBuilder)     
    {         
        return ruleBuilder.Must(m => m != null && !m.EndsWith(" ")).WithMessage("'{PropertyName}' should not end with whitespace");     
    } 
}

You can use the custom validators in the PersonValidator in the following way:

public class PersonValidator : AbstractValidator<Person> 
{     
    public PersonValidator()     
    {                 
        RuleFor(e => e.FirstName).NotEmpty().MaximumLength(30).NotStartWithWhiteSpace().NotEndWithWhiteSpace();         
        RuleFor(e => e.LastName).NotEmpty().MaximumLength(30).NotStartWithWhiteSpace().NotEndWithWhiteSpace();     
    } 
}

With this above custom validator is validating your objects very easy to do.

In the next blog post we go one step further. I will then show you how to apply the same validation rules on multiple classes.