Unit testing with xUnit in .NET Core

This post is about Unit testing with xUnit in .NET Core. The last few weeks I was working on a new  project in .NET Core. What I didn’t expected was that so many features weren’t documented or very bad documented. Many articles of Microsoft explained a different solution for the same result. I understand the framework is changing but the documentation should be changing as well then.

So I started unit testing with xUnit. I like the framework a lot so I hoped everything was working in the latest version of .NET Core. What I wanted to achieve was to create of course unit tests but also good integration in Visual Studio and TFS. That was not so easy as I hoped for. It took me a lot of searching and combining of solution to get everything working. Just because of the poor documentation. If you see the result to get this to work then it looks to easy.

First, which version of all the tools and Frameworks did I use:

  • Visual Studio 2017 Enterprise 15.2 (26430.12)
  • ReSharper 2017.1.2
  • dotnet version 1.0.4 (dotnet –version in command prompt)
  • Team Foundation Server 2017 Update 1

When I used the xUnit Nuget package I got with little effort the tests working in Visual Studio. But I wanted more. Because I’m CI/CD engineer, I wanted some automated builds in Team Foundation Server. So I created a new CI build for my project. I couldn’t get everything to work with the tasks that where in TFS so I used the command prompt task. I found this post from xUnit for testing in .NET Core that got me pointing in the right direction.

I installed the following Nuget packages in my project:

<ItemGroup>
  <PackageReference Include="Microsoft.NET.Test.Sdk" Version="15.0.0" />
  <PackageReference Include="xunit" Version="2.3.0-beta2-build3683" />
  <PackageReference Include="xunit.runner.visualstudio" Version="2.2.0" />
  <DotNetCliToolReference Include="dotnet-xunit" Version="2.3.0-beta2-build3683" />
</ItemGroup>

This gave me access to the new xunit CLI. I also installed the VS runner package so you could also run the unittests with the “Test Explorer” window in Visual Studio.

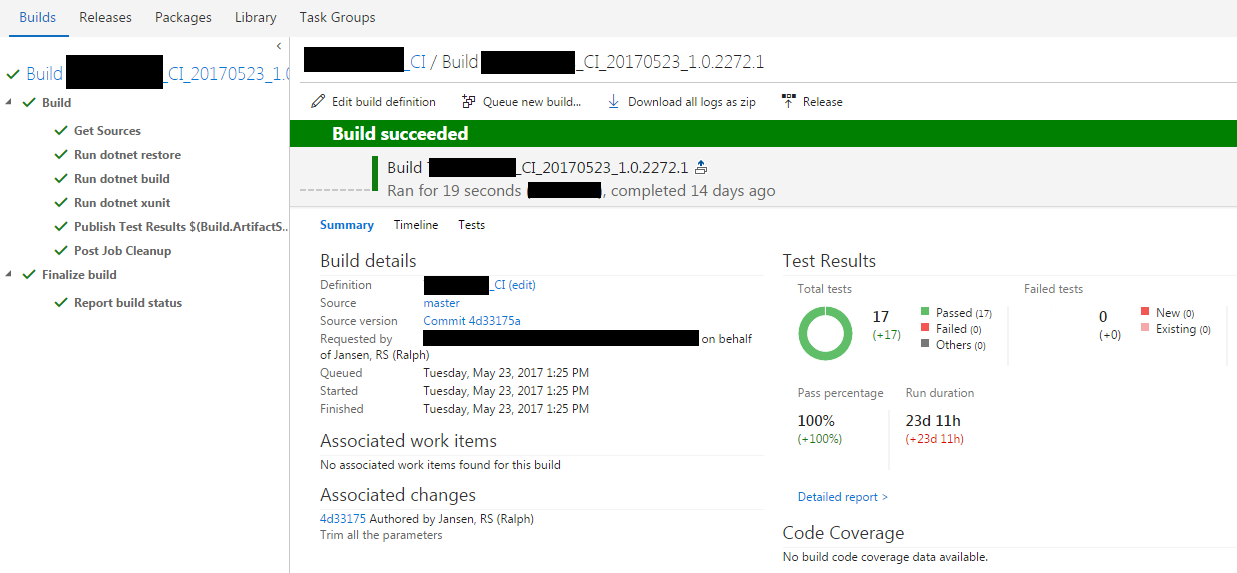
Now I could finish my CI Build definition. I removed all the tasks because in every combination that I tried I couldn’t get a part to work. I still wanted, to build the project, run the test, see the results back in Visual Studio and in TFS. As a bonus I wanted to see the Code Coverage of the tests in TFS as well.

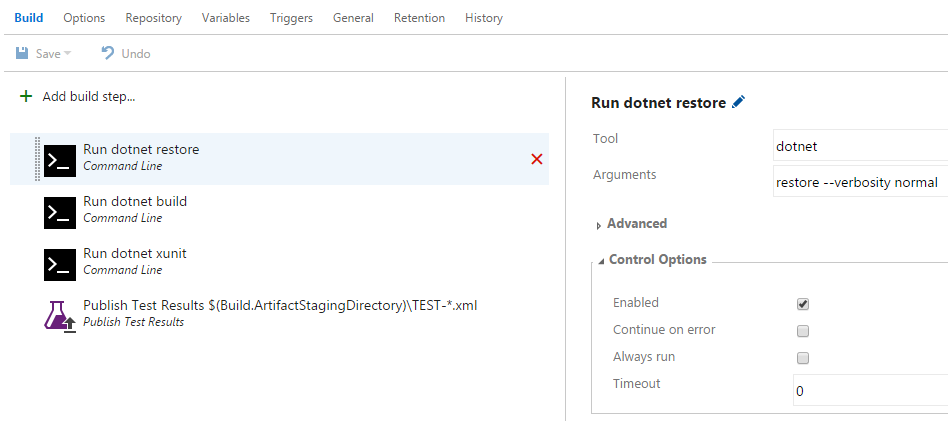
First restore all external dependencies:

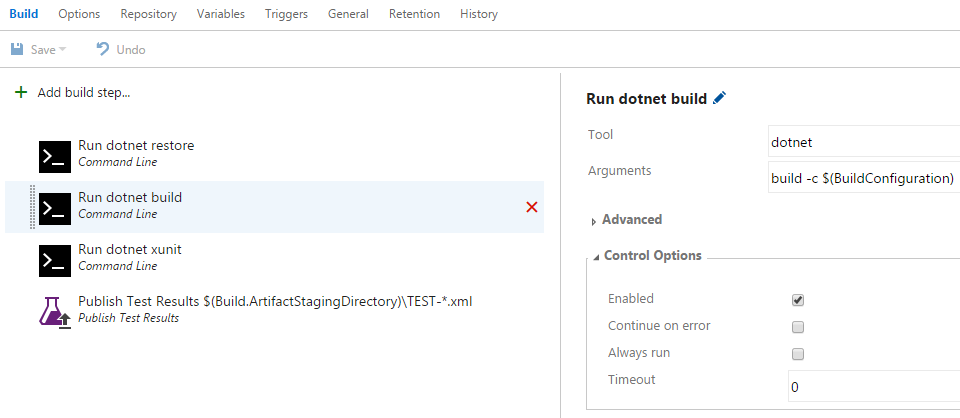
Then build the project:

Run the tests:


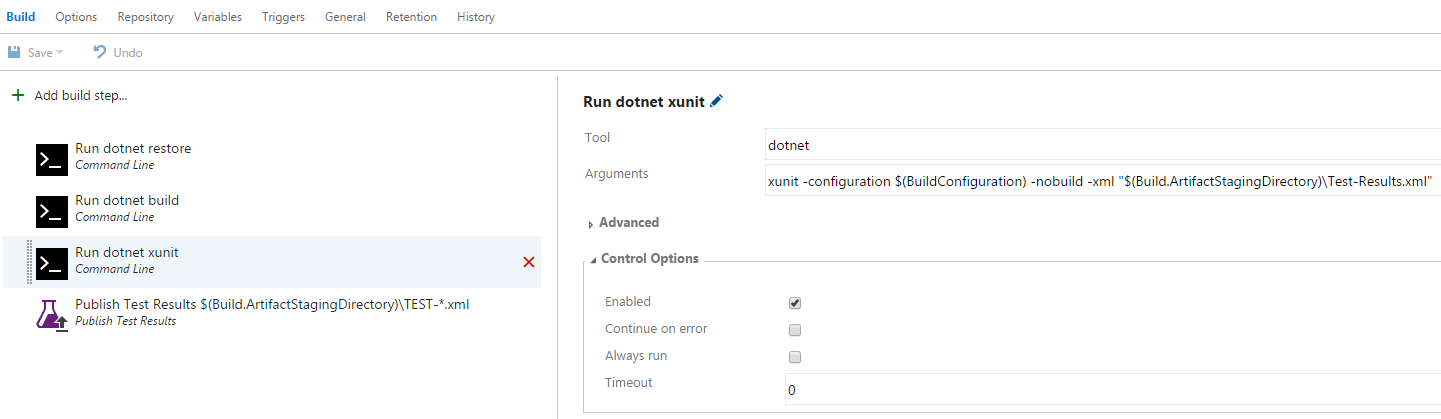
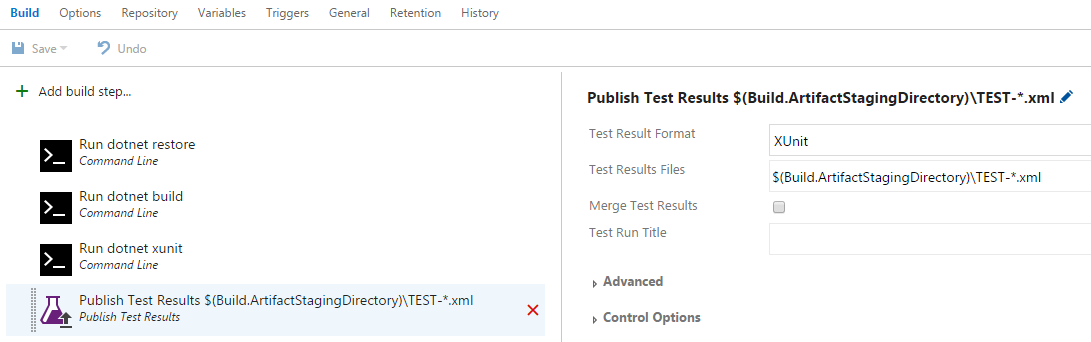
The trick is to use the right configuration and to export the result to an xml file. Place that file in the “$(Build.ArtifactStagingDirectory)” so we can use it in the next step. We already build the solution so add the “-nobuild” option.

Upload the test results:

The Code Coverage was not possible because that is still under development by Microsoft for the .NET Core framework. In the next version of Visual Studio will this be possible. You can already test it in the Visual Studio 2017 15.3 preview version. See this thread on Github for more information.
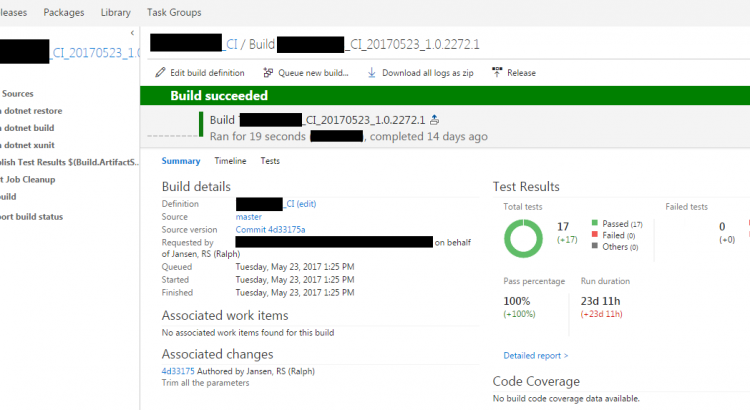
The result is:

Trigger a CI build after a gated checkin

We want to trigger a CI build after a gated checkin because we have two builds in our company. One with a gated checkin for fast building and very important test. The other build is for code analysis and long running tests. Because we don’t want to wait very long on our CI build we have created that QM build. The problem is that the QM isn’t triggered anymore after changing the CI build to a Gated checkin build.

I found a blogpost for TFS 2010. Because TFS 2013 is slightly different, I thought I would give it an update.

This is how to fix it for TFS 2013

  1. Create an argument called “NoCIOption” of the type boolean with default True.
    CreateDisableCiArgument
  2. Set the metadata information so you understand the argument in your build definition.
    MetadataDisableCiBuild
  3. Use the argument in the TFS 2013 build template. You can find the property under “Run on agent” and then “Get sources from Team Foundation Version Control”. Go to the properties window and change the hard coded “True” in the NoCIOption property to the argument you just created.
    SetDisableCiArgument

Now checkin your changes of the teamplate and use (if you don’t already have) the template in your CI build (the one with the gated checkin). Change the new argument to “false”.

Now your second build (our QM) is also triggered again.

Download files from TFS server with PowerShell

If you want to download files from TFS with PowerShell, you will need to write a script that can access the TFS Server and access the folder on your drive.

This script uses a server path in the TFS server and download some files under that server path to the drop folder of your build. If you don’t use a build, you can change then environment variables. This script is created because of an original question on StackOverflow.

# The deploy directory for all the msi, zip etc.
$AutoDeployDir = "Your TFS Directory Server Path"
$deployDirectory = $($Env:TF_BUILD_DROPLOCATION + "\Deploy\" + $Env:TF_BUILD_BUILDNUMBER)

# Add TFS 2013 dlls so we can download some files
Add-Type -AssemblyName 'Microsoft.TeamFoundation.Client, Version=12.0.0.0, Culture=neutral, PublicKeyToken=b03f5f7f11d50a3a'
Add-Type -AssemblyName 'Microsoft.TeamFoundation.VersionControl.Client, Version=12.0.0.0, Culture=neutral, PublicKeyToken=b03f5f7f11d50a3a'
$tfsCollectionUrl = 'http://YourServer:8080/tfs/YourCollection' 
$tfsCollection = New-Object -TypeName Microsoft.TeamFoundation.Client.TfsTeamProjectCollection -ArgumentList $tfsCollectionUrl
$tfsVersionControl = $tfsCollection.GetService([Microsoft.TeamFoundation.VersionControl.Client.VersionControlServer])

# Register PowerShell commands
Add-PSSnapin Microsoft.TeamFoundation.PowerShell

# Get all directories and files in the AutoDeploy directory
$items = Get-TfsChildItem $AutoDeployDir -Recurse

# Download each item to a specific destination
foreach ($item in $items) {
    # Serverpath of the item
    Write-Host "TFS item to download:" $($item.ServerItem) -ForegroundColor Blue

    $destinationPath = $item.ServerItem.Replace($AutoDeployDir, $deployDirectory)
    Write-Host "Download to" $([IO.Path]::GetFullPath($destinationPath)) -ForegroundColor Blue

    if ($item.ItemType -eq "Folder") {
        New-Item $([IO.Path]::GetFullPath($destinationPath)) -ItemType Directory -Force
    }
    else {
        # Download the file (not folder) to destination directory
        $tfsVersionControl.DownloadFile($item.ServerItem, $([IO.Path]::GetFullPath($destinationPath)))
    }
}


TFS Power tools 2013 update 2 are released

The TFS Power tools 2013 update 2 are released a few days ago. Strange that there isn’t any notification in your Visual Studio 2013 environment. This update gives you better support for the new features in TFS 2013 Update 2.

You first have to uninstall the old version before installing the new version. If you want PowerShell support, you have to choose the custom installer in the wizard.

Download

You can download the update in the Visual Studio gallery by following this link:
http://visualstudiogallery.msdn.microsoft.com/f017b10c-02b4-4d6d-9845-58a06545627f

TFS delete build definition timeout

When you do a tfs delete on a build definition and you receive a timeout, you probably have to many builds in your TFS server. Even if you delete all the build for your build definition, tfs still stores all the builds in your TFS Server. Just like your TFS Team projects, you have to delete and then destroy the builds. After that, you could delete the build definition completely.

The only way to do this is, is to delete and destroy the builds in pieces. You can only do that by the command prompt.

I created a PowerShell script that loops through the builds for a specific build definition and deletes all the builds before a specific date. So if your build is maybe a year old, you could start the script a year back from now and loop through all the builds until let’s say two months ago. You could skip the number of days you want. I set the days to skip to 15 because I have a lot of builds each month and otherwise the TFS server has trouble to delete the bigger chunks.

$TfsCollectionUrl = "http://YourTfsServer:8080/tfs/YourTeamCollection"
$teamProject = "YourTeamProject"
$BuildDefinition = "YourTeamBuildDefinitionName"

Function CountForward {
    Param([datetime]$startDate,[int]$daysToSkip,[datetime]$endDate)

    Write-Host "Count forward from:" $startDate.ToString("yyyy-MM-dd") -foregroundcolor "magenta"
    Write-Host "Count forward until:" $endDate.ToString("yyyy-MM-dd")-foregroundcolor "magenta"
    Write-Host "Count every" $daysToSkip "day(s)" -foregroundcolor "magenta"

    while ($startDate -le $endDate) {
        $BuildDefinitionFull = $teamProject + "\" + $BuildDefinition
        $dateToQuery = $startDate.ToString("yyyy-MM-dd")

        Write-Host "Delete and destroy Builds before" $startDate.ToString("yyyy-MM-dd") "for build definition" $BuildDefinitionFull -foregroundcolor "magenta"
        
        tfsbuild.exe delete /server:$TfsCollectionUrl /builddefinition:"$BuildDefinitionFull" /daterange:~$dateToQuery /deleteoptions:All /noprompt /silent
        tfsbuild.exe destroy /server:$TfsCollectionUrl /builddefinition:"$BuildDefinitionFull" /daterange:~$dateToQuery /noprompt /silent
        
        $startDate = $startDate.AddDays($daysToSkip)
    }
}
CountForward -startDate (get-Date).AddDays(-300) -daysToSkip 15 -endDate (get-Date).AddDays(-60)

Save the PowerShell file as “DeleteBuildDefinition.ps1” and execute it in your Visual Studio command prompt. You can execute the PowerShell file in your VS command prompt with the following command:

PowerShell -Command "& {D:\DeleteBuildDefinition.ps1}"

tfs delete build definition timeout

Update TypeMock version with AutoDeploy enabled

We use TypeMock in a project. We also use the TypeMock AutoDeploy feature so we can use different versions of TypeMock on one build server. The AutoDeploy feature of TypeMock makes it possible to run your unit tests on the build server without installing TypeMock on the build server. You can read about this feature in my other blog post:


https://www.locktar.nl/programming/embed-typemock-in-your-tfs-build-definition


Because we are using VS2013 now, we had to upgrade the TypeMock version to a new Release Candidate version that I got from TypeMock for testing. When we where testing, we saw that the tests where failing because the old version was referenced in the AutoDeploy folder. So we had to update the TypeMock version in source control to keep the AutoDeploy functionality working on the build server. After some tries, I now have a best practice for update TypeMock.


  1. Uninstall TypeMock (not always necessary but for this Release Candidate they advised me to do it)
  2. Install your new version of TypeMock (you whole team off course)
  3. Search for your AutoDeploy folder in the root of your project and check it out of TFS
  4. Open your solution and go to the TypeMock menu and choose “Fix references…”
  5. Choose the second radio button that says “Copy libraries from installation folder to:” and browse to your AutoDeploy folder of step 3
  6. Hit ok. Now every test project that uses TypeMock will be modified with the new TypeMock version. The TypeMock folder in the AutoDeploy folder now also has the new version of the dll.
  7. If some of the projects have a TypeMock references to your program files, you have to change it. This is needed because otherwise the AutoDeploy feature isn’t working. To fix this, you have to delete the reference and add a new one. Browse for the right dll to the TypeMock folder in the AutoDeploy folder in the root of your project. Repeat this for every reference in every project that has the wrong path.
  8. Browse with Windows Explorer to your TypeMock installation directory in program files. In this installation directory you will also find an AutoDeploy folder. Copy all the files in that folder and overwrite your old TypeMock version files in the AutoDeploy folder in the root of your project. 
  9. Check everything in and test your build

 When you followed these steps, you have the new TypeMock version in your project in minutes. 

Typemock Settings

Embed Typemock in your TFS Build definition

When you want to test your code that uses Typemock, you can use a Team Foundation Server Build Server. The current version of Typemock is 7.4 and this version (introduced in 6.2) has the AutoDeploy feature included. This is very important because now you can use multiple versions of Typemock on one Build server. The reason for that is that you don’t have to install Typemock on you build server anymore. To setup Typemock Autodeploy, you can use the tutorial on their help page in the chapter: Typemock Isolator Integration with Team Foundation Server 2010 (TFS). The only thing that they forgot to mention in the documentation is that there is generated a Typemock directory with a couple of dll’s in it inside your just added AutoDeploy directory. This is done after you fixed the references and restarted Visual Studio. Don’t forget to checkin that directory.

In the help documentation, they say that you have to use the workflow of Typemock to get the AutoDeploy to work. The customer that I now work for already have a custom workflow. I just created that workflow last week with some custom actions for them. So I want to integrate the custom Typemock stuff in the workflow of the customer. The customer works with TFS 2010 (just migrated a few months ago from 2008 so they have a lot of catching up to do) so this blog is aimed at TFS Build 2010. But this will also work for 2012. You can also check the documentation about Typemock with TFS 2012 on their website.


The differences between the build templates

There only 4 differences between the template that are special for Typemock. I will show them beneath. The only thing that you have watch for is the right place to put custom activities on the right place.

First open your own workflow in the designer. In your toolbox, add a new category and choose the TypeMock.TFS2010.dll assembly in the installation directory of your Typemock version on your machine. After that, three custom activities are added to your toolbox. Don’t forget to reference the dll in your project where your custom workflow is located.

image

Now add the activities on the right place by dragging them into the workflow. You don’t have to edit any properties. On the left side, you see the default template of TFS 2010. On the right side the template of Typemock. Drag the activities on the same place in your own workflow.

Registreren Typemock

Stoppen Typemock

After that, add a workflow argument of the TypemockSettings type. You can optionally edit the Metadata argument to customize the text that you will see in you build definition.

Typemock arguments

Save your workflow and checkin your workflow. Restart Visual Studio and configure the license in your build definition.

That’s it! It’s very easy. It is not more than 10 minutes of work to edit your own template. When you run your build now with the AutoDeploy feature on and with entering the right license info in your build definition, the build will succeed en will test your Typemock tests.

VC 10.0 Runtime file failed verification with installing TFS Test Controller

Yesterday I was creating three virtual servers for a customer of me with the TFS 2010 Testcontroller and test agents installed on it. The virtual servers are all new Windows Server 2008 SP2 versions. The first thing that I had to do was (obviously) installing the TFS test controller software. So I started the ISO that the system administrator had mounted for me and started the setup. After that I clicked installing test controller software because that was needed on the first server. The setup said it would install the VC 10.0 Runtime for me and the test controller so I hit the next button. The installation started but after say 5 seconds the setup failed. I opened the setup log file and saw a weird error:


CMsiComponent::Install() expects the setup file for VC 10.0 Runtime (x86), but the file failed verification.


This was not clear for me what to do so I did a search with my favorite search engine. I saw a lot of post with a corrupted version of the Visual Studio 2010 ISO. But this was not the case because this was TFS software. So I downloaded the ISO myself again and extracted all the files. This gave me also the same error.

Then I remembered that I had this error one time before. It took me 2,5 hours of searching and trying before I remembered that… I downloaded Daemon Tools lite (mounting software) and mounted my new downloaded ISO on my new virutal DVD player. Started the setup again and now it installed within a minute. Very strange but you have to mount the ISO directly on the Windows Server 2008 server and not from a network share. I tried the solution on the other two servers (they where giving me the same error) and there the solution worked also instantly.

Hopefully I help someone with this problem or a related problem so your not searching 2,5 hours for a solution (a second time).

TFS 2010 Build server with TFS 2012 Update 2

TFS 2012 Update 2 is released last week. I’m working in a large company with a lot of TFS 2010 build servers. With Update 2, TFS 2012 supports the build server of TFS 2010. This is a huge advantage because now we don’t have to upgrade all the build server at the same moment.

When I was testing my TFS 2010 build server (a clone of the production) the build server wasn’t working. I got the message “The device is not ready”.

I checked the ALM blogs about the new feature from Update 2 and saw that the build server needed Service Pack 1. I downloaded, installed it and after 15 minutes everything was done. I rebooted and installed 3 critical updates for SP1. I rebooted again and tested my build again. It was still not working. The strange error with no information about it was still there.

I checked all the settings of the build server and everything seemed to be right. I unregistered the build server from my collection and deleted the controller and agent. After registering the build server to the collection, I created a new controller and agent with the same settings as before. I tested the Build definition again and everything was working right this time!

What really was the problem is not clear but it could be the case that registering tot TFS 2012 without SP 1 for the TFS 2010 build server could be the problem or the controller and agent should alway be recreated.

We also tested a newly created TFS 2010 SP1 Build server connecting to TFS 2012 and then everything was working the first time we tried.

TFS connection Value cannot be null

In our company, we are upgrading from TFS 2010 to TFS 2012. So to test everything we have a clone of the TFS server.

To test the clone I had to switch my connection to the different servers. After hitting the “Connect” button I got a “Value cannot be null.” exception. It said that also that: “Parameter name: baseUri” was the problem. After contacting a colleague of me, he said to delete the cache of the TFS server on my computer. After doing that, the connection worked as it suppose to work.

You can find the cache in the following folder: C:Users<yourusername>Local SettingsApplication DataMicrosoftTeam Foundation2.0Cache