Is it possible to connect SoapUI to WCF Service certificate authentication, the answer is yes! If you search on the internet, there is little information about this topic but it is really possible!
Adding security to your WCF service is a best practice. Not only when your creating services connected by the internet but also inside your company.
One way for securing your WCF service is adding certificates for authentication. But also signing your message is good way to preserve the integrity of your message. So to use a secure service we can enable transport and message security. See a list of common security scenarios with WCF for a good reference. In that way we can use SSL in IIS.
Service configuration
Add a service to your application with a WsHttpBinding. See for an example the following config:
<?xml version="1.0" encoding="utf-8" ?>
<system.serviceModel>
  <services>
    <service name="SampleService">
      <endpoint binding="wsHttpBinding" contract="ISampleService" bindingNamespace="http://your/binding/namespace"/>
    </service>
  </services>
  <behaviors>
    <serviceBehaviors>
      <behavior name="">
        <serviceMetadata httpsGetEnabled="true" />
        <serviceCredentials>
          <serviceCertificate findValue="YourThumbprint" storeName="My" storeLocation="LocalMachine" x509FindType="FindByThumbprint" />
          <clientCertificate>
            <certificate findValue="YourThumbprint" storeName="My" storeLocation="LocalMachine" x509FindType="FindByThumbprint" />
            <authentication certificateValidationMode="ChainTrust" revocationMode="NoCheck" />
            <!-- Check revocationMode for production -->
          </clientCertificate>
        </serviceCredentials>
        <serviceDebug includeExceptionDetailInFaults="true" />
      </behavior>
    </serviceBehaviors>
  </behaviors>
  <bindings>
    <wsHttpBinding>
      <binding maxReceivedMessageSize="10485760">
        <readerQuotas maxDepth="32" maxStringContentLength="2147483647" maxArrayLength="2147483647" maxBytesPerRead="4096" maxNameTableCharCount="16384" />
        <security mode="TransportWithMessageCredential">
          <message clientCredentialType="Certificate" algorithmSuite="Basic256Sha256Rsa15" negotiateServiceCredential="false" establishSecurityContext="false" />
        </security>
      </binding>
    </wsHttpBinding>
  </bindings>
  <serviceHostingEnvironment aspNetCompatibilityEnabled="true" multipleSiteBindingsEnabled="true" />
</system.serviceModel>
Client Configurations
Configuration .NET
Then use in your .NET client the following config. The assumption is that you already know how to add a service.
<?xml version="1.0" encoding="utf-8" ?>
<configuration>
  <system.serviceModel>
    <bindings>
      <wsHttpBinding>
        <binding name="WsHttpBinding_ISampleService">
          <security mode="TransportWithMessageCredential">
            <message clientCredentialType="Certificate" algorithmSuite="Basic256Sha256Rsa15"/>
          </security>
        </binding>
      </wsHttpBinding>
    </bindings>
    <behaviors>
      <endpointBehaviors>
        <behavior name="">
          <clientCredentials>
            <clientCertificate findValue="your thumbprint" storeName="My" storeLocation="LocalMachine" x509FindType="FindByThumbprint" />

            <serviceCertificate>
              <defaultCertificate findValue="your thumbprint" storeName="My" storeLocation="LocalMachine" x509FindType="FindByThumbprint" />
              <authentication certificateValidationMode="ChainTrust" revocationMode="NoCheck" /><!-- Check revocationMode for production -->
            </serviceCertificate>
          </clientCredentials>
        </behavior>
      </endpointBehaviors>
    </behaviors>
    <client>
      <endpoint address="https://url/SampleService.svc"
          binding="wsHttpBinding" bindingConfiguration="WsHttpBinding_ISampleService"
          contract="ISampleService" name="WsHttpBinding_ISampleService1">
        <identity>
          <dns value="IngHubServerTest"/>
        </identity>
      </endpoint>
    </client>
  </system.serviceModel>
</configuration>
Configuration SoapUI
If you want to connect to this service with SoapUI it is more difficult. I’m not a Java developer so I use SoapUI for an easier understanding of connecting to our WCF Service in a different language. For this example I use the curret latest version 5.3. See for an overview of WS-Security the following help page.
Follow the steps below for adding a new project to SoapUI with the right configuration.
Project configuration
- First of all create a new project and add the url to the wsdl. A new project is generated with a sample request for your service.
- Now double click the project or use right click of the mouse to open the “Project view”.
- Navigate to the “WS-Security Configurations” tab
- Select the “Keystores” tab and add the certificate with private key so we can sign the request.
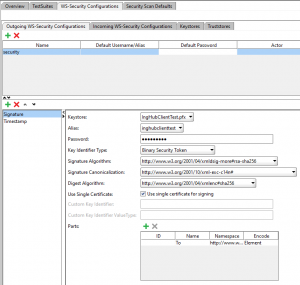
- Go to the “Outgoing WS-Security Configurations” and add a new configuration with the name that you like.
- Add in the newly created configuration a “Signature”.
- Configure the keystore that you’ve added.
- Use “Binary Security Token” as Key Identifier Type.
- Set the right Algorithms that you have configured in the service. I change the configuration to a higher security because the default uses SHA1 and that is not a best practice anymore. I changed the configuration in my WCF service to algorithmSuite=”Basic256Sha256Rsa15″ in the message element of the binding. See this page for more information. Then it uses RSA-SHA256 for signature algorithm, XML-EXC-C14n# for Signature Canonicalization and XMLENC#SHA256 for the Digest Algorithm.
- Check the “Use single certificate” checkbox.
- By default SoapUI signs the whole request but that isn’t the default by WCF so we have to set the parts that we want to sign. So add as Name “To”, Namespace “http://www.w3.org/2005/08/addressing” (this is my namespace but check yours) and set Encode to “Element”.
- Add a timestamp and set it to 300. Use milisecond precision.
- Check the order on the left. So first signature and then timestamp!
Request configuration
- Adjust the sample request body so it is a valid request.
- Go back to your request.
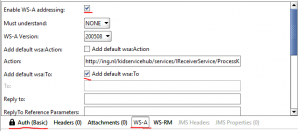
- Under the request open the “Auth” panel. Add Basic security. Leave everything blank except the “Outgoing WSS” configuration. Select the configuration that you have created.
- Go to the WS-A panel and check the “Enable WS-A addressing” checkbox.
- Finally the last thing that you have to do is check the checkbox “Add default wsa:To”. This in combination with the signature parts “To” configuration passes the right header values to the server. If you don’t do this you will get the following exception “The message received over Transport security has unsigned ‘To’ header”. See this StackOverflow post for simulair issue.
Hopefully this helped somebody. I spend to much time to this issue with SoapUI. Just to show that SoapUI works with a WCF soap service and high security configuration. The conclusion is that it works! It’s just soap… why wouldn’t…