How to fix the CA0053 error in Code Analysis in Visual Studio 2012

I upgraded one big Team project with a lot of different solutions (to separate stuff) to Visual Studio 2012. The custom Code Analysis gave me an CA0053 error on the build server. So I searched for the problem and came to this great blog post: How to fix the CA0053 error in Code Analysis in Visual Studio 2012. This solved my problem. I removed all the tags CodeAnalysisRuleDirectories and CodeAnalysisRuleSetDirectories. This was enough. Now Visual Studio 2012 would get the latest Code Analysis dll’s.

When queued another build, I still got the same error. This was not in all solutions so it had something to do with the solution file or with some of the projects inside it. After removing the project one at the time (after each try the build succeeded) I did a reset of the solution file so that was the same. At the end, all projects where the same and I still got the error. I then searched for a difference between solutions files.

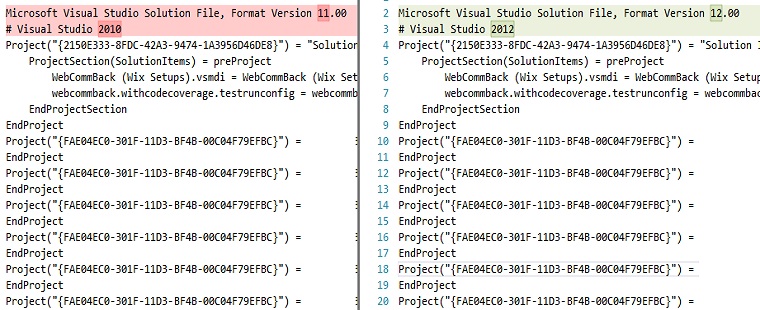
There was the solution, the version of the file format was different and the Visual Studio version was different.

image

I think that I know what the cause of the problem is. Because we have a lot of different solution files (with overlapping projects in it), all the upgrades to Visual Studio 2012 where already done. Because they where already done, no file change was done so the format file version wasn’t migrated to the Visual Studio 2012 version. The custom ruleset in the projects where searching for the Visual Studio 2012 dll’s but the solution was build in Visual Studio 2010 on the build server because of the different format version.

Hopefully this fix will help someone. Let me know!


Update 11/06/2013:

We upgraded our solution to VS2013 and the Custom Code Analysis didn’t work again. So I builded the custom rules in VS2013 and used that version of the DLL. Now the clients worked again. When I started a CI build, the build failed with the CA0053 error. It seems that the build server has (in my opinion) a bug that it uses the format version of your solution file -1 to determine the Visual Studio version. Visual Studio 2013 uses the same format version as VS2012 (version 12) so you will end up with VS2012 on the build server. But because we have builded the custom rules against VS2013, the buildserver wont recognize the rules. The solution is to add the /p:VisualStudioVersion=12.0 parameter by the “MSBuild Argurments” in your CI build definition.

Typemock Settings

Embed Typemock in your TFS Build definition

When you want to test your code that uses Typemock, you can use a Team Foundation Server Build Server. The current version of Typemock is 7.4 and this version (introduced in 6.2) has the AutoDeploy feature included. This is very important because now you can use multiple versions of Typemock on one Build server. The reason for that is that you don’t have to install Typemock on you build server anymore. To setup Typemock Autodeploy, you can use the tutorial on their help page in the chapter: Typemock Isolator Integration with Team Foundation Server 2010 (TFS). The only thing that they forgot to mention in the documentation is that there is generated a Typemock directory with a couple of dll’s in it inside your just added AutoDeploy directory. This is done after you fixed the references and restarted Visual Studio. Don’t forget to checkin that directory.

In the help documentation, they say that you have to use the workflow of Typemock to get the AutoDeploy to work. The customer that I now work for already have a custom workflow. I just created that workflow last week with some custom actions for them. So I want to integrate the custom Typemock stuff in the workflow of the customer. The customer works with TFS 2010 (just migrated a few months ago from 2008 so they have a lot of catching up to do) so this blog is aimed at TFS Build 2010. But this will also work for 2012. You can also check the documentation about Typemock with TFS 2012 on their website.


The differences between the build templates

There only 4 differences between the template that are special for Typemock. I will show them beneath. The only thing that you have watch for is the right place to put custom activities on the right place.

First open your own workflow in the designer. In your toolbox, add a new category and choose the TypeMock.TFS2010.dll assembly in the installation directory of your Typemock version on your machine. After that, three custom activities are added to your toolbox. Don’t forget to reference the dll in your project where your custom workflow is located.

image

Now add the activities on the right place by dragging them into the workflow. You don’t have to edit any properties. On the left side, you see the default template of TFS 2010. On the right side the template of Typemock. Drag the activities on the same place in your own workflow.

Registreren Typemock

Stoppen Typemock

After that, add a workflow argument of the TypemockSettings type. You can optionally edit the Metadata argument to customize the text that you will see in you build definition.

Typemock arguments

Save your workflow and checkin your workflow. Restart Visual Studio and configure the license in your build definition.

That’s it! It’s very easy. It is not more than 10 minutes of work to edit your own template. When you run your build now with the AutoDeploy feature on and with entering the right license info in your build definition, the build will succeed en will test your Typemock tests.

VC 10.0 Runtime file failed verification with installing TFS Test Controller

Yesterday I was creating three virtual servers for a customer of me with the TFS 2010 Testcontroller and test agents installed on it. The virtual servers are all new Windows Server 2008 SP2 versions. The first thing that I had to do was (obviously) installing the TFS test controller software. So I started the ISO that the system administrator had mounted for me and started the setup. After that I clicked installing test controller software because that was needed on the first server. The setup said it would install the VC 10.0 Runtime for me and the test controller so I hit the next button. The installation started but after say 5 seconds the setup failed. I opened the setup log file and saw a weird error:


CMsiComponent::Install() expects the setup file for VC 10.0 Runtime (x86), but the file failed verification.


This was not clear for me what to do so I did a search with my favorite search engine. I saw a lot of post with a corrupted version of the Visual Studio 2010 ISO. But this was not the case because this was TFS software. So I downloaded the ISO myself again and extracted all the files. This gave me also the same error.

Then I remembered that I had this error one time before. It took me 2,5 hours of searching and trying before I remembered that… I downloaded Daemon Tools lite (mounting software) and mounted my new downloaded ISO on my new virutal DVD player. Started the setup again and now it installed within a minute. Very strange but you have to mount the ISO directly on the Windows Server 2008 server and not from a network share. I tried the solution on the other two servers (they where giving me the same error) and there the solution worked also instantly.

Hopefully I help someone with this problem or a related problem so your not searching 2,5 hours for a solution (a second time).