MVC localization validation

This is not the first time that I write about mvc localization validation. The last time that I wrote about this was back in 2012 when I wrote the blog “Localization validation in MVC“. This blog post helped a lot of people with this question on StackOverflow.

In this blog post I create a website with localization for English and Dutch. I will use a DateTime as an example property to display and edit this property for validating the localization. This because the Dutch localization is dd-MM-yyyy and in English we have MM\dd\yyyy.

Technology used

Now I want to write a new post that uses all the latest technology in the MVC world at this moment. At this moment the latest version of Visual Studio is Visual Studio 2013 Update 3. The latest version of MVC is: 5.2.2. This is also the version that we use in combination with .NET Framework 4.5.1.

Setup MVC localization validation

New project

Create a new MVC 5 ASP.NET Web Application in Visual Studio with the use of the .NET Framework 4.5.1. When it is created, update all your Nuget packages about MVC.

Web.config

Some people say that you have to alter the web.config to use localization. This is true when you create a website for a particular localization. In this tutorial I want to create a website that is compatible with multiple cultures from all over the world. Of course you can create a website in English but some people prefer their own language. In this tutorial I will create a website in English and Dutch (I’m from the Netherlands).

So we don’t edit the web.config. We don’t set any culture or UI culture in the web.config. In that way, the default culture is the culture of the pc or (if set) the culture of the browser.

Culture selector

The user should be able to overwrite the default culture from his browser or pc. Maybe the user wants to use another culture than his default culture for your website. So we create some code to create a list with the cultures that you have setup to support in your website.

Code for creating the list of cultures and select a culture different to your browser culture. Add this code in your “_Layout” page in example your menu or footer:

@{
	System.Globalization.CultureInfo currentCulture;
	var supportedCultures = Website.Helpers.CultureHelper.GetSwitchCultures(out currentCulture);
	string currentCultureDisplayName = currentCulture.Parent.NativeName;
}

	<ul>
		@foreach (var culture in supportedCultures)
		{
            string url = Url.Action("SetPreferredCulture", "Culture", new { culture = culture.Name, returnUrl = Request.RawUrl });
            string urlName = culture.Parent.NativeName;
            
			if (culture.Name == currentCulture.Name)
			{
				<li class="active"><a href="@url">@urlName <i class="fa fa-check"></i></a></li>
            }
            else
            {
                <li><a href="@url">@urlName</a></li>
            }
		}
	</ul>

Create a static class called CultureHelper and past the following code:

using System;
using System.Collections.Generic;
using System.Collections.Specialized;
using System.Diagnostics;
using System.Globalization;
using System.Linq;
using System.Threading;
using System.Web;

namespace Website.Helpers
{
	/// <summary>
	/// Set the culture of the user for the rest of the application. The culture can be overridden by the user. 
	/// If it is overridden a cookie is set with the selected culture. For testing don't forget to remove the cookie for selecting the default browser language again.
	/// </summary>
	public static class CultureHelper
	{

		#region Constants

		/// <summary>
		/// The cookie name of the selected culture. By default there isn't any cookie but only the culture of the browser. 
		/// If the user selects a specific culture, the cookie is added.
		/// </summary>
		const string CookieName = "PreferredCulture";

		#endregion

		#region Fields

		/// <summary>
		/// The supported cultures of this application. If a new localization file is added to the application, the cultureinfo must be added as well.
		/// </summary>
		public static readonly CultureInfo[] SupportedCultures = new CultureInfo[] 
		{ 
			CultureInfo.GetCultureInfo("en-US"), 
			CultureInfo.GetCultureInfo("nl-NL"),
			//CultureInfo.GetCultureInfo("de-DE"), 
			//CultureInfo.GetCultureInfo("fr-FR"), 
			//CultureInfo.GetCultureInfo("es-ES"), 
		};

		#endregion

		#region Public Methods

		public static void ApplyUserCulture(this HttpRequest request)
		{
			ApplyUserCulture(request.Headers, request.Cookies);
		}

		public static CultureInfo GetMatch(CultureInfo[] acceptedCultures, CultureInfo[] supportedCultures, Func<CultureInfo, CultureInfo, bool> predicate)
		{
			foreach (var acceptedCulture in acceptedCultures)
			{
				var match = supportedCultures
					.Where(supportedCulture => predicate(acceptedCulture, supportedCulture))
					.FirstOrDefault();

				if (match != null)
				{
					return match;
				}
			}

			return null;
		}

		public static CultureInfo GetMatchingCulture(CultureInfo[] acceptedCultures, CultureInfo[] supportedCultures)
		{
			return
				// first pass: exact matches as well as requested neutral matching supported region 
				// supported: en-US, de-DE 
				// requested: de, en-US;q=0.8 
				// => de-DE! (de has precendence over en-US) 
				GetMatch(acceptedCultures, supportedCultures, MatchesCompletely)
				// second pass: look for requested neutral matching supported _neutral_ region 
				// supported: en-US, de-DE 
				// requested: de-AT, en-GB;q=0.8 
				// => de-DE! (no exact match, but de-AT has better fit than en-GB) 
				?? GetMatch(acceptedCultures, supportedCultures, MatchesPartly);
		}

		public static void GetSwitchCultures(out CultureInfo currentCulture, out CultureInfo nextCulture)
		{
			currentCulture = Thread.CurrentThread.CurrentUICulture;
			var currentIndex = Array.IndexOf(SupportedCultures.Select(ci => ci.Name).ToArray(), currentCulture.Name);
			int nextIndex = (currentIndex + 1) % SupportedCultures.Length;
			nextCulture = SupportedCultures[nextIndex];
		}

		public static CultureInfo[] GetSwitchCultures(out CultureInfo currentCulture)
		{
			currentCulture = Thread.CurrentThread.CurrentUICulture;

			return SupportedCultures;
		}

		public static CultureInfo GetUserCulture(NameValueCollection headers)
		{
			var acceptedCultures = GetUserCultures(headers["Accept-Language"]);
			var culture = GetMatchingCulture(acceptedCultures, SupportedCultures);

			return culture;
		}

		public static CultureInfo[] GetUserCultures(string acceptLanguage)
		{
			// Accept-Language: fr-FR , en;q=0.8 , en-us;q=0.5 , de;q=0.3 
			if (string.IsNullOrWhiteSpace(acceptLanguage))
				return new CultureInfo[] { };

			var cultures = acceptLanguage
				.Split(',')
				.Select(s => WeightedLanguage.Parse(s))
				.OrderByDescending(w => w.Weight)
				 .Select(w => GetCultureInfo(w.Language))
				 .Where(ci => ci != null)
				 .ToArray();

			return cultures;
		}

		public static void SetPreferredCulture(this HttpResponseBase response, string cultureName)
		{
			SetPreferredCulture(response.Cookies, cultureName);
		}

		#endregion

		#region Private Methods

		private static void ApplyUserCulture(NameValueCollection headers, HttpCookieCollection cookies)
		{
			var culture = GetPreferredCulture(cookies)
				?? GetUserCulture(headers)
				?? SupportedCultures[0];

			var t = Thread.CurrentThread;
			t.CurrentCulture = culture;
			t.CurrentUICulture = culture;

			Debug.WriteLine("Culture: " + culture.Name);
		}

		private static CultureInfo GetCultureInfo(string language)
		{
			try
			{
				return CultureInfo.GetCultureInfo(language);
			}
			catch (CultureNotFoundException)
			{
				return null;
			}
		}

		private static CultureInfo GetPreferredCulture(HttpCookieCollection cookies)
		{
			var cookie = cookies[CookieName];
			if (cookie == null)
				return null;

			var culture = GetCultureInfo((string)cookie.Value);
			if (culture == null)
				return null;

			if (!SupportedCultures.Where(ci => ci.Name == culture.Name).Any())
				return null;

			return culture;
		}

		private static bool MatchesCompletely(CultureInfo acceptedCulture, CultureInfo supportedCulture)
		{
			if (supportedCulture.Name == acceptedCulture.Name)
			{
				return true;
			}

			// acceptedCulture could be neutral and supportedCulture specific, but this is still a match (de matches de-DE, de-AT, …) 
			if (acceptedCulture.IsNeutralCulture)
			{
				if (supportedCulture.Parent.Name == acceptedCulture.Name)
				{
					return true;
				}
			}

			return false;
		}

		private static bool MatchesPartly(CultureInfo acceptedCulture, CultureInfo supportedCulture)
		{
			supportedCulture = supportedCulture.Parent;
			if (!acceptedCulture.IsNeutralCulture)
			{
				acceptedCulture = acceptedCulture.Parent;
			}

			if (supportedCulture.Name == acceptedCulture.Name)
			{
				return true;
			}

			return false;
		}

		private static void SetPreferredCulture(HttpCookieCollection cookies, string cultureName)
		{
			var cookie = new HttpCookie(CookieName, cultureName)
			{
				Expires = DateTime.Now.AddDays(30)
			};

			cookies.Set(cookie);

			Debug.WriteLine("SetPreferredCulture: " + cultureName);
		}

		#endregion

	}

	[DebuggerDisplay("Language = {Language} Weight = {Weight}")]
	internal class WeightedLanguage
	{
		public string Language { get; set; }

		public double Weight { get; set; }

		public static WeightedLanguage Parse(string weightedLanguageString)
		{
			// de 
			// en;q=0.8 
			var parts = weightedLanguageString.Split(';');
			var result = new WeightedLanguage { Language = parts[0].Trim(), Weight = 1.0 };

			if (parts.Length > 1)
			{
				parts[1] = parts[1].Replace("q=", "").Trim();
				double d;
				if (double.TryParse(parts[1], NumberStyles.AllowDecimalPoint, CultureInfo.InvariantCulture, out d))
					result.Weight = d;
			}

			return result;
		}
	}
}

The “SupportedCultures” field contains the list of supported cultures for your website.

We must also make the Culture of the client available in your project. You have to do this in every request. So go to your Global.asax and add the following event:

/// <summary>
/// Fire on each request.
/// </summary>
protected void Application_OnBeginRequest()
{
    // Get the culture of the client
    CultureHelper.ApplyUserCulture(Request);
}

Create a new CultureController in your project and paste the following code:

using System;
using System.Collections.Generic;
using System.Linq;
using System.Web.Mvc;
using Website.Helpers;

namespace Website.Controllers
{
    public class CultureController : Controller
    {
		// GET: /SetPreferredCulture/de-DE 
		[AllowAnonymous]
		public ActionResult SetPreferredCulture(string culture, string returnUrl)
		{
			Response.SetPreferredCulture(culture);
			
			if (string.IsNullOrEmpty(returnUrl))
				return RedirectToAction("Index", "Home");

			return Redirect(returnUrl);
		}
				
    }
}

Add a new route above the default route in your RouteConfig.cs.

// Set culture route
routes.MapRoute(
    name: "SetPreferredCulture",
    url: "SetPreferredCulture/{culture}",
    defaults: new { controller = "Culture", action = "SetPreferredCulture", culture = UrlParameter.Optional }
);

Create a folder in the root of your project called “Localizations”. Add a Resource file called “Labels.resx” in that folder. This is your English resource file so the default language is the English language. Set the Access Modifier to Public. Copy the Labels resource file for the other languages. For Dutch is this: Labels.nl-NL.resx. So when the user switches from culture or the browser has another culture set, the right resource file is automatically chosen.

DateTime Example

Now we have the right culture of the user, we need an example so we can prove it actually works. So we create an object with a DateTime property. In that way we can display and edit that property in the different cultures. Remember that the Dutch language has a different date format than the English language.

Because all the browser are displaying date textboxes different, we create our own until the HTML 5 specification is finally done. Also, the older browsers don’t support HTML 5 so we must create our own textbox with jQuery UI datepicker.

To do this, we create a new EditorTemplate. If you never done this before, don’t worry it is very easy. Create a new folder called “EditorTemplates” in your “Shared” folder in the “Views” folder. In the EditorTemplates folder, create a new view called “Date”.

Now when a Date field is used for editing, the editortemplate is automatically used. Paste the following code in the Date editortemplate.

@model DateTime?

@if (Model.HasValue)
{
    @Html.TextBox("", Model.Value.ToShortDateString(), new { @class = "date form-control" })
}
else
{
    @Html.TextBox("", Model, new { @class = "date form-control" })
}

Initialize the Datepicker

Now we have created an editor for editing, the jQuery datepicker should be created. Because we also create the datepicker for a specific culture, the right language file of the jQuery datepicker should be selected as well. You can find the url of the language file in the documentation/source code from the jQuery datepicker documentation page.

Add the following code in the _Layout page just after setting up jQuery and jQuery UI.

@if (!string.IsNullOrWhiteSpace(UICulture))
{
	string shortCulture = UICulture.Substring(0, 2);
	if (shortCulture != "en")
	{
		// Only set culture script if it isn't en because en is the default
		string url = string.Format("/Scripts/datepicker-{0}.js", shortCulture);
		<script src="@url"></script>
	}
}

This code finds the right language file and add it to the page for the current (selected) culture.

<script type="text/javascript">
	$(document).ready(function () {
		$('.date').datepicker({
			showOtherMonths: true,
			selectOtherMonths: true,
			changeMonth: true,
			changeYear: true,
			numberOfMonths: 1,
			showButtonPanel: true
		});
	});
</script>

This code creates the datepicker in the right culture.

Test the editor

To test the editor, create an object with a DateTime property. See the following example for the class “Member”:

public class Member
{
    [Key]
    public int Id { get; set; }
		
    [Display(Name = "Voornaam")]
    [Required]
    [StringLength(50)]
    public string FirstName { get; set; }

    [Display(Name = "Achternaam")]
    [Required]
    [StringLength(50)]
    public string LastName { get; set; }
        
    [Display(Name = "Geboortedatum")]
    [Required]
    [DataType(DataType.Date)]
    public DateTime BirthDay { get; set; }
}

The EditorTemplate is selected because we have used the “DataType” attribute with the “DataType.Date” value. You could also use the “UIHint” attribute.

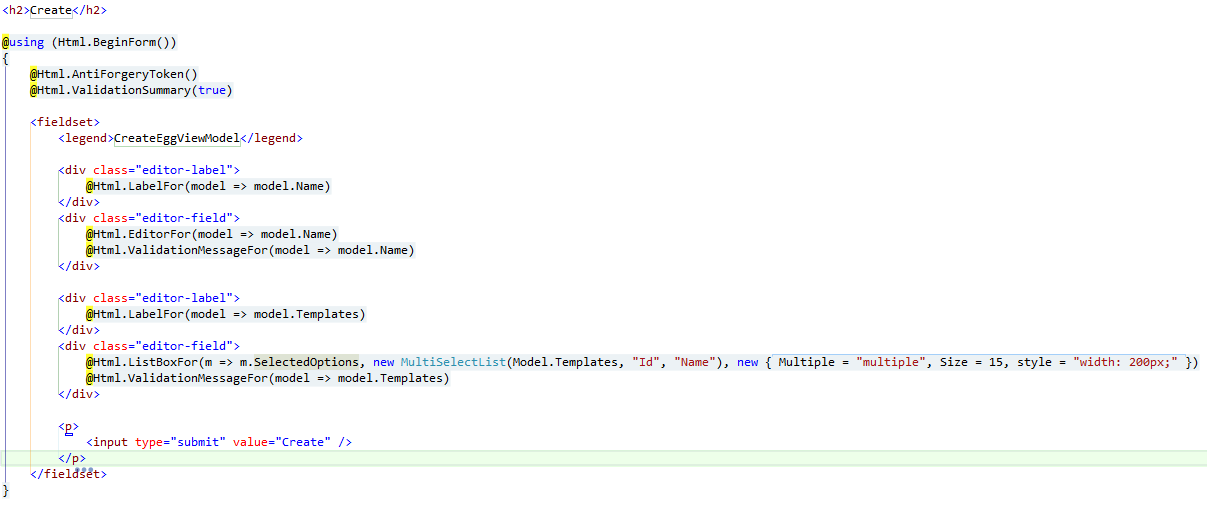
If you generate (scaffold) a new Edit or Create view, change the code for the Birthday property to:

<div class="form-group">
    @Html.LabelFor(model => model.BirthDay, new { @class = "control-label col-md-2" })
    <div class="col-md-10">
        @Html.EditorFor(model => model.BirthDay, new { htmlAttributes = new { @class = "form-control" }, })
        @Html.ValidationMessageFor(model => model.BirthDay)
    </div>
</div>

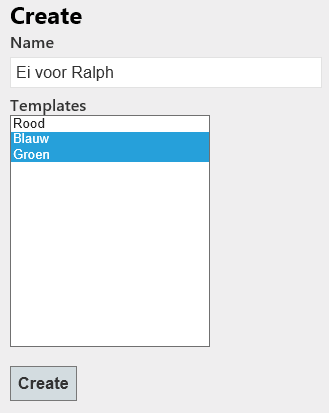
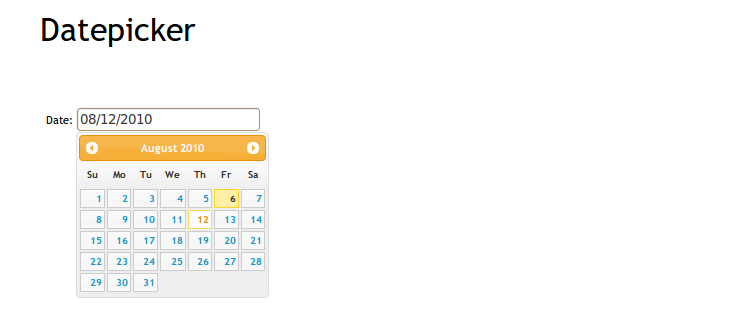
Now run your project and try to edit or create a member object. You now should see a textbox with a jQuery UI datepicker inside. When you select a date from the datepicker, the format of the date should be the format of the culture you requested. Also the validation should be right for the Culture you have selected.

Conclusion

Now you have a culture independent website with a jQuery datepicker in the culture that the user wants. You can upload this website to every server you want. You don’t have to set any culture on the server because this solution is culture independent. This is easy for me in the Netherlands because now I can create a Dutch website that I can upload to Microsoft Azure (in azure you have en-US culture) without any problems.

Custom domain url in IIS Express with Visual Studio 2013

If your creating a web application in Visual Studio 2013 (VS2013) and run it, your site is hosted in IIS express. Your url is localhost with a random portnumber.

If you want integration with Facebook, other services or just want a custom domain in your browser then you can follow these steps.

  1. Go to the properties of your (MVC) web application
  2. Go to the web tab on the left
  3. Under Servers check the Override application root URL and fill in http://YourSubDomain.YourDomain.com
  4. Hit Create Virutal Directory
  5. Change the start url above under Start Action to http://YourSubDomain.YourDomain.com
  6. Go to your IIS Express settings under C:\Users\Ralph\Documents\IISExpress\config and open the applicationhost.config file.
  7. Find your site and adjust the binding<bindings>
    <binding protocol=”http” bindingInformation=”*:80:YourSubDomain.YourDomain.com” />
    </bindings>
  8. Optionally add the binding for https (443)
  9. Go to your host file under C:\Windows\System32\drivers\etc and add 127.0.0.1 YourSubDomain.YourDomain.com
  10. Run your site

If you get an error. Try to run your Visual Studio instance as Administrator.

Use Config Transforms when Debugging your web application

Config Transforms are a great way to adjust your publish strategy. You just right click your web.config file and click “Add Config Transforms”. In that way you get the transform files of your configuration options.

In our company, we are working with a website that has multiple versions for different customers. So it is the same website only the config is changed. The config includes all kind of security settings. When we are developing we want to use the config of the specific “brand” of the website. How to accomplish this without?

SlowCheetah is a nice extension for visual studio that gives that option for WinForms projects but not (yet) for Web Applications. See the issue for this feature:
https://github.com/sayedihashimi/slow-cheetah/issues/39


For now I found this solution:

  1. Create your transforms as you want.
  2. Create a new config file with the name web.template.config
  3. Copy everything from your web.config file to the new web.template.config
  4. Create new config files for temp for your transforms. So if you have the transforms Debug and Release, you should create temp files for them. Call them web.dev.{Configuration}.config. So this would be web.dev.debug.config and web.dev.release.config. Place the config files in the root of your project just like your standard web.config.
  5. Copy everything from your transform files to the temp files.
  6. Add a target file to the root of your project location. Don’t do this in Visual Studio but just in Windows Explorer. Give it the following name: {Projectname}.wpp.targets
  7. Past the code beneath in the targets file.
  8. Delete your “old” web.config in Windows Explorer (not in Visual Studio)
  9. Restart Visual Studio and open your project. The solution explorer says now that you don’t have a web.config but you see the config transforms as childs. Ignore the alert that the file is missing.
  10. Rebuild your project and your done. The new web.config is generated on your drive. (if you hit refresh in the solution explorer, the alert is gone). Just change your Configuration at the top of Visual Studio and your config is changed.

Notes
Remove your web.config file from source control otherwise you will get check outs.

Screenshots
Config transforms for F5

SlowCheetah targets files


Contents of targets file

<?xml version="1.0" encoding="utf-8"?>
<Project ToolsVersion="4.0" xmlns="http://schemas.microsoft.com/developer/msbuild/2003">

  <PropertyGroup>
    <PrepareForBuildDependsOn>
      $(PrepareForBuildDependsOn);
      UpdateWebConfigBeforeBuild;
    </PrepareForBuildDependsOn>
  </PropertyGroup>

  <!-- This target will run right before you run your app in Visual Studio -->
  <Target Name="UpdateWebConfigBeforeBuild">
    <Message Text="Configuration: $(Configuration): web.dev.$(Configuration).config"/>
    <TransformXml Source="web.template.config"
              Transform="web.dev.$(Configuration).config"
              Destination="web.config" />
  </Target>

  <!-- Exclude the config template files from the created package -->
  <Target Name="ExcludeCustomConfigTransformFiles" BeforeTargets="ExcludeFilesFromPackage">
    <ItemGroup>
      <ExcludeFromPackageFiles Include="web.template.config;web.dev.*.config"/>
    </ItemGroup>
    <Message Text="ExcludeFromPackageFiles: @(ExcludeFromPackageFiles)" Importance="high"/>
  </Target>
</Project>


Update
An optional thing that you can do is, grouping your config files beneath the template config just like that standard web.config and his transforms. The dev configs are dependent upon the template so let’s place them there. To do this is easy. Unload your project and find your dev configs. You will see something like this:

<Content Include="web.dev.{your configuration}.config" />

Change this in:

<Content Include="web.dev.{your configuration}.config">
  <DependentUpon>web.template.config</DependentUpon>
</Content>

Repeat this for all your dev transforms. After that, save the file and reload your project.
You can also use the Visual Studio extension VSCommands. right click the files that you want to group, hit group items and select your base config file.

Multiple select listbox in MVC 4

This post will be in Dutch because I based this on a discussion with someone else.

Vandaag gaf ik al weer voor de vierde keer les op de Hogeschool van Rotterdam. Daar geef ik les aan een groep studenten in het vak Microsoft ASP .NET MVC 4 met alle standaard tools als Entity Framework en Web API er om heen.

Bob Joziasse sprak ik vandaag over een multiple select in een listbox voor zijn laatste blog Eggplication die in het leuke paas thema is geschreven. Ik ben er even ingedoken aangezien ik zelf de listbox in HTML nooit gebruik. Op zich is het een standaard control en het is al snel duidelijk voor een gebruiker wat hij er mee kan doen. Ik zelf gebruik hem nooit omdat de styling van het control niet voor elke browser gelijk is. Maarja, terug naar het onderwerp.

In zijn blog heeft Bob een kleine applicatie gemaakt om aan het te geven hoe een meer op meer relatie werkt door middel van Code First in het wel bekende Entity Framework. In de applicatie kan je een ei maken en die verschillende templates geven voor het beschilderen. Ik heb de applicatie hetzelfde genoemd maar de properties van de objecten een beetje mijn eigen gang laten gaan. Zo heb ik ook een meer op meer relatie en kan ik dus templates koppelen aan een ei en eieren koppelen aan (schilder)templates.

De objecten zien er als volgt uit:

Egg:

Template:

Simpele ViewModel voor de Create van de Egg:

De database wordt dan als volgt gegenereerd:

De controller met de Create Get en Post functies zien er dan als volgt uit:

Om dit werkend te krijgen hebben we natuurlijk ook een View nodig. Dit ziet er bij mij zo uit:

Als we dit draaien ziet dat er als volt uit:

Om vervolgens dit weer te kunnen bekijken heb ik het als volgt gemaakt:

Wat resulteert in onderstaande om het ei met de gekozen templates te kunnen weergeven:

Een simpele applicatie maar wel handig om snel een meer op meer relatie te maken met een listbox.

Localization validation in MVC

Edit 10\15\2014: I created a new version of this blogpost. It is called MVC localization validation.


Last week I was working on a bug for my website SeeTings. The bug was the validation of a DateTime not working in Firefox and Chrome. In Internet Explorer (even version 9) was working correct.

After hours searching and hundreds of form posts further, I finally found the solution. I thought the problem was in implementing the jQuery UI Date picker with the Dutch Format of a date (dd-MM-yyyy) in it but that wasn’t true.

The problem was the client validation of the jQuery Validation plugin. ASP .NET MVC 3 and 4 are shipped with an installed version of jQuery. And the internet template (the one that I was using) creates a login and register process.

To test the bug, I created a new project and added a DateTime field called Birthday to the register login form. I deleted all other fields except the UserName field because then I could test if the Required validation still worked if I might fined a solution for the validation problem.

After long searching, I saw this post http://stackoverflow.com/a/511670 on Stackoverflow. There was another script file called “additional-methods.js” that I didn’t heard of. After long searching, I found the official website of jQuery validation http://bassistance.de/jquery-plugins/jquery-plugin-validation/ and saw the CDN of all the jQuery instances.

It seemed not necessary to link the additional-methods.js file because that would only add extra validation like credit card or url TLD and email TLD etc. checking.  I found out that jQuery validation had multiple localization files. One for the messages and one for one other thing and that was my problem, the date validation.

When you go to the CDN of Microsoft, you will see in version 1.6 (current version is 1.9) a long list of localization files.

imageimage

The files ending with messages_xxx.js are the error messages localized. The files ending with methods_xx.js (like for me methods_nl.js) are the localized versions of some script. In this case only the date.

So reference on your page where you need to do the validation, the standard validation scripts of jQuery and after that you need to reference you localization file. Only do this if the browser is that language. So I only reference the script file if I know that the browser is Dutch. You can find the current language settings of the browser with JavaScript as well. You can change the url of the CDN from 1.6 to 1.9 and it will still work. Why the files are not listed on the 1.9 page, I don’t know.

After completing this above, you can after that implementing the jQuery Datepicker. Don’t forget that the Datepicker of jQuery UI also needs a localization reference file. See the last part of the documentation on this page http://jqueryui.com/demos/datepicker/. Just reference the file and everything is working.

Good luck and hopefully you guys aren’t that long busy figuring out why the validation isn’t working.

OutputCache explanation

Why should we use caching?

The reason why we should use caching is to increase the performance for the end user and to decrease the traffic on the server. There are multiple kind of caching. In this post, I will explain the OutputCache attribute of MVC 3 (and 4).

Using the OutputCache Attribute

To cache a page or image in ASP .NET MVC 3 we only have to set the OutputCache attribute above the action.

image

The Duration property is the timespan you want to cache the action in seconds. So above, the page will be cached for 10 seconds. When you run the application, the page is showing the ViewBag.Time on your screen. If you hit F5 (refresh), the page is refreshed but your action isn’t. The time is still the same if you did refresh the page within the 10 seconds. When you hit F5 after 10 seconds, the new time is shown.

Use fiddler to see if the caching is working.

Caching the action for different result

When you have an action for different results, like asking for an image for a given imageId you use a parameter in your action. The OutputCache attribute will automatically use the parameter for caching the result for that specific item.

image

So when you ask for example image 3 and 24, the caching will work on both images.

Use fiddler to see if the caching is working.

Caching of private items

By default, the cache is saved on the server and client. But when you have private data the cache should only be used on the client (the browser). Otherwise, private data could be accessed by anyone.

We could use the location property for this.

image

Set the location property to Client to only store the image in the browser.

When you run the page now and see the image or page, the image or page is cached only in your browser. When you hit F5, the caching won’t work. This is because client caching will not work for browser refreshing. If you use a hyperlink to the same page or image the caching will work.

Again use fiddler to see the results.

How to disable caching of an action

To disable caching for an action, use the code as shown below.

image

Caching profiles

When you have a lot of actions with the same settings, you could implement caching profiles. In this way, you only have to change the settings on one place.

In the web.config, add the following section.

image

You then could use the caching profile in the following way.

image

Minification and Bundling in MVC 4 RC

Asp .NET MVC 4 Release Candidate is out. One of the features that is included is called the minification and bundling feature. This was already there in the beta but in the release candidate version it has changed.

Why should we use it

The reason why we should use the bundling and minification feature is performance. The features increases your loading performance of your website. Every time you reference a JavaScript (like jQuery or your own), or CSS file in your page, the browser makes a call to the server. This is done for each separate reference. Each referenced file has included all the comments and spacing in your file. This makes the file larger then when we should delete those spaced. The bundling and minification feature does this for us.

How does it work

In your Global.asax the CSS and JavaScript files are Bundled with BundleConfig.RegisterBundles(BundleTable.Bundles); line.

image

image

Reference the files in your page.

image

When you run the application and use Fiddler to view the calls to your server, you still see all the files called separately.

image

image

This is because the Bundling and Minification feature by default only work when your not in debug mode. This handy because then you could debug with all the whitespaces in your files and have the performance in the production environment.

See the difference in your production environment:

image

image

Force Bundling and Minification

You can use the BundleTable.EnableOptmizations override but the best way for a little test is to remove the debug=”true” attribute in your web.config.

image

Browser caching

When the feature is active, the browser will cache the files. When you add or change some JavaScript or CSS code, the files are generated again and the version number in the references are updated. In that way, the browser knows that there is a new version and your website wont brake.

image

ASP .NET MVC 3 Release Candidate released

Ralph JansenOn November 9th 2010 the ASP .NET team released the release candidate of MVC 3. The big change of MVC 3 is the new “Razor” view engine. With this new view engine the syntax of the code is a lot smaller. You now just put an @ on your editor and the intellisense will pick it up.

An other thing that is added in MVC 3 is: partial caching of pages. You can add an attribute above your action in the controller with the right amount of seconds that you want to cache the information. You can even say what the dependent parameter is that the caching will focus on. So if an action is fired and the parametervalue is the same as a previous parametervalue within the specified amount of time, the data will come out of the cache. That way, no database call is required!!!

Check for more information the blog of Scott Guthrie or the official ASP .NET MVC 3 Releas Candidate page.