Manage custom user attributes in Azure B2C

Azure B2C has the capability to manage custom user attributes. Those attributes are custom extension on the Azure AD profile in the background. But how do they work and how can you access them with the Graph API?

Accesstoken

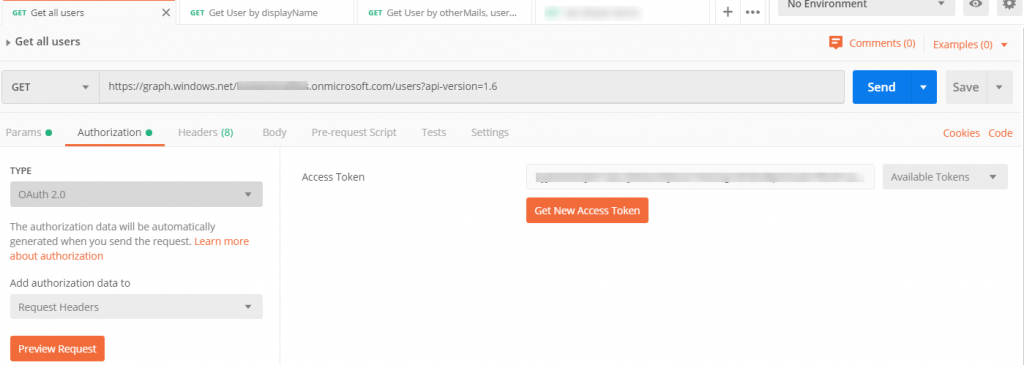
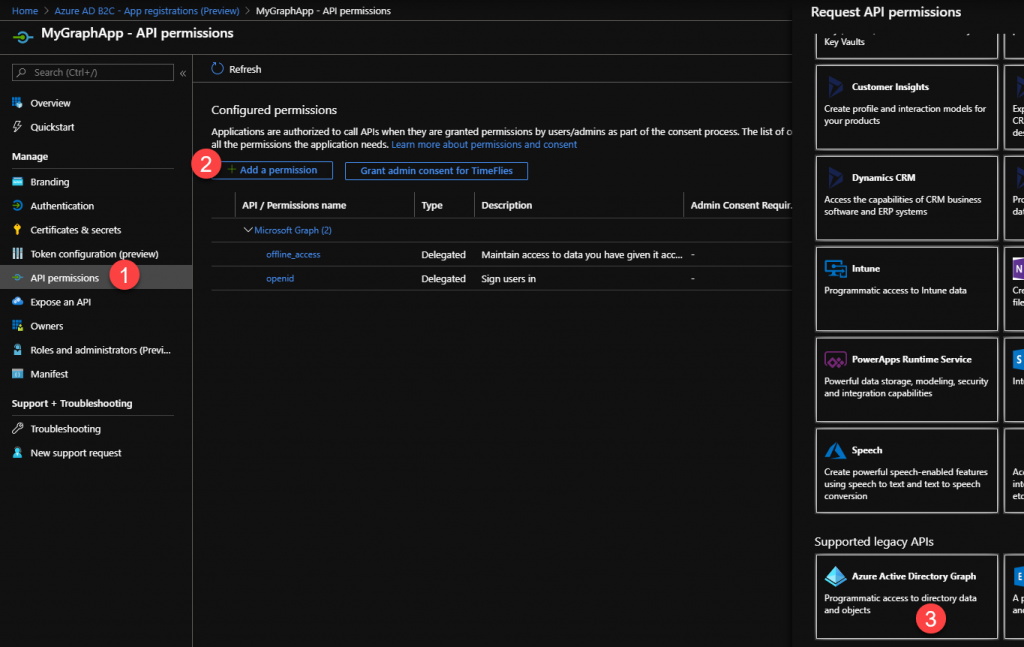
First you need an accesstoken. The get an access token, read my previous post with an introduction to Azure B2C with the Graph API or how to find users in Azure B2C with the Graph API.

Create a Custom User Attribute

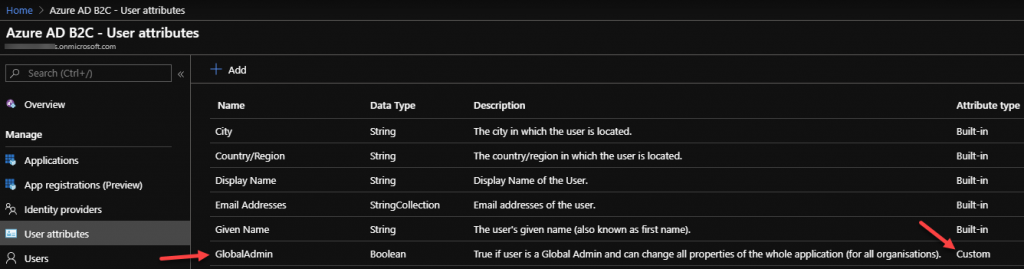
In this sample, we are going to create a custom attribute called “GlobalAdmin”. It’s just a boolean for simplicity.

You can get the details of the user with the ObjectId using the url:
https://graph.windows.net/{{tenant}}.onmicrosoft.com/users/fdabad31-92bf-43f7-8370-53c280ef042b?api-version=1.6
When the attribute is new, you won’t find the attribute on the user. Not even with the default value (in our case false because of the boolean).

Set a Custom User Attribute

To set the custom created user attribute we need to know where the custom attribute is coming from. An B2C user attribute is an extension to the Azure AD. Just as you would do with the regular Azure AD. You can imagine that if there is a big Azure AD and there are many applications connected to it. So Microsoft decided that an extension belongs to an application.

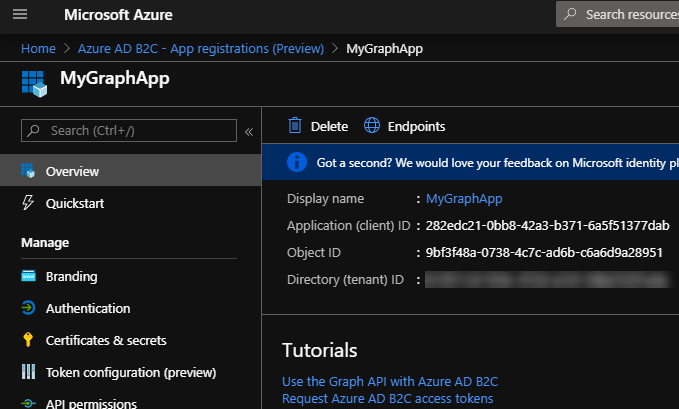
In our case, B2C it self is an application on top of the Azure AD. So Azure B2C has an application (app registration) in your Azure AD tenant. You can see this, when you navigate to the Azure AD blade in the Azure portal and go to the app registrations. When you click on the “All applications” you will see the default “b2c-extensions-app” application. You can also navigate to new preview blade in B2C it self.

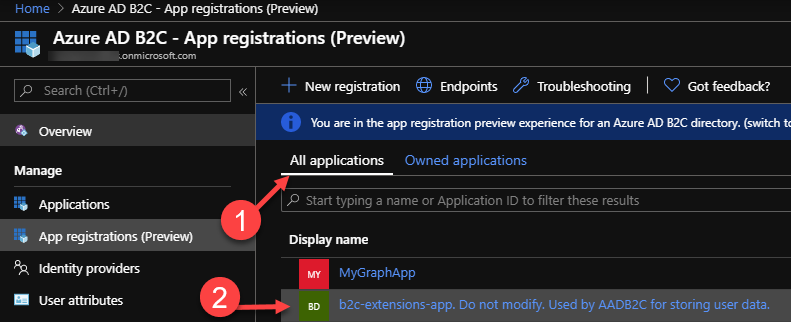
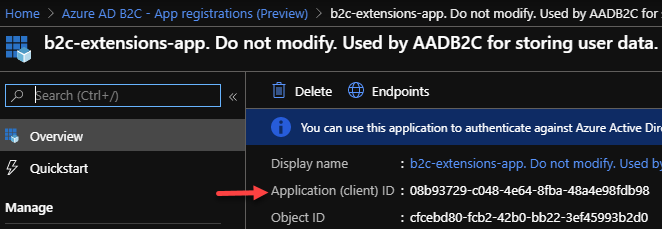
You need the “ApplicationId” (ClientId) of that “b2c-extensions-app”. So open it, and copy it. Do not change anything on this application otherwise your Azure B2C can be broken!

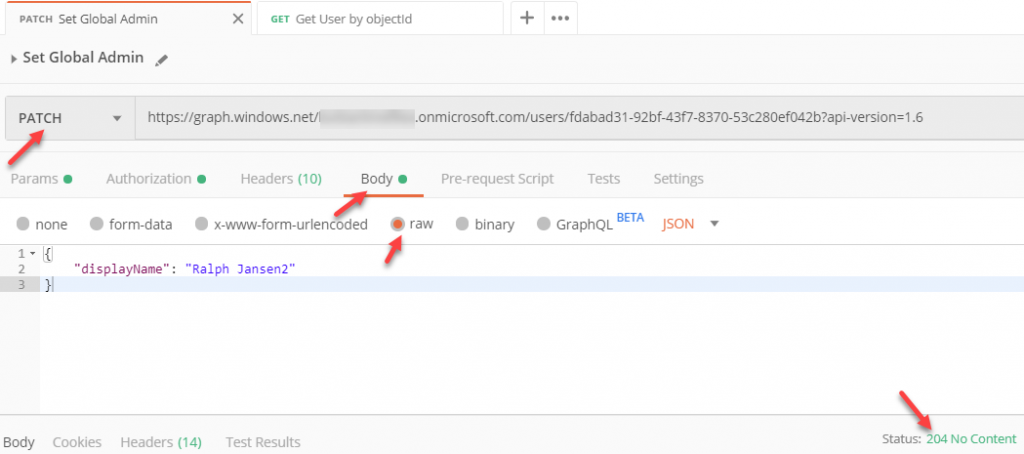
We have all the information that we need, so let’s set the custom attribute. Create a new postman request and use the same url as getting the user detail information with the ObjectId. Set the type of request to “Patch” and add a header “Content-Type” with the value “application/json”.

But in the body the fields (attributes) you want to set. Let’t practice with the “displayName” of the user using the following body:

{
    "displayName": "Ralph Jansen2"
}

Hit send and the return code will be a 204 No Content. When you get the user, you will see the updated value. It can take about 15 seconds before the update is propagated over the whole world.

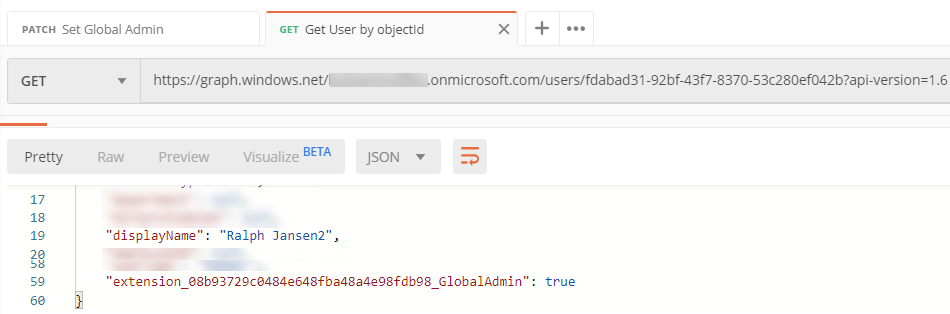
Now that is working, let’s update the custom user attribute “GlobalAdmin”. The attribute belongs to an application. In our case the applicationid is “08b93729-c048-4e64-8fba-48a4e98fdb98”. An Azure B2C user attribute extension will have the syntax “extension_b2cApplicationIdWithoutDashes_attributeName”. So this will result in “extension_08b93729c0484e648fba48a4e98fdb98_GlobalAdmin” in our case. So let’s put it in the body with the value true (because our attribute is a boolean) and hit send.

Get a Custom User Attribute

Let’s see the result by getting the user details again with the ObjectId. You will see the new attribute on the user (can take again a few seconds).

Find users in Azure B2C with graph api

Searching a user in Azure B2C with the graph api can be difficult. You need to know which field you need to get the right information. The documentation (if any) is always behind. Hopefully this post will help someone that needs to get some user information from Azure B2C.

Accesstoken

You need an access token to query the B2C tenant. To get an accesstoken, follow my other blog that gives an introduction to Azure B2C.

Getting users

Above you see an example for getting all the users from your B2C tenant. Below you see a list for other queries that are more advanced. Change the tenant name.

Get all users
https://graph.windows.net/{{tenant}}.onmicrosoft.com/users?api-version=1.6

Get User by displayName
https://graph.windows.net/{{tenant}}.onmicrosoft.com/users?api-version=1.6&$filter=displayName eq ‘Ralph Jansen’

Get User by objectId
https://graph.windows.net/{{tenant}}.onmicrosoft.com/users/fdabad31-92bf-43f7-8370-53c280ef042b?api-version=1.6

Get User by otherMails, userPrincipalName, mail
https://graph.windows.net/{{tenant}}.onmicrosoft.com/users?api-version=1.6&$filter=(otherMails/any(x:x eq ‘info@sample.com’) or userPrincipalName eq ‘info@sample.com’ or mail eq ‘info@sample.com’)

Introduction for Azure B2C with graph api

Working with B2C can be difficult. The user interface is changing a lot and is always behind the normal Azure AD user interface. Using the graph api is helpfull in some situation. But how to get started? Hopefully this will help someone.

Accesstoken

First you need an accesstoken for the “old graph”. The Azure AD still works the best with the old Azure AD graph. Since Azure B2C is an implementation of the Azure AD, we are using that old graph.

First navigate to your B2C instance (do not go to Azure Active directory) in the Azure portal and create a new application with the app registration preview blade.

Create a new secret for the application under the menu item “Certificates & secrets”.

Copy the clientid (see Overview screen) and secret for later.

In this example we are going to use the accesstoken to manage users in Azure B2C. So we need permissions to do this. Add the permissions to the application. Make sure you add the permissions to the old Azure Active Directory graph!

Make sure you grant permissions and you selected application permissions (not delegated).

Postman

Open postman to generate a new accesstoken (for in example a Collection of requests) to manage B2C. We are using client credentials because we are managing B2C in name of the application.

You get the “Access Token URL” from here:
https://login.microsoftonline.com/{{TenantId}}/oauth2/token

Create a new request for getting all users

Use AzureAD PowerShell cmdlets on VSTS agent

Today, I continued working on my custom VSTS extension that I will publish in the near future. In the extension I needed a way how to use AzureAD PowerShell cmdlets on VSTS agent because it isn’t installed by default.

Ship cmdlets in extension

Installing AzureAD cmdlets is not really that difficult. You just download the AzureAD cmdlets module from the PowerShell gallery and put them in your extension so they will be installed with your extension.

Importing the cmdlets

After you put the cmdlets as artifact in your extension, you need to import them. You can do this in example in your execution PowerShell file (in my case Main.ps1) with the following code:

Write-Verbose "Import AzureAD module because is not on default VSTS agent"
$azureAdModulePath = $PSScriptRoot + "\AzureAD\2.0.1.16\AzureAD.psd1"
Import-Module $azureAdModulePath

Connect-AzureAD

After imported, you can use them. Of course you first need to login. Because we don’t want to hard code credentials in our extension, you will have to pass them to the Connect-AzureAD cmdlet. There are multiple ways on how to do this. Think in example of a credential file as variable. I used an Azure Resource Manager endpoint for this. I did this because I actually only wanted to use the AzureRM module for my extension but some of the cmdlets are only in the AzureAD module.

So how do we login? Connect-AzureAD doesn’t allow to login with a Service Principal and a key. You need to use a self-signed certificate for this what I don’t want. I already have an Azure Resource Manager endpoint with a key. I want to use that key so the login procedures for AzureRM and AzureAD are the same. I already wrote a post on how to login with a SP and key but with an existing Azure Resource Manager endpoint in your task you can use the following code:

Write-Verbose "Import AzureAD module because is not on default VSTS agent"
$azureAdModulePath = $PSScriptRoot + "\AzureAD\2.0.1.16\AzureAD.psd1"
Import-Module $azureAdModulePath 

# Workaround to use AzureAD in this task. Get an access token and call Connect-AzureAD
$serviceNameInput = Get-VstsInput -Name ConnectedServiceNameSelector -Require
$serviceName = Get-VstsInput -Name $serviceNameInput -Require
$endPointRM = Get-VstsEndpoint -Name $serviceName -Require

$clientId = $endPointRM.Auth.Parameters.ServicePrincipalId
$clientSecret = $endPointRM.Auth.Parameters.ServicePrincipalKey
$tenantId = $endPointRM.Auth.Parameters.TenantId

$adTokenUrl = "https://login.microsoftonline.com/$tenantId/oauth2/token"
$resource = "https://graph.windows.net/"

$body = @{
    grant_type    = "client_credentials"
    client_id     = $clientId
    client_secret = $clientSecret
    resource      = $resource
}

$response = Invoke-RestMethod -Method 'Post' -Uri $adTokenUrl -ContentType "application/x-www-form-urlencoded" -Body $body
$token = $response.access_token

Write-Verbose "Login to AzureAD with same application as endpoint"
Connect-AzureAD -AadAccessToken $token -AccountId $clientId -TenantId $tenantId

After the above code, you can run any cmdlet that you want (if your AzureRM endpoint SP has permission on it).

Connect to AzureAD with Service Principal

I needed this already multiple times but never got it working. Today, I needed again the ability to Connect to AzureAD with Service Principal because some actions can’t be done (yet) via the Azure Resource Manager.

You can’t login into the Azure AD with a key as a Service Principal. You need a certificate for this. Read for more information the documentation of Connect-AzureAD. In order to use a key for logging into the Azure AD, we need to login first into AzureRM because there it is possible by default. Then call something from the Azure AD (in example a group or application) with AzureRM so the tokencache of the AzureRM context is filled with a valid token to “https://graph.windows.net/”. After that, use the token to login with Connect-AzureAD AadAccessToken cmdlet.

Sample

This script (written in AzureRM 5.1.1 because VSTS hosted agents are using that as well) will get an Azure AD application via AzureRM and then via AzureAD cmdlets.

$ObjectIdOfApplicationToChange = "82bd7dd3-accf-4808-97ef-6bc6e27ade9b"

$TenantId = "You tenant here"
$ApplicationId = "Your application id to login here"
$ServicePrincipalKey = ConvertTo-SecureString -String "Put a key of the application here" -AsPlainText -Force

Write-Information "Login to AzureRM as SP: $ApplicationId"
$AzureADCred = New-Object System.Management.Automation.PSCredential($ApplicationId, $ServicePrincipalKey)
Add-AzureRmAccount -ServicePrincipal -Credential $AzureADCred -TenantId $TenantId

# Get application with AzureRM because this will fill the tokencache for AzureAD as well (hidden feature).
Write-Information "Get application with AzureRM: $ObjectIdOfApplicationToChange"
Get-AzureRmADApplication -ObjectId $ObjectIdOfApplicationToChange

$ctx = Get-AzureRmContext
$cache = $ctx.TokenCache
$cacheItems = $cache.ReadItems()

$token = ($cacheItems | where { $_.Resource -eq "https://graph.windows.net/" })

Write-Information "Login to AzureAD with same SP: $ApplicationId"
Connect-AzureAD -AadAccessToken $token.AccessToken -AccountId $ctx.Account.Id -TenantId $ctx.Tenant.Id

Write-Information "Now get same application with AzureAD: $ObjectIdOfApplicationToChange"
Get-AzureADApplication -ObjectId $ObjectIdOfApplicationToChange

Add Azure AD Application as owner of another AD Application

This is just to explain to myself how to add Azure AD Application as owner of another AD Application because I have searched to many times for it.

You can’t do this as Global Admin. You need to be a normal user that is of course owner of the AD Application that you want to change.

This script uses both AzureAD and AzureRM PowerShell modules because on this moment not everything is available in AzureRM.

First get the owners of the application where you want to add the owner to. Check if it’s not already there.

Get-AzureADApplicationOwner -ObjectId $objectIdOfApplicationToChange

Then get the service principal object id (property id) of the Azure AD Application

Get-AzureRmADApplication -ObjectId $objectIdOfApplicationThatNeedsToBeAdded | Get-AzureRmADServicePrincipal

The result will be the ApplicationId, DisplayName, Id and Type. Copy the Id property (ObjectId) to add it as owner. You can also use the following shortcut:

(Get-AzureRmADApplication -ObjectId $objectIdOfApplicationThatNeedsToBeAdded | Get-AzureRmADServicePrincipal).Id

Add the new ObjectId as owner:

Add-AzureADApplicationOwner -ObjectId $objectIdOfApplicationToChange -RefObjectId $objectIdOfOtherAppServicePrincipal

Check if the new owner is set (you can check this as well in the portal):

Get-AzureADApplicationOwner -ObjectId $objectIdOfApplicationToChange

Oneliner

Or everything in one line:

$objectIdOfApplicationToChange = "976876-6567-49e0-ab8c-e40848205883"
$objectIdOfApplicationThatNeedsToBeAdded = "98098897-86b9-4dc5-b447-c94138db3a61"

Add-AzureADApplicationOwner -ObjectId $objectIdOfApplicationToChange -RefObjectId (Get-AzureRmADApplication -ObjectId $objectIdOfApplicationThatNeedsToBeAdded | Get-AzureRmADServicePrincipal).Id