Multiple select listbox in MVC 4

This post will be in Dutch because I based this on a discussion with someone else.

Vandaag gaf ik al weer voor de vierde keer les op de Hogeschool van Rotterdam. Daar geef ik les aan een groep studenten in het vak Microsoft ASP .NET MVC 4 met alle standaard tools als Entity Framework en Web API er om heen.

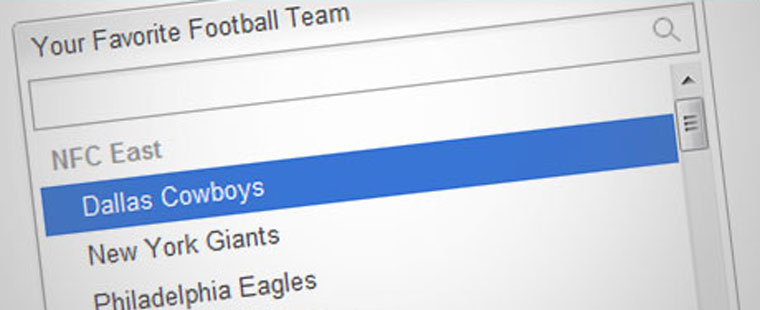
Bob Joziasse sprak ik vandaag over een multiple select in een listbox voor zijn laatste blog Eggplication die in het leuke paas thema is geschreven. Ik ben er even ingedoken aangezien ik zelf de listbox in HTML nooit gebruik. Op zich is het een standaard control en het is al snel duidelijk voor een gebruiker wat hij er mee kan doen. Ik zelf gebruik hem nooit omdat de styling van het control niet voor elke browser gelijk is. Maarja, terug naar het onderwerp.

In zijn blog heeft Bob een kleine applicatie gemaakt om aan het te geven hoe een meer op meer relatie werkt door middel van Code First in het wel bekende Entity Framework. In de applicatie kan je een ei maken en die verschillende templates geven voor het beschilderen. Ik heb de applicatie hetzelfde genoemd maar de properties van de objecten een beetje mijn eigen gang laten gaan. Zo heb ik ook een meer op meer relatie en kan ik dus templates koppelen aan een ei en eieren koppelen aan (schilder)templates.

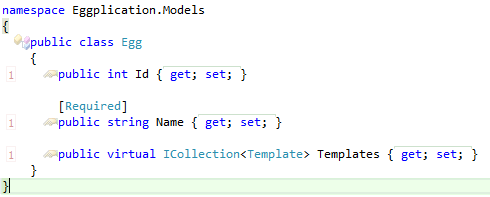
De objecten zien er als volgt uit:

Egg:

Template:

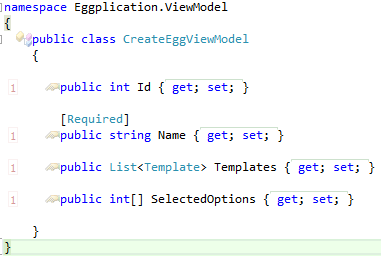
Simpele ViewModel voor de Create van de Egg:

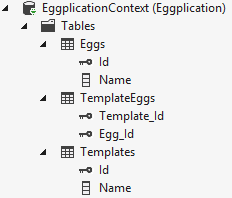
De database wordt dan als volgt gegenereerd:

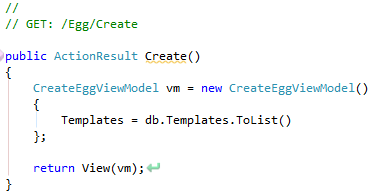
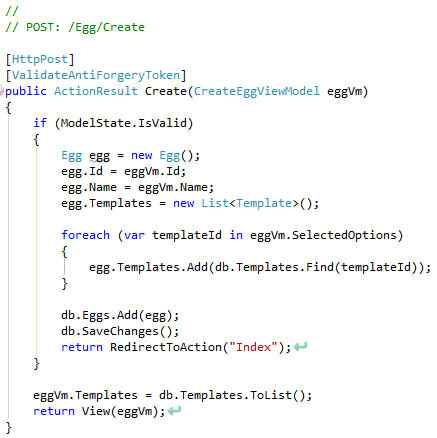
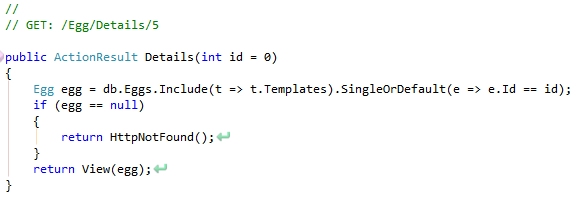
De controller met de Create Get en Post functies zien er dan als volgt uit:

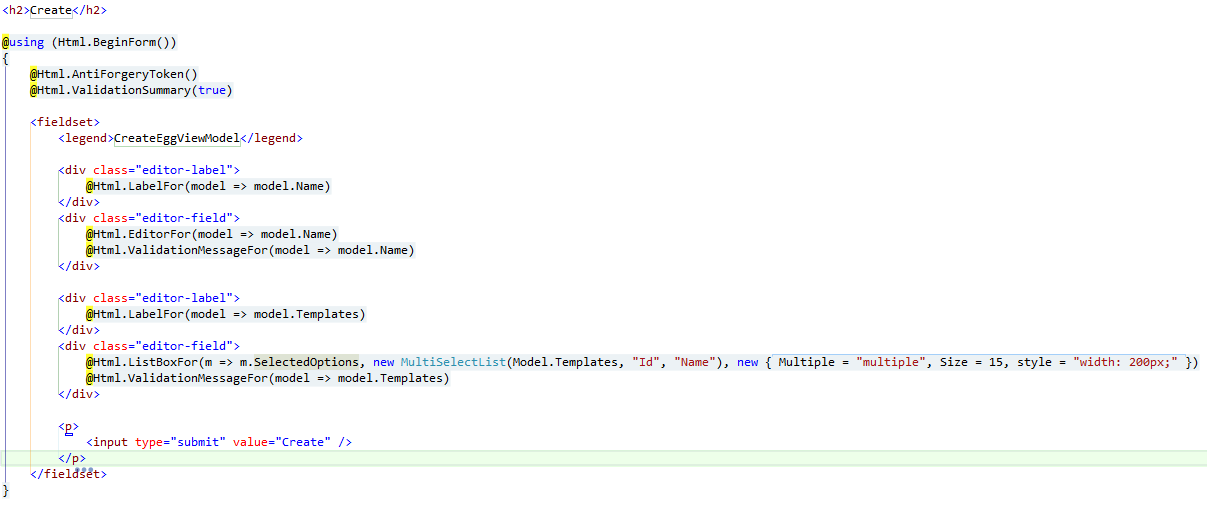
Om dit werkend te krijgen hebben we natuurlijk ook een View nodig. Dit ziet er bij mij zo uit:

Als we dit draaien ziet dat er als volt uit:

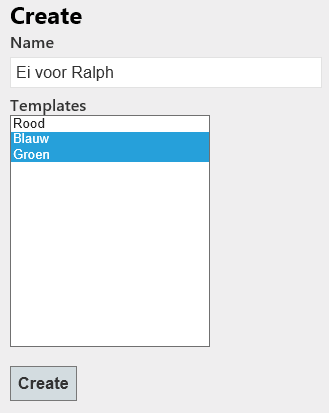
Om vervolgens dit weer te kunnen bekijken heb ik het als volgt gemaakt:

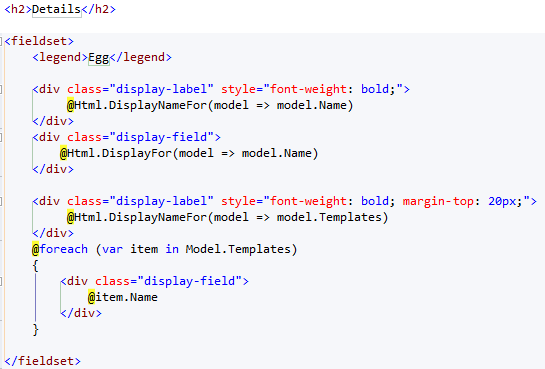
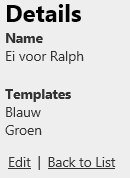
Wat resulteert in onderstaande om het ei met de gekozen templates te kunnen weergeven:

Een simpele applicatie maar wel handig om snel een meer op meer relatie te maken met een listbox.

OutputCache explanation

Why should we use caching?

The reason why we should use caching is to increase the performance for the end user and to decrease the traffic on the server. There are multiple kind of caching. In this post, I will explain the OutputCache attribute of MVC 3 (and 4).

Using the OutputCache Attribute

To cache a page or image in ASP .NET MVC 3 we only have to set the OutputCache attribute above the action.

image

The Duration property is the timespan you want to cache the action in seconds. So above, the page will be cached for 10 seconds. When you run the application, the page is showing the ViewBag.Time on your screen. If you hit F5 (refresh), the page is refreshed but your action isn’t. The time is still the same if you did refresh the page within the 10 seconds. When you hit F5 after 10 seconds, the new time is shown.

Use fiddler to see if the caching is working.

Caching the action for different result

When you have an action for different results, like asking for an image for a given imageId you use a parameter in your action. The OutputCache attribute will automatically use the parameter for caching the result for that specific item.

image

So when you ask for example image 3 and 24, the caching will work on both images.

Use fiddler to see if the caching is working.

Caching of private items

By default, the cache is saved on the server and client. But when you have private data the cache should only be used on the client (the browser). Otherwise, private data could be accessed by anyone.

We could use the location property for this.

image

Set the location property to Client to only store the image in the browser.

When you run the page now and see the image or page, the image or page is cached only in your browser. When you hit F5, the caching won’t work. This is because client caching will not work for browser refreshing. If you use a hyperlink to the same page or image the caching will work.

Again use fiddler to see the results.

How to disable caching of an action

To disable caching for an action, use the code as shown below.

image

Caching profiles

When you have a lot of actions with the same settings, you could implement caching profiles. In this way, you only have to change the settings on one place.

In the web.config, add the following section.

image

You then could use the caching profile in the following way.

image

Minification and Bundling in MVC 4 RC

Asp .NET MVC 4 Release Candidate is out. One of the features that is included is called the minification and bundling feature. This was already there in the beta but in the release candidate version it has changed.

Why should we use it

The reason why we should use the bundling and minification feature is performance. The features increases your loading performance of your website. Every time you reference a JavaScript (like jQuery or your own), or CSS file in your page, the browser makes a call to the server. This is done for each separate reference. Each referenced file has included all the comments and spacing in your file. This makes the file larger then when we should delete those spaced. The bundling and minification feature does this for us.

How does it work

In your Global.asax the CSS and JavaScript files are Bundled with BundleConfig.RegisterBundles(BundleTable.Bundles); line.

image

image

Reference the files in your page.

image

When you run the application and use Fiddler to view the calls to your server, you still see all the files called separately.

image

image

This is because the Bundling and Minification feature by default only work when your not in debug mode. This handy because then you could debug with all the whitespaces in your files and have the performance in the production environment.

See the difference in your production environment:

image

image

Force Bundling and Minification

You can use the BundleTable.EnableOptmizations override but the best way for a little test is to remove the debug=”true” attribute in your web.config.

image

Browser caching

When the feature is active, the browser will cache the files. When you add or change some JavaScript or CSS code, the files are generated again and the version number in the references are updated. In that way, the browser knows that there is a new version and your website wont brake.

image