Use AzureAD PowerShell cmdlets on VSTS agent

Today, I continued working on my custom VSTS extension that I will publish in the near future. In the extension I needed a way how to use AzureAD PowerShell cmdlets on VSTS agent because it isn’t installed by default.

Ship cmdlets in extension

Installing AzureAD cmdlets is not really that difficult. You just download the AzureAD cmdlets module from the PowerShell gallery and put them in your extension so they will be installed with your extension.

Importing the cmdlets

After you put the cmdlets as artifact in your extension, you need to import them. You can do this in example in your execution PowerShell file (in my case Main.ps1) with the following code:

Write-Verbose "Import AzureAD module because is not on default VSTS agent"
$azureAdModulePath = $PSScriptRoot + "\AzureAD\2.0.1.16\AzureAD.psd1"
Import-Module $azureAdModulePath

Connect-AzureAD

After imported, you can use them. Of course you first need to login. Because we don’t want to hard code credentials in our extension, you will have to pass them to the Connect-AzureAD cmdlet. There are multiple ways on how to do this. Think in example of a credential file as variable. I used an Azure Resource Manager endpoint for this. I did this because I actually only wanted to use the AzureRM module for my extension but some of the cmdlets are only in the AzureAD module.

So how do we login? Connect-AzureAD doesn’t allow to login with a Service Principal and a key. You need to use a self-signed certificate for this what I don’t want. I already have an Azure Resource Manager endpoint with a key. I want to use that key so the login procedures for AzureRM and AzureAD are the same. I already wrote a post on how to login with a SP and key but with an existing Azure Resource Manager endpoint in your task you can use the following code:

Write-Verbose "Import AzureAD module because is not on default VSTS agent"
$azureAdModulePath = $PSScriptRoot + "\AzureAD\2.0.1.16\AzureAD.psd1"
Import-Module $azureAdModulePath 

# Workaround to use AzureAD in this task. Get an access token and call Connect-AzureAD
$serviceNameInput = Get-VstsInput -Name ConnectedServiceNameSelector -Require
$serviceName = Get-VstsInput -Name $serviceNameInput -Require
$endPointRM = Get-VstsEndpoint -Name $serviceName -Require

$clientId = $endPointRM.Auth.Parameters.ServicePrincipalId
$clientSecret = $endPointRM.Auth.Parameters.ServicePrincipalKey
$tenantId = $endPointRM.Auth.Parameters.TenantId

$adTokenUrl = "https://login.microsoftonline.com/$tenantId/oauth2/token"
$resource = "https://graph.windows.net/"

$body = @{
    grant_type    = "client_credentials"
    client_id     = $clientId
    client_secret = $clientSecret
    resource      = $resource
}

$response = Invoke-RestMethod -Method 'Post' -Uri $adTokenUrl -ContentType "application/x-www-form-urlencoded" -Body $body
$token = $response.access_token

Write-Verbose "Login to AzureAD with same application as endpoint"
Connect-AzureAD -AadAccessToken $token -AccountId $clientId -TenantId $tenantId

After the above code, you can run any cmdlet that you want (if your AzureRM endpoint SP has permission on it).

Connect to AzureAD with Service Principal

I needed this already multiple times but never got it working. Today, I needed again the ability to Connect to AzureAD with Service Principal because some actions can’t be done (yet) via the Azure Resource Manager.

You can’t login into the Azure AD with a key as a Service Principal. You need a certificate for this. Read for more information the documentation of Connect-AzureAD. In order to use a key for logging into the Azure AD, we need to login first into AzureRM because there it is possible by default. Then call something from the Azure AD (in example a group or application) with AzureRM so the tokencache of the AzureRM context is filled with a valid token to “https://graph.windows.net/”. After that, use the token to login with Connect-AzureAD AadAccessToken cmdlet.

Sample

This script (written in AzureRM 5.1.1 because VSTS hosted agents are using that as well) will get an Azure AD application via AzureRM and then via AzureAD cmdlets.

$ObjectIdOfApplicationToChange = "82bd7dd3-accf-4808-97ef-6bc6e27ade9b"

$TenantId = "You tenant here"
$ApplicationId = "Your application id to login here"
$ServicePrincipalKey = ConvertTo-SecureString -String "Put a key of the application here" -AsPlainText -Force

Write-Information "Login to AzureRM as SP: $ApplicationId"
$AzureADCred = New-Object System.Management.Automation.PSCredential($ApplicationId, $ServicePrincipalKey)
Add-AzureRmAccount -ServicePrincipal -Credential $AzureADCred -TenantId $TenantId

# Get application with AzureRM because this will fill the tokencache for AzureAD as well (hidden feature).
Write-Information "Get application with AzureRM: $ObjectIdOfApplicationToChange"
Get-AzureRmADApplication -ObjectId $ObjectIdOfApplicationToChange

$ctx = Get-AzureRmContext
$cache = $ctx.TokenCache
$cacheItems = $cache.ReadItems()

$token = ($cacheItems | where { $_.Resource -eq "https://graph.windows.net/" })

Write-Information "Login to AzureAD with same SP: $ApplicationId"
Connect-AzureAD -AadAccessToken $token.AccessToken -AccountId $ctx.Account.Id -TenantId $ctx.Tenant.Id

Write-Information "Now get same application with AzureAD: $ObjectIdOfApplicationToChange"
Get-AzureADApplication -ObjectId $ObjectIdOfApplicationToChange

Upgrading PowershellGet to the latest version

This is a small tutorial on how to upgrade PowershellGet to the latest version. The easiest way to upgrade your PowershellGet module is to run the following command:

Find-Module powershellget | Install-Module

After that, check your installed versions:

Get-Module powershellget -ListAvailable
Get-Module packagemanagement -ListAvailable

If you have multiple versions, the best thing todo is to remove the older versions. To remove the older versions, do the following:

  1. Browse to C:\Program Files\WindowsPowerShell\Modules\
  2. Go into C:\Program Files\WindowsPowerShell\Modules\PowershellGet folder, and delete the older version folders
  3. Then do the same for C:\Program Files\WindowsPowerShell\Modules\PackageManagement

Now run the Get-Module commands again and see if the old versions are gone.

Get-Module powershellget -ListAvailable
Get-Module packagemanagement -ListAvailable


Add Azure AD Application as owner of another AD Application

This is just to explain to myself how to add Azure AD Application as owner of another AD Application because I have searched to many times for it.

You can’t do this as Global Admin. You need to be a normal user that is of course owner of the AD Application that you want to change.

This script uses both AzureAD and AzureRM PowerShell modules because on this moment not everything is available in AzureRM.

First get the owners of the application where you want to add the owner to. Check if it’s not already there.

Get-AzureADApplicationOwner -ObjectId $objectIdOfApplicationToChange

Then get the service principal object id (property id) of the Azure AD Application

Get-AzureRmADApplication -ObjectId $objectIdOfApplicationThatNeedsToBeAdded | Get-AzureRmADServicePrincipal

The result will be the ApplicationId, DisplayName, Id and Type. Copy the Id property (ObjectId) to add it as owner. You can also use the following shortcut:

(Get-AzureRmADApplication -ObjectId $objectIdOfApplicationThatNeedsToBeAdded | Get-AzureRmADServicePrincipal).Id

Add the new ObjectId as owner:

Add-AzureADApplicationOwner -ObjectId $objectIdOfApplicationToChange -RefObjectId $objectIdOfOtherAppServicePrincipal

Check if the new owner is set (you can check this as well in the portal):

Get-AzureADApplicationOwner -ObjectId $objectIdOfApplicationToChange

Oneliner

Or everything in one line:

$objectIdOfApplicationToChange = "976876-6567-49e0-ab8c-e40848205883"
$objectIdOfApplicationThatNeedsToBeAdded = "98098897-86b9-4dc5-b447-c94138db3a61"

Add-AzureADApplicationOwner -ObjectId $objectIdOfApplicationToChange -RefObjectId (Get-AzureRmADApplication -ObjectId $objectIdOfApplicationThatNeedsToBeAdded | Get-AzureRmADServicePrincipal).Id


FluentValidation in ASP.NET Core

FluentValidation is a wonderful validation package that is around for years. Last week I was busy with a new application in ASP.NET core. I wanted to add some validation and didn’t used FluentValidation in ASP.NET Core before. So I wanted to see if things where changed. This blog post contains some examples from the official FluentValidation Getting started documentation. In the next blog posts I will go into deeper validation of properties and reusing validators in different models.

Installation

For integration with ASP.NET Core, install the FluentValidation.AspNetCore package:

Install-Package FluentValidation.AspNetCore

Basic validation

Using the package is very easy. Let’s say you have to following class:

public class Customer {
  public int Id { get; set; }
  public string Surname { get; set; }
  public string Forename { get; set; }
  public decimal Discount { get; set; }
  public string Address { get; set; }
}

You would define a set of validation rules for this class by inheriting from AbstractValidator:

using FluentValidation; 

public class CustomerValidator : AbstractValidator<Customer> {
}

To specify a validation rule for a particular property, call the RuleFor method, passing a lambda expression that indicates the property that you wish to validate. For example, to ensure that the Surname property is not null, the validator class would look like this:

using FluentValidation;

public class CustomerValidator : AbstractValidator<Customer> {
  public CustomerValidator() {
    RuleFor(customer => customer.Surname).NotNull();
  }
}

To run the validator, instantiate the validator object and call the Validate method, passing in the object to validate.

Customer customer = new Customer();
CustomerValidator validator = new CustomerValidator();

ValidationResult result = validator.Validate(customer);

The following code would write any validation failures to the console:

if(! results.IsValid) {
  foreach(var failure in results.Errors) {
    Console.WriteLine("Property " + failure.PropertyName + " failed validation. Error was: " + failure.ErrorMessage);
  }
}

Deeper validation

In the next blog posts I will go into deeper validation with custom validators for properties and reusing validators in different models.

DbInitializer dotnet core 2.0

Seed database with users and roles in dotnet core 2.0

In this post I will explain how to seed database users roles dotnet core 2.0 ef. For this we use the UserManager and RoleManager of the AspNetCore Identity framework. In that way, your application already has a default user and role for in example logging into the application. You can use it for test data but also for new installations of your application. In my case I will create a default Administrator user with the Administrator role attached to it for new installations of the application.

Seeding a database in dotnet core 2.0 is different than earlier versions. I followed the basics of the new documentation of Microsoft to get to a good solution. So I first created a new project with the authentication set to Individual Accounts.

Program.cs

In the program.cs class I changed the code to the following:

public class Program
{
    public static void Main(string[] args)
    {
        var host = BuildWebHost(args);

        using (var scope = host.Services.CreateScope())
        {
            var services = scope.ServiceProvider;
            try
            {
                var context = services.GetRequiredService<ApplicationDbContext>();
                var userManager = services.GetRequiredService<UserManager<ApplicationUser>>();
                var roleManager = services.GetRequiredService<RoleManager<IdentityRole>>();

                var dbInitializerLogger = services.GetRequiredService<ILogger<DbInitializer>>();
                DbInitializer.Initialize(context, userManager, roleManager, dbInitializerLogger).Wait();
            }
            catch (Exception ex)
            {
                var logger = services.GetRequiredService<ILogger<Program>>();
                logger.LogError(ex, "An error occurred while seeding the database.");
            }
        }

        host.Run();
    }

    public static IWebHost BuildWebHost(string[] args) =>
        WebHost.CreateDefaultBuilder(args)
            .UseStartup<Startup>()
            .Build();
}

This is almost the same code as the documentation but I also injected a RoleManager and UserManager so we can create the default user and role for the application. When the instances are created the Initialize method of the DbInitializer is called. This can be used to seed your database.

Because I want to know more information about my users than just their email and username, I extended the ApplicationUser object that is used to create a user in the database with the UserManaer.

// Add profile data for application users by adding properties to the ApplicationUser class
public class ApplicationUser : IdentityUser
{

    public ApplicationUser()
        : base()
    {
    }
   
    public ApplicationUser(string userName, string firstName, string lastName, DateTime birthDay)
        : base(userName)
    {
        base.Email = userName;

        this.FirstName = firstName;
        this.LastName = lastName;
        this.BirthDay = birthDay;

    }

    [Required]
    [StringLength(50)]
    public string FirstName { get; set; }

    [Required]
    [StringLength(50)]
    public string LastName { get; set; }

    [Required]
    [DataType(DataType.Date)]
    public DateTime BirthDay { get; set; }

    public string FullName => $"{this.FirstName} {this.LastName}";
}

I like constructors for new objects so I will use the long constructor to create my default user.

DbInitializer

The DbInitializer is the class that is used to seed the database. It is created by the program class. It has a static method Initialize that will be used to pass the external dependencies. The Initialize method will be used to orchestrate all the actions.

public class DbInitializer
{
    public static async Task Initialize(ApplicationDbContext context, UserManager<ApplicationUser> userManager,
        RoleManager<IdentityRole> roleManager, ILogger<DbInitializer> logger)
    {
        context.Database.EnsureCreated();

        // Look for any users.
        if (context.Users.Any())
        {
            return; // DB has been seeded
        }

        await CreateDefaultUserAndRoleForApplication(userManager, roleManager, logger);
    }

    private static async Task CreateDefaultUserAndRoleForApplication(UserManager<ApplicationUser> um, RoleManager<IdentityRole> rm, ILogger<DbInitializer> logger)
    {
        const string administratorRole = "Administrator";
        const string email = "noreply@your-domain.com";

        await CreateDefaultAdministratorRole(rm, logger, administratorRole);
        var user = await CreateDefaultUser(um, logger, email);
        await SetPasswordForDefaultUser(um, logger, email, user);
        await AddDefaultRoleToDefaultUser(um, logger, email, administratorRole, user);
    }

    private static async Task CreateDefaultAdministratorRole(RoleManager<IdentityRole> rm, ILogger<DbInitializer> logger, string administratorRole)
    {
        logger.LogInformation($"Create the role `{administratorRole}` for application");
        var ir = await rm.CreateAsync(new IdentityRole(administratorRole));
        if (ir.Succeeded)
        {
            logger.LogDebug($"Created the role `{administratorRole}` successfully");
        }
        else
        {
            var exception = new ApplicationException($"Default role `{administratorRole}` cannot be created");
            logger.LogError(exception, GetIdentiryErrorsInCommaSeperatedList(ir));
            throw exception;
        }
    }

    private static async Task<ApplicationUser> CreateDefaultUser(UserManager<ApplicationUser> um, ILogger<DbInitializer> logger, string email)
    {
        logger.LogInformation($"Create default user with email `{email}` for application");
        var user = new ApplicationUser(email, "First", "Last", new DateTime(1970, 1, 1));

        var ir = await um.CreateAsync(user);
        if (ir.Succeeded)
        {
            logger.LogDebug($"Created default user `{email}` successfully");
        }
        else
        {
            var exception = new ApplicationException($"Default user `{email}` cannot be created");
            logger.LogError(exception, GetIdentiryErrorsInCommaSeperatedList(ir));
            throw exception;
        }

        var createdUser = await um.FindByEmailAsync(email);
        return createdUser;
    }

    private static async Task SetPasswordForDefaultUser(UserManager<ApplicationUser> um, ILogger<DbInitializer> logger, string email, ApplicationUser user)
    {
        logger.LogInformation($"Set password for default user `{email}`");
        const string password = "YourPassword01!";
        var ir = await um.AddPasswordAsync(user, password);
        if (ir.Succeeded)
        {
            logger.LogTrace($"Set password `{password}` for default user `{email}` successfully");
        }
        else
        {
            var exception = new ApplicationException($"Password for the user `{email}` cannot be set");
            logger.LogError(exception, GetIdentiryErrorsInCommaSeperatedList(ir));
            throw exception;
        }
    }

    private static async Task AddDefaultRoleToDefaultUser(UserManager<ApplicationUser> um, ILogger<DbInitializer> logger, string email, string administratorRole, ApplicationUser user)
    {
        logger.LogInformation($"Add default user `{email}` to role '{administratorRole}'");
        var ir = await um.AddToRoleAsync(user, administratorRole);
        if (ir.Succeeded)
        {
            logger.LogDebug($"Added the role '{administratorRole}' to default user `{email}` successfully");
        }
        else
        {
            var exception = new ApplicationException($"The role `{administratorRole}` cannot be set for the user `{email}`");
            logger.LogError(exception, GetIdentiryErrorsInCommaSeperatedList(ir));
            throw exception;
        }
    }

    private static string GetIdentiryErrorsInCommaSeperatedList(IdentityResult ir)
    {
        string errors = null;
        foreach (var identityError in ir.Errors)
        {
            errors += identityError.Description;
            errors += ", ";
        }
        return errors;
    }
}

First a new Administrator role is created. In my application this is the highest role a user can have. When the role is created, a new default user is created with the earlier provided constructor. After the user is created, the user needs a password to sign into the application. So a password is set. The last step is to connect the user to the Administrator role so he has all the permissions that he needs.

For logging, I use the default logging extension framework provided by dotnet core. I connected Serilog to the logging extension for better control.

Unit testing with xUnit in .NET Core

This post is about Unit testing with xUnit in .NET Core. The last few weeks I was working on a new  project in .NET Core. What I didn’t expected was that so many features weren’t documented or very bad documented. Many articles of Microsoft explained a different solution for the same result. I understand the framework is changing but the documentation should be changing as well then.

So I started unit testing with xUnit. I like the framework a lot so I hoped everything was working in the latest version of .NET Core. What I wanted to achieve was to create of course unit tests but also good integration in Visual Studio and TFS. That was not so easy as I hoped for. It took me a lot of searching and combining of solution to get everything working. Just because of the poor documentation. If you see the result to get this to work then it looks to easy.

First, which version of all the tools and Frameworks did I use:

  • Visual Studio 2017 Enterprise 15.2 (26430.12)
  • ReSharper 2017.1.2
  • dotnet version 1.0.4 (dotnet –version in command prompt)
  • Team Foundation Server 2017 Update 1

When I used the xUnit Nuget package I got with little effort the tests working in Visual Studio. But I wanted more. Because I’m CI/CD engineer, I wanted some automated builds in Team Foundation Server. So I created a new CI build for my project. I couldn’t get everything to work with the tasks that where in TFS so I used the command prompt task. I found this post from xUnit for testing in .NET Core that got me pointing in the right direction.

I installed the following Nuget packages in my project:

<ItemGroup>
  <PackageReference Include="Microsoft.NET.Test.Sdk" Version="15.0.0" />
  <PackageReference Include="xunit" Version="2.3.0-beta2-build3683" />
  <PackageReference Include="xunit.runner.visualstudio" Version="2.2.0" />
  <DotNetCliToolReference Include="dotnet-xunit" Version="2.3.0-beta2-build3683" />
</ItemGroup>

This gave me access to the new xunit CLI. I also installed the VS runner package so you could also run the unittests with the “Test Explorer” window in Visual Studio.

Now I could finish my CI Build definition. I removed all the tasks because in every combination that I tried I couldn’t get a part to work. I still wanted, to build the project, run the test, see the results back in Visual Studio and in TFS. As a bonus I wanted to see the Code Coverage of the tests in TFS as well.

First restore all external dependencies:

Then build the project:

Run the tests:


The trick is to use the right configuration and to export the result to an xml file. Place that file in the “$(Build.ArtifactStagingDirectory)” so we can use it in the next step. We already build the solution so add the “-nobuild” option.

Upload the test results:

The Code Coverage was not possible because that is still under development by Microsoft for the .NET Core framework. In the next version of Visual Studio will this be possible. You can already test it in the Visual Studio 2017 15.3 preview version. See this thread on Github for more information.

The result is:

Connect SoapUI to WCF service certificate authentication

Is it possible to connect SoapUI to WCF Service certificate authentication, the answer is yes! If you search on the internet, there is little information about this topic but it is really possible!

Adding security to your WCF service is a best practice. Not only when your creating services connected by the internet but also inside your company.

One way for securing your WCF service is adding certificates for authentication. But also signing your message is good way to preserve the integrity of your message. So to use a secure service we can enable transport and message security. See a list of common security scenarios with WCF for a good reference. In that way we can use SSL in IIS.

Service configuration

Add a service to your application with a WsHttpBinding. See for an example the following config:

<?xml version="1.0" encoding="utf-8" ?>
<system.serviceModel>
  <services>
    <service name="SampleService">
      <endpoint binding="wsHttpBinding" contract="ISampleService" bindingNamespace="http://your/binding/namespace"/>
    </service>
  </services>
  <behaviors>
    <serviceBehaviors>
      <behavior name="">
        <serviceMetadata httpsGetEnabled="true" />
        <serviceCredentials>
          <serviceCertificate findValue="YourThumbprint" storeName="My" storeLocation="LocalMachine" x509FindType="FindByThumbprint" />
          <clientCertificate>
            <certificate findValue="YourThumbprint" storeName="My" storeLocation="LocalMachine" x509FindType="FindByThumbprint" />
            <authentication certificateValidationMode="ChainTrust" revocationMode="NoCheck" />
            <!-- Check revocationMode for production -->
          </clientCertificate>
        </serviceCredentials>
        <serviceDebug includeExceptionDetailInFaults="true" />
      </behavior>
    </serviceBehaviors>
  </behaviors>
  <bindings>
    <wsHttpBinding>
      <binding maxReceivedMessageSize="10485760">
        <readerQuotas maxDepth="32" maxStringContentLength="2147483647" maxArrayLength="2147483647" maxBytesPerRead="4096" maxNameTableCharCount="16384" />
        <security mode="TransportWithMessageCredential">
          <message clientCredentialType="Certificate" algorithmSuite="Basic256Sha256Rsa15" negotiateServiceCredential="false" establishSecurityContext="false" />
        </security>
      </binding>
    </wsHttpBinding>
  </bindings>
  <serviceHostingEnvironment aspNetCompatibilityEnabled="true" multipleSiteBindingsEnabled="true" />
</system.serviceModel>

Client Configurations

Configuration .NET

Then use in your .NET client the following config. The assumption is that you already know how to add a service.

<?xml version="1.0" encoding="utf-8" ?>
<configuration>
  <system.serviceModel>
    <bindings>
      <wsHttpBinding>
        <binding name="WsHttpBinding_ISampleService">
          <security mode="TransportWithMessageCredential">
            <message clientCredentialType="Certificate" algorithmSuite="Basic256Sha256Rsa15"/>
          </security>
        </binding>
      </wsHttpBinding>
    </bindings>
    <behaviors>
      <endpointBehaviors>
        <behavior name="">
          <clientCredentials>
            <clientCertificate findValue="your thumbprint" storeName="My" storeLocation="LocalMachine" x509FindType="FindByThumbprint" />

            <serviceCertificate>
              <defaultCertificate findValue="your thumbprint" storeName="My" storeLocation="LocalMachine" x509FindType="FindByThumbprint" />
              <authentication certificateValidationMode="ChainTrust" revocationMode="NoCheck" /><!-- Check revocationMode for production -->
            </serviceCertificate>
          </clientCredentials>
        </behavior>
      </endpointBehaviors>
    </behaviors>
    <client>
      <endpoint address="https://url/SampleService.svc"
          binding="wsHttpBinding" bindingConfiguration="WsHttpBinding_ISampleService"
          contract="ISampleService" name="WsHttpBinding_ISampleService1">
        <identity>
          <dns value="IngHubServerTest"/>
        </identity>
      </endpoint>
    </client>
  </system.serviceModel>
</configuration>

Configuration SoapUI

If you want to connect to this service with SoapUI it is more difficult. I’m not a Java developer so I use SoapUI for an easier understanding of connecting to our WCF Service in a different language. For this example I use the curret latest version 5.3. See for an overview of WS-Security the following help page.

Follow the steps below for adding a new project to SoapUI with the right configuration.

Project configuration

  1. First of all create a new project and add the url to the wsdl. A new project is generated with a sample request for your service.
  2. Now double click the project or use right click of the mouse to open the “Project view”.
  3. Navigate to the “WS-Security Configurations” tab
  4. Select the “Keystores” tab and add the certificate with private key so we can sign the request.
  5. Go to the “Outgoing WS-Security Configurations” and add a new configuration with the name that you like.
  6. Add in the newly created configuration a “Signature”.
  7. Configure the keystore that you’ve added.
  8. Use “Binary Security Token” as Key Identifier Type.
  9. Set the right Algorithms that you have configured in the service. I change the configuration to a higher security because the default uses SHA1 and that is not a best practice anymore. I changed the configuration in my WCF service to algorithmSuite=”Basic256Sha256Rsa15″ in the message element of the binding. See this page for more information. Then it uses RSA-SHA256 for signature algorithm, XML-EXC-C14n# for Signature Canonicalization and XMLENC#SHA256 for the Digest Algorithm.
  10. Check the “Use single certificate” checkbox.
  11. By default SoapUI signs the whole request but that isn’t the default by WCF so we have to set the parts that we want to sign. So add as Name “To”, Namespace “http://www.w3.org/2005/08/addressing” (this is my namespace but check yours) and set Encode to “Element”.
  12. Add a timestamp and set it to 300. Use milisecond precision.
  13. Check the order on the left. So first signature and then timestamp!

Request configuration

  1. Adjust the sample request body so it is a valid request.
  2. Go back to your request.
  3. Under the request open the “Auth” panel. Add Basic security. Leave everything blank except the “Outgoing WSS” configuration. Select the configuration that you have created.
  4. Go to the WS-A panel and check  the “Enable WS-A addressing” checkbox.
  5. Finally the last thing that you have to do is check the checkbox “Add default wsa:To”. This in combination with the signature parts “To” configuration passes the right header values to the server. If you don’t do this you will get the following exception “The message received over Transport security has unsigned ‘To’ header”. See this StackOverflow post for simulair issue.

Hopefully this helped somebody. I spend to much time to this issue with SoapUI. Just to show that SoapUI works with a WCF soap service and high security configuration. The conclusion is that it works! It’s just soap… why wouldn’t…

Web API load testing with Visual Studio webtest

This is the first post about load testing with Visual Studio webtest. This series of posts is describing load testing on a Visual Studio Web API.

This first post is about setting up the Visual Studio webtest for the demo Web API project with Visual Studio 2015. We’re using the latest version of the .NET Framework so we can use all the latest cool stuff in our code.

Setup the project

  1. Create a new WebApi project and don’t forget to set the .NET Framework version to 4.6. Remember, I use the new Visual Studio 2015 RTM version.
  2. Create a new class library and call it “Extensions”.
  3. In the Extensions project, add a reference to “Microsoft.VisualStudio.QualityTools.WebTestFramework”. This project is for creating custom extension for Visual Studio webtests.
  4. Add again a new project. Choose a “Web Performance and Load test Project” project. I called mine “WebApiTest”.
  5. Add a reference from the test project to the Extensions project so we can use the extensions in the webtests.

So, the first thing is done. Setting up the project is the easy part. Now comes the testing part.

When you created the test project, a new empty webtest is created. We are now going to change the request so we can test it.

  1. Rename the webtest to ValuesTest because we are going to test the ValuesController of the Web Api project.
  2. Right click your ValuesTest and add a “Web Service Request”. Change the url to “http://localhost:26159/api/values” (your portnumber can be different).
  3. Change the method from POST to GET.
  4. Run your test and you will get a 401 unauthorized request back.
  5. Remove the Authorize attribute on the ValuesController
  6. Run the webtest again and now you will get a status 200 with as response “Binary Data”. This is off course your JSON response message.

Now we have to validate your response message because we don’t know if your test is sending the correct message.

  1. Right click your web request and select “Add Validation Rule”.
  2. A window appears. Select the “Find text” validation rule.
    Webstest add validation rule
  3. Enter in the “Find text” property the value “value3”.
  4. Run your test and your test will fail on the validation rule.
    Find text validation rule value3 failed
  5. Change the “Find text” property to “value2”.
  6. Run the test again and now your test will be valid.
    Find text validation rule value2 passed

Ok. The foundation is done for the testing part. We have a test project and a source project that must be validated. The extensions part isn’t used yet. This will be done in the next part. In that part we are going to create a more detailed ValidationRule that really understand JSON reponses. Then we don’t have to “find text” in the reponse but we can search for a property that we want to validate.

Create custom code analysis rules in Visual Studio 2013

This blog explains how to create custom code analysis rules in Visual Studio 2013 and how to debug them in Visual Studio 2013.

Create a custom code analysis rule

Start with creating a new class library. Rename the generated ‘Class1’ to ‘BaseRule’.
Add references in your class library to:

  • FxCopSdk
    C:\Program Files (x86)\Microsoft Visual Studio 12.0\Team Tools\Static Analysis Tools\FxCop\\FxCopSdk.dll
  • Microsoft.Cci
    C:\Program Files (x86)\Microsoft Visual Studio 12.0\Team Tools\Static Analysis Tools\FxCop\\Microsoft.Cci.dll
  • Microsoft.VisualStudio.CodeAnalysis
    C:\Program Files (x86)\Microsoft Visual Studio 12.0\Team Tools\Static Analysis Tools\FxCop\\Microsoft.VisualStudio.CodeAnalysis.dll

In the BaseRule class we have to identify how the rules are named and where they could be found. To do this change the code in the BaseRule class.

using Microsoft.FxCop.Sdk;

namespace CustomCodeAnalysisRules
{
	public abstract class BaseRule : BaseIntrospectionRule
	{
		protected BaseRule(string name)
			: base(

				// The name of the rule (must match exactly to an entry
				// in the manifest XML)
				name,

				// The name of the manifest XML file, qualified with the
				// namespace and missing the extension
				typeof(BaseRule).Assembly.GetName().Name + ".Rules",

				// The assembly to find the manifest XML in
				typeof(BaseRule).Assembly)
		{

		}
	}
}

Now we have the framework for our new custom code analysis rules. In this example we are creating a custom rule that says that fields are not allowed. We are creating this rule because our team doesn’t want any fields in Data Transfer Objects (DTO).

We name the custom rule ‘NoFieldsAllowed’, so create a class with the name ‘NoFieldsAllowed’. The rule is inherit from our BaseRule so we can give the name of the rule to the base class.

using Microsoft.FxCop.Sdk;

namespace CustomCodeAnalysisRules
{
	internal sealed class NoFieldsAllowed : BaseRule
	{

		public NoFieldsAllowed()
			: base("NoFieldsAllowed")
		{

		}
	}
}

Next we have to say for which type of access modifiers the rule is made for. We can do this be overriding the ‘TargetVisibility’ property. We want to make this rule for all access modifiers so we have to use ‘TargetVisibilities.All’.

// TargetVisibilities 'All' will give you rule violations about public, internal, protected and private access modifiers.
public override TargetVisibilities TargetVisibility
{
	get
	{
		return TargetVisibilities.All;
	}
}

The setup for the rule is complete so we can write the implementation. Override the ‘Check’ method for a ‘Member’. Cast the member that you get as parameter to a ‘Field’. Check if the Field is ‘null’. If so, the check is not for this member.

public override ProblemCollection Check(Member member)
{
	Field field = member as Field;
	if (field == null)
	{
		// This rule only applies to fields.
		// Return a null ProblemCollection so no violations are reported for this member.
		return null;
	}
}

If this member is a field we have to create a ‘Problem’ and a ‘Resolution’. To create a resolution you must create a ‘Rules.xml’ file in your project.

<?xml version="1.0" encoding="utf-8" ?>
<Rules FriendlyName="My Custom Rules">
	<Rule TypeName="NoFieldsAllowed" Category="CustomRules.DTO" CheckId="CR1011">
		<Name>No Fields allowed</Name>
		<Description>Check if fields are used in a class.</Description>
		<Resolution>Field {0} is not allowed. Field must be removed from this class.</Resolution>
		<MessageLevel Certainty="100">Warning</MessageLevel>
		<FixCategories>NonBreaking</FixCategories>
		<Url />
		<Owner />
		<Email />
	</Rule>
</Rules>

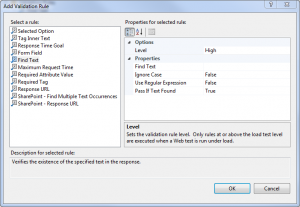
You can add the following information to the ‘Resolution’:

  • Display name of the rule.
  • Rule description.
  • One or more rule resolutions.
  • The MessageLevel (severity) of the rule. This can be set to one of the following:
    • CriticalError
    • Error
    • CriticalWarning
    • Warning
    • Information
  • The certainty of the violation. This field represents the accuracy percentage of the rule. In other words this field describes the rule author’s confidence in how accurate this rule is.
  • The FixCategory of this rule. This field describes if fixing this rule would require a breaking change, ie a change that could break other assemblies referencing the one being analyzed.
  • The help url for this rule.
  • The name of the owner of this rule.
  • The support email to contact about this rule.

Now we have the information to show as a Resolution. We only have to show it to the user in Visual Studio. So expand the ‘Check’ method by creating a ‘Resolution’ and add it to the ‘Problems’ list of the base class.

public override ProblemCollection Check(Member member)
{
	Field field = member as Field;
	if (field == null)
	{
		// This rule only applies to fields.
		// Return a null ProblemCollection so no violations are reported for this member.
		return null;
	}

	Resolution resolution = GetResolution(
		  field  // Field {0} is not allowed. Field must be removed from this class.
		  );
	Problem problem = new Problem(resolution);
	Problems.Add(problem);

	// By default the Problems collection is empty so no violations will be reported
	// unless CheckFieldName found and added a problem.
	return Problems;
}

Test your Custom code analysis rule

To test your custom rule we can add some fields to your custom rule class. So add under the ‘Check’ method the following fields.

private string testField1 = "This should give an error!!!";
private const string testFieldconst1 = "This should give an error!!!";
protected string testField2 = "This should give an error!!!";
internal string testField3 = "This should give an error!!!";
public string testField4 = "This should give an error!!!";
public const string testFieldconst4 = "This should give an error!!!";

To test this we are going to change the “Start Action” of your class library. Open the properties of your class library and navigate to the ‘Debug’ tab.

Change the ‘Start Action’ to ‘Start external program’. Use as external program ‘FxCopCmd.exe’ from your Visual Studio directory. For me it is: ‘C:\Program Files (x86)\Microsoft Visual Studio 12.0\Team Tools\Static Analysis Tools\FxCop\FxCopCmd.exe’.

Use as Command line arguments: ‘/out:”results.xml” /file:”WebCommBack.CustomCodeAnalysisRules.dll” /rule:”WebCommBack.CustomCodeAnalysisRules.dll” /D:”C:\Program Files (x86)\Microsoft Visual Studio 12.0\Team Tools\Static Analysis Tools\FxCop”‘.

Use as working directory your debug folder in the bin folder of this class library.

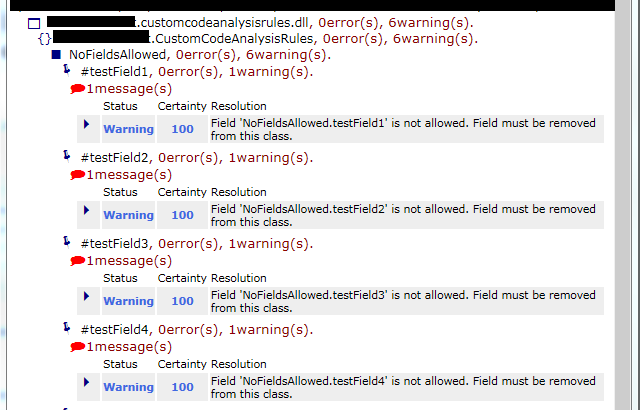
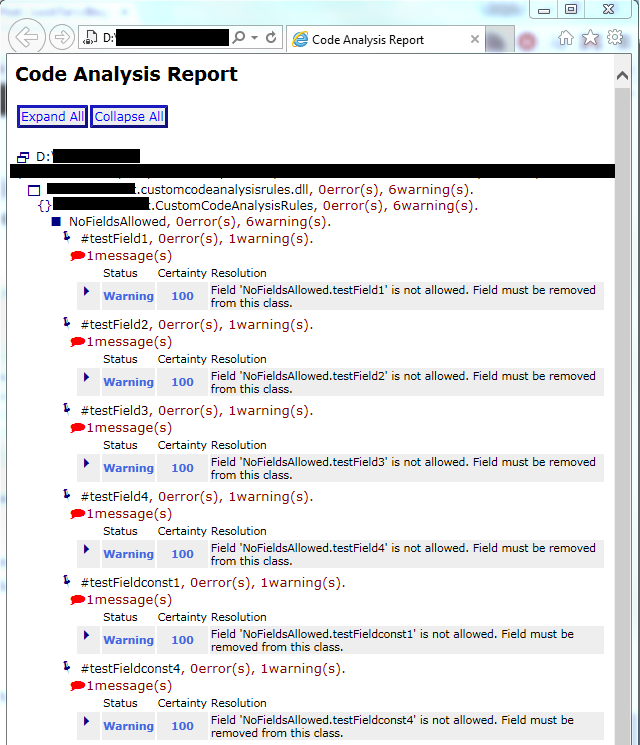
Now run your application with Debug. You will see a command prompt showing up. This will check your fields with your rules. The outcome of the test will be written in your debug folder. There you will find a ‘results.xml’ file. If you open it in ‘Internet Explorer’ you will see the information. Of course you can open it in every xml tool.

Code Analysis test results

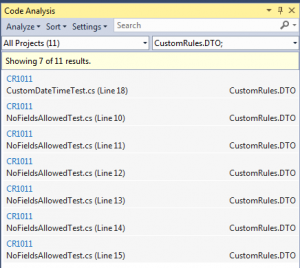
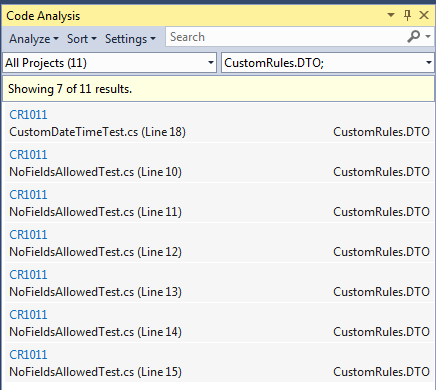
If your test is what you’ve expected, you can use your custom code analysis dll in your ruleset for your application. See here the outcome an application that uses the custom dll.

Code Analysis application results