Upgrading PowershellGet to the latest version

This is a small tutorial on how to upgrade PowershellGet to the latest version. The easiest way to upgrade your PowershellGet module is to run the following command:

Find-Module powershellget | Install-Module

After that, check your installed versions:

Get-Module powershellget -ListAvailable
Get-Module packagemanagement -ListAvailable

If you have multiple versions, the best thing todo is to remove the older versions. To remove the older versions, do the following:

  1. Browse to C:\Program Files\WindowsPowerShell\Modules\
  2. Go into C:\Program Files\WindowsPowerShell\Modules\PowershellGet folder, and delete the older version folders
  3. Then do the same for C:\Program Files\WindowsPowerShell\Modules\PackageManagement

Now run the Get-Module commands again and see if the old versions are gone.

Get-Module powershellget -ListAvailable
Get-Module packagemanagement -ListAvailable


Add Azure AD Application as owner of another AD Application

This is just to explain to myself how to add Azure AD Application as owner of another AD Application because I have searched to many times for it.

You can’t do this as Global Admin. You need to be a normal user that is of course owner of the AD Application that you want to change.

This script uses both AzureAD and AzureRM PowerShell modules because on this moment not everything is available in AzureRM.

First get the owners of the application where you want to add the owner to. Check if it’s not already there.

Get-AzureADApplicationOwner -ObjectId $objectIdOfApplicationToChange

Then get the service principal object id (property id) of the Azure AD Application

Get-AzureRmADApplication -ObjectId $objectIdOfApplicationThatNeedsToBeAdded | Get-AzureRmADServicePrincipal

The result will be the ApplicationId, DisplayName, Id and Type. Copy the Id property (ObjectId) to add it as owner. You can also use the following shortcut:

(Get-AzureRmADApplication -ObjectId $objectIdOfApplicationThatNeedsToBeAdded | Get-AzureRmADServicePrincipal).Id

Add the new ObjectId as owner:

Add-AzureADApplicationOwner -ObjectId $objectIdOfApplicationToChange -RefObjectId $objectIdOfOtherAppServicePrincipal

Check if the new owner is set (you can check this as well in the portal):

Get-AzureADApplicationOwner -ObjectId $objectIdOfApplicationToChange

Oneliner

Or everything in one line:

$objectIdOfApplicationToChange = "976876-6567-49e0-ab8c-e40848205883"
$objectIdOfApplicationThatNeedsToBeAdded = "98098897-86b9-4dc5-b447-c94138db3a61"

Add-AzureADApplicationOwner -ObjectId $objectIdOfApplicationToChange -RefObjectId (Get-AzureRmADApplication -ObjectId $objectIdOfApplicationThatNeedsToBeAdded | Get-AzureRmADServicePrincipal).Id


FluentValidation in ASP.NET Core

FluentValidation is a wonderful validation package that is around for years. Last week I was busy with a new application in ASP.NET core. I wanted to add some validation and didn’t used FluentValidation in ASP.NET Core before. So I wanted to see if things where changed. This blog post contains some examples from the official FluentValidation Getting started documentation. In the next blog posts I will go into deeper validation of properties and reusing validators in different models.

Installation

For integration with ASP.NET Core, install the FluentValidation.AspNetCore package:

Install-Package FluentValidation.AspNetCore

Basic validation

Using the package is very easy. Let’s say you have to following class:

public class Customer {
  public int Id { get; set; }
  public string Surname { get; set; }
  public string Forename { get; set; }
  public decimal Discount { get; set; }
  public string Address { get; set; }
}

You would define a set of validation rules for this class by inheriting from AbstractValidator:

using FluentValidation; 

public class CustomerValidator : AbstractValidator<Customer> {
}

To specify a validation rule for a particular property, call the RuleFor method, passing a lambda expression that indicates the property that you wish to validate. For example, to ensure that the Surname property is not null, the validator class would look like this:

using FluentValidation;

public class CustomerValidator : AbstractValidator<Customer> {
  public CustomerValidator() {
    RuleFor(customer => customer.Surname).NotNull();
  }
}

To run the validator, instantiate the validator object and call the Validate method, passing in the object to validate.

Customer customer = new Customer();
CustomerValidator validator = new CustomerValidator();

ValidationResult result = validator.Validate(customer);

The following code would write any validation failures to the console:

if(! results.IsValid) {
  foreach(var failure in results.Errors) {
    Console.WriteLine("Property " + failure.PropertyName + " failed validation. Error was: " + failure.ErrorMessage);
  }
}

Deeper validation

In the next blog posts I will go into deeper validation with custom validators for properties and reusing validators in different models.

DbInitializer dotnet core 2.0

Seed database with users and roles in dotnet core 2.0

In this post I will explain how to seed database users roles dotnet core 2.0 ef. For this we use the UserManager and RoleManager of the AspNetCore Identity framework. In that way, your application already has a default user and role for in example logging into the application. You can use it for test data but also for new installations of your application. In my case I will create a default Administrator user with the Administrator role attached to it for new installations of the application.

Seeding a database in dotnet core 2.0 is different than earlier versions. I followed the basics of the new documentation of Microsoft to get to a good solution. So I first created a new project with the authentication set to Individual Accounts.

Program.cs

In the program.cs class I changed the code to the following:

public class Program
{
    public static void Main(string[] args)
    {
        var host = BuildWebHost(args);

        using (var scope = host.Services.CreateScope())
        {
            var services = scope.ServiceProvider;
            try
            {
                var context = services.GetRequiredService<ApplicationDbContext>();
                var userManager = services.GetRequiredService<UserManager<ApplicationUser>>();
                var roleManager = services.GetRequiredService<RoleManager<IdentityRole>>();

                var dbInitializerLogger = services.GetRequiredService<ILogger<DbInitializer>>();
                DbInitializer.Initialize(context, userManager, roleManager, dbInitializerLogger).Wait();
            }
            catch (Exception ex)
            {
                var logger = services.GetRequiredService<ILogger<Program>>();
                logger.LogError(ex, "An error occurred while seeding the database.");
            }
        }

        host.Run();
    }

    public static IWebHost BuildWebHost(string[] args) =>
        WebHost.CreateDefaultBuilder(args)
            .UseStartup<Startup>()
            .Build();
}

This is almost the same code as the documentation but I also injected a RoleManager and UserManager so we can create the default user and role for the application. When the instances are created the Initialize method of the DbInitializer is called. This can be used to seed your database.

Because I want to know more information about my users than just their email and username, I extended the ApplicationUser object that is used to create a user in the database with the UserManaer.

// Add profile data for application users by adding properties to the ApplicationUser class
public class ApplicationUser : IdentityUser
{

    public ApplicationUser()
        : base()
    {
    }
   
    public ApplicationUser(string userName, string firstName, string lastName, DateTime birthDay)
        : base(userName)
    {
        base.Email = userName;

        this.FirstName = firstName;
        this.LastName = lastName;
        this.BirthDay = birthDay;

    }

    [Required]
    [StringLength(50)]
    public string FirstName { get; set; }

    [Required]
    [StringLength(50)]
    public string LastName { get; set; }

    [Required]
    [DataType(DataType.Date)]
    public DateTime BirthDay { get; set; }

    public string FullName => $"{this.FirstName} {this.LastName}";
}

I like constructors for new objects so I will use the long constructor to create my default user.

DbInitializer

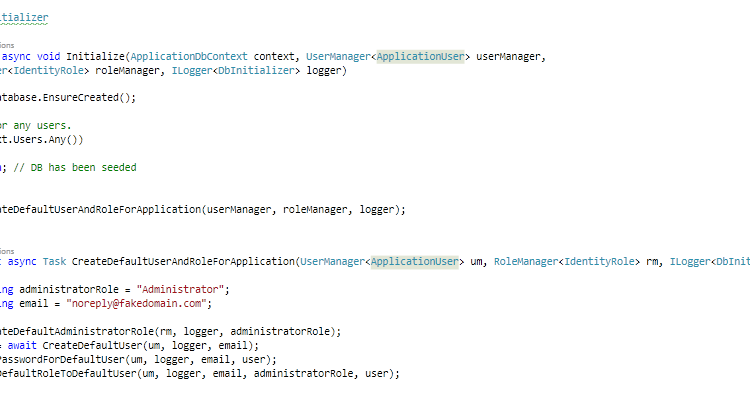
The DbInitializer is the class that is used to seed the database. It is created by the program class. It has a static method Initialize that will be used to pass the external dependencies. The Initialize method will be used to orchestrate all the actions.

public class DbInitializer
{
    public static async Task Initialize(ApplicationDbContext context, UserManager<ApplicationUser> userManager,
        RoleManager<IdentityRole> roleManager, ILogger<DbInitializer> logger)
    {
        context.Database.EnsureCreated();

        // Look for any users.
        if (context.Users.Any())
        {
            return; // DB has been seeded
        }

        await CreateDefaultUserAndRoleForApplication(userManager, roleManager, logger);
    }

    private static async Task CreateDefaultUserAndRoleForApplication(UserManager<ApplicationUser> um, RoleManager<IdentityRole> rm, ILogger<DbInitializer> logger)
    {
        const string administratorRole = "Administrator";
        const string email = "noreply@your-domain.com";

        await CreateDefaultAdministratorRole(rm, logger, administratorRole);
        var user = await CreateDefaultUser(um, logger, email);
        await SetPasswordForDefaultUser(um, logger, email, user);
        await AddDefaultRoleToDefaultUser(um, logger, email, administratorRole, user);
    }

    private static async Task CreateDefaultAdministratorRole(RoleManager<IdentityRole> rm, ILogger<DbInitializer> logger, string administratorRole)
    {
        logger.LogInformation($"Create the role `{administratorRole}` for application");
        var ir = await rm.CreateAsync(new IdentityRole(administratorRole));
        if (ir.Succeeded)
        {
            logger.LogDebug($"Created the role `{administratorRole}` successfully");
        }
        else
        {
            var exception = new ApplicationException($"Default role `{administratorRole}` cannot be created");
            logger.LogError(exception, GetIdentiryErrorsInCommaSeperatedList(ir));
            throw exception;
        }
    }

    private static async Task<ApplicationUser> CreateDefaultUser(UserManager<ApplicationUser> um, ILogger<DbInitializer> logger, string email)
    {
        logger.LogInformation($"Create default user with email `{email}` for application");
        var user = new ApplicationUser(email, "First", "Last", new DateTime(1970, 1, 1));

        var ir = await um.CreateAsync(user);
        if (ir.Succeeded)
        {
            logger.LogDebug($"Created default user `{email}` successfully");
        }
        else
        {
            var exception = new ApplicationException($"Default user `{email}` cannot be created");
            logger.LogError(exception, GetIdentiryErrorsInCommaSeperatedList(ir));
            throw exception;
        }

        var createdUser = await um.FindByEmailAsync(email);
        return createdUser;
    }

    private static async Task SetPasswordForDefaultUser(UserManager<ApplicationUser> um, ILogger<DbInitializer> logger, string email, ApplicationUser user)
    {
        logger.LogInformation($"Set password for default user `{email}`");
        const string password = "YourPassword01!";
        var ir = await um.AddPasswordAsync(user, password);
        if (ir.Succeeded)
        {
            logger.LogTrace($"Set password `{password}` for default user `{email}` successfully");
        }
        else
        {
            var exception = new ApplicationException($"Password for the user `{email}` cannot be set");
            logger.LogError(exception, GetIdentiryErrorsInCommaSeperatedList(ir));
            throw exception;
        }
    }

    private static async Task AddDefaultRoleToDefaultUser(UserManager<ApplicationUser> um, ILogger<DbInitializer> logger, string email, string administratorRole, ApplicationUser user)
    {
        logger.LogInformation($"Add default user `{email}` to role '{administratorRole}'");
        var ir = await um.AddToRoleAsync(user, administratorRole);
        if (ir.Succeeded)
        {
            logger.LogDebug($"Added the role '{administratorRole}' to default user `{email}` successfully");
        }
        else
        {
            var exception = new ApplicationException($"The role `{administratorRole}` cannot be set for the user `{email}`");
            logger.LogError(exception, GetIdentiryErrorsInCommaSeperatedList(ir));
            throw exception;
        }
    }

    private static string GetIdentiryErrorsInCommaSeperatedList(IdentityResult ir)
    {
        string errors = null;
        foreach (var identityError in ir.Errors)
        {
            errors += identityError.Description;
            errors += ", ";
        }
        return errors;
    }
}

First a new Administrator role is created. In my application this is the highest role a user can have. When the role is created, a new default user is created with the earlier provided constructor. After the user is created, the user needs a password to sign into the application. So a password is set. The last step is to connect the user to the Administrator role so he has all the permissions that he needs.

For logging, I use the default logging extension framework provided by dotnet core. I connected Serilog to the logging extension for better control.

Unit testing with xUnit in .NET Core

This post is about Unit testing with xUnit in .NET Core. The last few weeks I was working on a new  project in .NET Core. What I didn’t expected was that so many features weren’t documented or very bad documented. Many articles of Microsoft explained a different solution for the same result. I understand the framework is changing but the documentation should be changing as well then.

So I started unit testing with xUnit. I like the framework a lot so I hoped everything was working in the latest version of .NET Core. What I wanted to achieve was to create of course unit tests but also good integration in Visual Studio and TFS. That was not so easy as I hoped for. It took me a lot of searching and combining of solution to get everything working. Just because of the poor documentation. If you see the result to get this to work then it looks to easy.

First, which version of all the tools and Frameworks did I use:

  • Visual Studio 2017 Enterprise 15.2 (26430.12)
  • ReSharper 2017.1.2
  • dotnet version 1.0.4 (dotnet –version in command prompt)
  • Team Foundation Server 2017 Update 1

When I used the xUnit Nuget package I got with little effort the tests working in Visual Studio. But I wanted more. Because I’m CI/CD engineer, I wanted some automated builds in Team Foundation Server. So I created a new CI build for my project. I couldn’t get everything to work with the tasks that where in TFS so I used the command prompt task. I found this post from xUnit for testing in .NET Core that got me pointing in the right direction.

I installed the following Nuget packages in my project:

<ItemGroup>
  <PackageReference Include="Microsoft.NET.Test.Sdk" Version="15.0.0" />
  <PackageReference Include="xunit" Version="2.3.0-beta2-build3683" />
  <PackageReference Include="xunit.runner.visualstudio" Version="2.2.0" />
  <DotNetCliToolReference Include="dotnet-xunit" Version="2.3.0-beta2-build3683" />
</ItemGroup>

This gave me access to the new xunit CLI. I also installed the VS runner package so you could also run the unittests with the “Test Explorer” window in Visual Studio.

Now I could finish my CI Build definition. I removed all the tasks because in every combination that I tried I couldn’t get a part to work. I still wanted, to build the project, run the test, see the results back in Visual Studio and in TFS. As a bonus I wanted to see the Code Coverage of the tests in TFS as well.

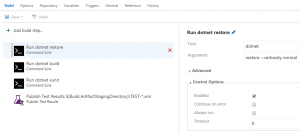
First restore all external dependencies:

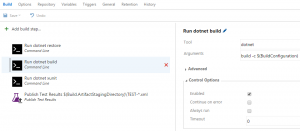
Then build the project:

Run the tests:


The trick is to use the right configuration and to export the result to an xml file. Place that file in the “$(Build.ArtifactStagingDirectory)” so we can use it in the next step. We already build the solution so add the “-nobuild” option.

Upload the test results:

The Code Coverage was not possible because that is still under development by Microsoft for the .NET Core framework. In the next version of Visual Studio will this be possible. You can already test it in the Visual Studio 2017 15.3 preview version. See this thread on Github for more information.

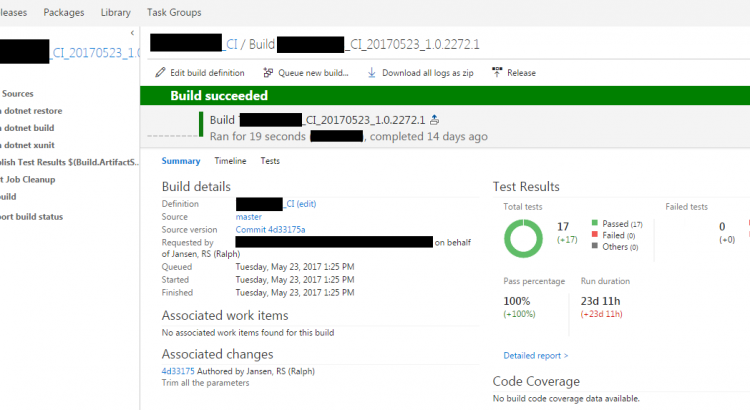
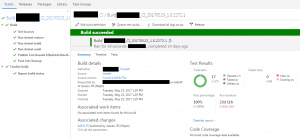
The result is:

Connect SoapUI to WCF service certificate authentication

Is it possible to connect SoapUI to WCF Service certificate authentication, the answer is yes! If you search on the internet, there is little information about this topic but it is really possible!

Adding security to your WCF service is a best practice. Not only when your creating services connected by the internet but also inside your company.

One way for securing your WCF service is adding certificates for authentication. But also signing your message is good way to preserve the integrity of your message. So to use a secure service we can enable transport and message security. See a list of common security scenarios with WCF for a good reference. In that way we can use SSL in IIS.

Service configuration

Add a service to your application with a WsHttpBinding. See for an example the following config:

<?xml version="1.0" encoding="utf-8" ?>
<system.serviceModel>
  <services>
    <service name="SampleService">
      <endpoint binding="wsHttpBinding" contract="ISampleService" bindingNamespace="http://your/binding/namespace"/>
    </service>
  </services>
  <behaviors>
    <serviceBehaviors>
      <behavior name="">
        <serviceMetadata httpsGetEnabled="true" />
        <serviceCredentials>
          <serviceCertificate findValue="YourThumbprint" storeName="My" storeLocation="LocalMachine" x509FindType="FindByThumbprint" />
          <clientCertificate>
            <certificate findValue="YourThumbprint" storeName="My" storeLocation="LocalMachine" x509FindType="FindByThumbprint" />
            <authentication certificateValidationMode="ChainTrust" revocationMode="NoCheck" />
            <!-- Check revocationMode for production -->
          </clientCertificate>
        </serviceCredentials>
        <serviceDebug includeExceptionDetailInFaults="true" />
      </behavior>
    </serviceBehaviors>
  </behaviors>
  <bindings>
    <wsHttpBinding>
      <binding maxReceivedMessageSize="10485760">
        <readerQuotas maxDepth="32" maxStringContentLength="2147483647" maxArrayLength="2147483647" maxBytesPerRead="4096" maxNameTableCharCount="16384" />
        <security mode="TransportWithMessageCredential">
          <message clientCredentialType="Certificate" algorithmSuite="Basic256Sha256Rsa15" negotiateServiceCredential="false" establishSecurityContext="false" />
        </security>
      </binding>
    </wsHttpBinding>
  </bindings>
  <serviceHostingEnvironment aspNetCompatibilityEnabled="true" multipleSiteBindingsEnabled="true" />
</system.serviceModel>

Client Configurations

Configuration .NET

Then use in your .NET client the following config. The assumption is that you already know how to add a service.

<?xml version="1.0" encoding="utf-8" ?>
<configuration>
  <system.serviceModel>
    <bindings>
      <wsHttpBinding>
        <binding name="WsHttpBinding_ISampleService">
          <security mode="TransportWithMessageCredential">
            <message clientCredentialType="Certificate" algorithmSuite="Basic256Sha256Rsa15"/>
          </security>
        </binding>
      </wsHttpBinding>
    </bindings>
    <behaviors>
      <endpointBehaviors>
        <behavior name="">
          <clientCredentials>
            <clientCertificate findValue="your thumbprint" storeName="My" storeLocation="LocalMachine" x509FindType="FindByThumbprint" />

            <serviceCertificate>
              <defaultCertificate findValue="your thumbprint" storeName="My" storeLocation="LocalMachine" x509FindType="FindByThumbprint" />
              <authentication certificateValidationMode="ChainTrust" revocationMode="NoCheck" /><!-- Check revocationMode for production -->
            </serviceCertificate>
          </clientCredentials>
        </behavior>
      </endpointBehaviors>
    </behaviors>
    <client>
      <endpoint address="https://url/SampleService.svc"
          binding="wsHttpBinding" bindingConfiguration="WsHttpBinding_ISampleService"
          contract="ISampleService" name="WsHttpBinding_ISampleService1">
        <identity>
          <dns value="IngHubServerTest"/>
        </identity>
      </endpoint>
    </client>
  </system.serviceModel>
</configuration>

Configuration SoapUI

If you want to connect to this service with SoapUI it is more difficult. I’m not a Java developer so I use SoapUI for an easier understanding of connecting to our WCF Service in a different language. For this example I use the curret latest version 5.3. See for an overview of WS-Security the following help page.

Follow the steps below for adding a new project to SoapUI with the right configuration.

Project configuration

  1. First of all create a new project and add the url to the wsdl. A new project is generated with a sample request for your service.
  2. Now double click the project or use right click of the mouse to open the “Project view”.
  3. Navigate to the “WS-Security Configurations” tab
  4. Select the “Keystores” tab and add the certificate with private key so we can sign the request.
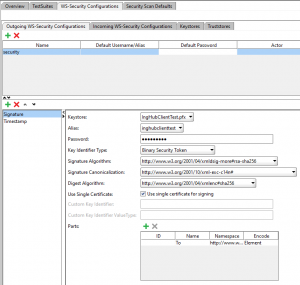
  5. Go to the “Outgoing WS-Security Configurations” and add a new configuration with the name that you like.
  6. Add in the newly created configuration a “Signature”.
  7. Configure the keystore that you’ve added.
  8. Use “Binary Security Token” as Key Identifier Type.
  9. Set the right Algorithms that you have configured in the service. I change the configuration to a higher security because the default uses SHA1 and that is not a best practice anymore. I changed the configuration in my WCF service to algorithmSuite=”Basic256Sha256Rsa15″ in the message element of the binding. See this page for more information. Then it uses RSA-SHA256 for signature algorithm, XML-EXC-C14n# for Signature Canonicalization and XMLENC#SHA256 for the Digest Algorithm.
  10. Check the “Use single certificate” checkbox.
  11. By default SoapUI signs the whole request but that isn’t the default by WCF so we have to set the parts that we want to sign. So add as Name “To”, Namespace “http://www.w3.org/2005/08/addressing” (this is my namespace but check yours) and set Encode to “Element”.
  12. Add a timestamp and set it to 300. Use milisecond precision.
  13. Check the order on the left. So first signature and then timestamp!

Request configuration

  1. Adjust the sample request body so it is a valid request.
  2. Go back to your request.
  3. Under the request open the “Auth” panel. Add Basic security. Leave everything blank except the “Outgoing WSS” configuration. Select the configuration that you have created.
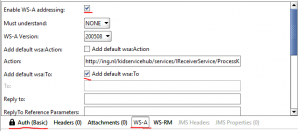
  4. Go to the WS-A panel and check  the “Enable WS-A addressing” checkbox.
  5. Finally the last thing that you have to do is check the checkbox “Add default wsa:To”. This in combination with the signature parts “To” configuration passes the right header values to the server. If you don’t do this you will get the following exception “The message received over Transport security has unsigned ‘To’ header”. See this StackOverflow post for simulair issue.

Hopefully this helped somebody. I spend to much time to this issue with SoapUI. Just to show that SoapUI works with a WCF soap service and high security configuration. The conclusion is that it works! It’s just soap… why wouldn’t…

Web API load testing with Visual Studio webtest

This is the first post about load testing with Visual Studio webtest. This series of posts is describing load testing on a Visual Studio Web API.

This first post is about setting up the Visual Studio webtest for the demo Web API project with Visual Studio 2015. We’re using the latest version of the .NET Framework so we can use all the latest cool stuff in our code.

Setup the project

  1. Create a new WebApi project and don’t forget to set the .NET Framework version to 4.6. Remember, I use the new Visual Studio 2015 RTM version.
  2. Create a new class library and call it “Extensions”.
  3. In the Extensions project, add a reference to “Microsoft.VisualStudio.QualityTools.WebTestFramework”. This project is for creating custom extension for Visual Studio webtests.
  4. Add again a new project. Choose a “Web Performance and Load test Project” project. I called mine “WebApiTest”.
  5. Add a reference from the test project to the Extensions project so we can use the extensions in the webtests.

So, the first thing is done. Setting up the project is the easy part. Now comes the testing part.

When you created the test project, a new empty webtest is created. We are now going to change the request so we can test it.

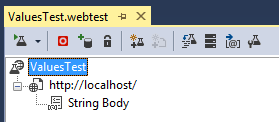
  1. Rename the webtest to ValuesTest because we are going to test the ValuesController of the Web Api project.
  2. Right click your ValuesTest and add a “Web Service Request”. Change the url to “http://localhost:26159/api/values” (your portnumber can be different).
  3. Change the method from POST to GET.
  4. Run your test and you will get a 401 unauthorized request back.
  5. Remove the Authorize attribute on the ValuesController
  6. Run the webtest again and now you will get a status 200 with as response “Binary Data”. This is off course your JSON response message.

Now we have to validate your response message because we don’t know if your test is sending the correct message.

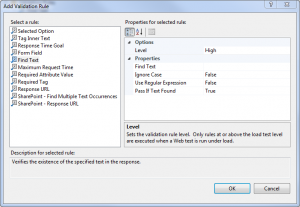
  1. Right click your web request and select “Add Validation Rule”.
  2. A window appears. Select the “Find text” validation rule.
    Webstest add validation rule
  3. Enter in the “Find text” property the value “value3”.
  4. Run your test and your test will fail on the validation rule.
    Find text validation rule value3 failed
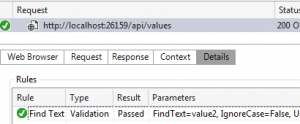
  5. Change the “Find text” property to “value2”.
  6. Run the test again and now your test will be valid.
    Find text validation rule value2 passed

Ok. The foundation is done for the testing part. We have a test project and a source project that must be validated. The extensions part isn’t used yet. This will be done in the next part. In that part we are going to create a more detailed ValidationRule that really understand JSON reponses. Then we don’t have to “find text” in the reponse but we can search for a property that we want to validate.

Create custom code analysis rules in Visual Studio 2013

This blog explains how to create custom code analysis rules in Visual Studio 2013 and how to debug them in Visual Studio 2013.

Create a custom code analysis rule

Start with creating a new class library. Rename the generated ‘Class1’ to ‘BaseRule’.
Add references in your class library to:

  • FxCopSdk
    C:\Program Files (x86)\Microsoft Visual Studio 12.0\Team Tools\Static Analysis Tools\FxCop\\FxCopSdk.dll
  • Microsoft.Cci
    C:\Program Files (x86)\Microsoft Visual Studio 12.0\Team Tools\Static Analysis Tools\FxCop\\Microsoft.Cci.dll
  • Microsoft.VisualStudio.CodeAnalysis
    C:\Program Files (x86)\Microsoft Visual Studio 12.0\Team Tools\Static Analysis Tools\FxCop\\Microsoft.VisualStudio.CodeAnalysis.dll

In the BaseRule class we have to identify how the rules are named and where they could be found. To do this change the code in the BaseRule class.

using Microsoft.FxCop.Sdk;

namespace CustomCodeAnalysisRules
{
	public abstract class BaseRule : BaseIntrospectionRule
	{
		protected BaseRule(string name)
			: base(

				// The name of the rule (must match exactly to an entry
				// in the manifest XML)
				name,

				// The name of the manifest XML file, qualified with the
				// namespace and missing the extension
				typeof(BaseRule).Assembly.GetName().Name + ".Rules",

				// The assembly to find the manifest XML in
				typeof(BaseRule).Assembly)
		{

		}
	}
}

Now we have the framework for our new custom code analysis rules. In this example we are creating a custom rule that says that fields are not allowed. We are creating this rule because our team doesn’t want any fields in Data Transfer Objects (DTO).

We name the custom rule ‘NoFieldsAllowed’, so create a class with the name ‘NoFieldsAllowed’. The rule is inherit from our BaseRule so we can give the name of the rule to the base class.

using Microsoft.FxCop.Sdk;

namespace CustomCodeAnalysisRules
{
	internal sealed class NoFieldsAllowed : BaseRule
	{

		public NoFieldsAllowed()
			: base("NoFieldsAllowed")
		{

		}
	}
}

Next we have to say for which type of access modifiers the rule is made for. We can do this be overriding the ‘TargetVisibility’ property. We want to make this rule for all access modifiers so we have to use ‘TargetVisibilities.All’.

// TargetVisibilities 'All' will give you rule violations about public, internal, protected and private access modifiers.
public override TargetVisibilities TargetVisibility
{
	get
	{
		return TargetVisibilities.All;
	}
}

The setup for the rule is complete so we can write the implementation. Override the ‘Check’ method for a ‘Member’. Cast the member that you get as parameter to a ‘Field’. Check if the Field is ‘null’. If so, the check is not for this member.

public override ProblemCollection Check(Member member)
{
	Field field = member as Field;
	if (field == null)
	{
		// This rule only applies to fields.
		// Return a null ProblemCollection so no violations are reported for this member.
		return null;
	}
}

If this member is a field we have to create a ‘Problem’ and a ‘Resolution’. To create a resolution you must create a ‘Rules.xml’ file in your project.

<?xml version="1.0" encoding="utf-8" ?>
<Rules FriendlyName="My Custom Rules">
	<Rule TypeName="NoFieldsAllowed" Category="CustomRules.DTO" CheckId="CR1011">
		<Name>No Fields allowed</Name>
		<Description>Check if fields are used in a class.</Description>
		<Resolution>Field {0} is not allowed. Field must be removed from this class.</Resolution>
		<MessageLevel Certainty="100">Warning</MessageLevel>
		<FixCategories>NonBreaking</FixCategories>
		<Url />
		<Owner />
		<Email />
	</Rule>
</Rules>

You can add the following information to the ‘Resolution’:

  • Display name of the rule.
  • Rule description.
  • One or more rule resolutions.
  • The MessageLevel (severity) of the rule. This can be set to one of the following:
    • CriticalError
    • Error
    • CriticalWarning
    • Warning
    • Information
  • The certainty of the violation. This field represents the accuracy percentage of the rule. In other words this field describes the rule author’s confidence in how accurate this rule is.
  • The FixCategory of this rule. This field describes if fixing this rule would require a breaking change, ie a change that could break other assemblies referencing the one being analyzed.
  • The help url for this rule.
  • The name of the owner of this rule.
  • The support email to contact about this rule.

Now we have the information to show as a Resolution. We only have to show it to the user in Visual Studio. So expand the ‘Check’ method by creating a ‘Resolution’ and add it to the ‘Problems’ list of the base class.

public override ProblemCollection Check(Member member)
{
	Field field = member as Field;
	if (field == null)
	{
		// This rule only applies to fields.
		// Return a null ProblemCollection so no violations are reported for this member.
		return null;
	}

	Resolution resolution = GetResolution(
		  field  // Field {0} is not allowed. Field must be removed from this class.
		  );
	Problem problem = new Problem(resolution);
	Problems.Add(problem);

	// By default the Problems collection is empty so no violations will be reported
	// unless CheckFieldName found and added a problem.
	return Problems;
}

Test your Custom code analysis rule

To test your custom rule we can add some fields to your custom rule class. So add under the ‘Check’ method the following fields.

private string testField1 = "This should give an error!!!";
private const string testFieldconst1 = "This should give an error!!!";
protected string testField2 = "This should give an error!!!";
internal string testField3 = "This should give an error!!!";
public string testField4 = "This should give an error!!!";
public const string testFieldconst4 = "This should give an error!!!";

To test this we are going to change the “Start Action” of your class library. Open the properties of your class library and navigate to the ‘Debug’ tab.

Change the ‘Start Action’ to ‘Start external program’. Use as external program ‘FxCopCmd.exe’ from your Visual Studio directory. For me it is: ‘C:\Program Files (x86)\Microsoft Visual Studio 12.0\Team Tools\Static Analysis Tools\FxCop\FxCopCmd.exe’.

Use as Command line arguments: ‘/out:”results.xml” /file:”WebCommBack.CustomCodeAnalysisRules.dll” /rule:”WebCommBack.CustomCodeAnalysisRules.dll” /D:”C:\Program Files (x86)\Microsoft Visual Studio 12.0\Team Tools\Static Analysis Tools\FxCop”‘.

Use as working directory your debug folder in the bin folder of this class library.

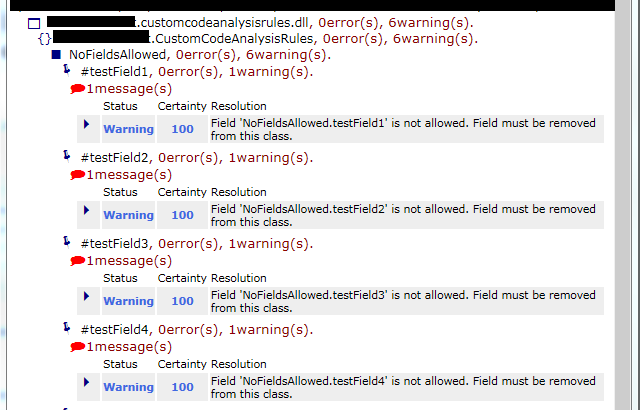
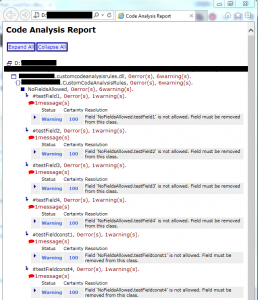
Now run your application with Debug. You will see a command prompt showing up. This will check your fields with your rules. The outcome of the test will be written in your debug folder. There you will find a ‘results.xml’ file. If you open it in ‘Internet Explorer’ you will see the information. Of course you can open it in every xml tool.

Code Analysis test results

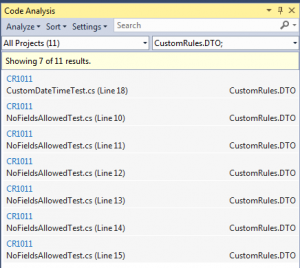
If your test is what you’ve expected, you can use your custom code analysis dll in your ruleset for your application. See here the outcome an application that uses the custom dll.

Code Analysis application results

Best Visual Studio extensions and applications

The list of tools beneath are tools that I use every day! Some are extensions for Team Foundation Server but also extensions for Visual Studio, awesome Nuget packages or general tools.
It are the best Visual Studio extension and applications that I could find.

Visual Studio Extensions

  1. EnterpriseLibrary.Config
    This is a handy tool for your Enterprise Library packages. With this tool you can edit your config with an interface.
  2. GhostDoc
    I use the free version of this but you also have a payed version of this.  With this tool you can generate your summaries above your code. It will also generate documentation for parameters, properties, field, methods etc.
  3. NuGet Package Manager
    I think there is no explanation needed for this…
  4. Target Framework Migrator
    With this extension, you can change all (if you want) your projects to a specific version of the .NET Framework with just one click.
  5. Team Foundation Server Power Tools
    Extra handy things for getting some information out of your TFS server.
  6. Web Essentials
    Handy tools for developing web applications. This allows you to minify and bundle your Javascript code and gives you other things like intellisence for extra languages in Visual Studio.
  7. Wix Toolset
    There is no MSI installer anymore in Visual Studio 2012. You can still use Wix to create your MSI installers.
  8. Recent workitems
    Show a list of last 5 associated workitems in your pending changes window
  9. Last workitem
    Select your last associated workitem
  10. AutoMerge
    AutoMerge your changeset over branches in TFS.
  11. Code Review Checkin policy
    A checkin policy for checking you have requested a code review.
  12. DevExpress CodeRush
    Faster coding and shortcuts in Visual Studio
  13. My History
    Your last history items like workitems or changesets
  14. Sandcastle
    Help file generator for your code.

Applications

  1. TFS Team Project Manager
    Manage your TFS team projects.

NuGet packages

  1. StyleCop
    Create defaults for your team about documentation and code formats.
  2. StyleCop Checkin Policy
    My own checkin policy for validating your StyleCop rules.
  3. Ninject
    Very easy dependency container for fast building applications.
  4. CuttingEdge.Conditions
    Small syntax for creating validation of your objects.
  5. NBuilder
    Generate test data based on your own POCO class.
  6. AutoMapper
    Map your classes from type A to B with just own line of code.

MVC localization validation

This is not the first time that I write about mvc localization validation. The last time that I wrote about this was back in 2012 when I wrote the blog “Localization validation in MVC“. This blog post helped a lot of people with this question on StackOverflow.

In this blog post I create a website with localization for English and Dutch. I will use a DateTime as an example property to display and edit this property for validating the localization. This because the Dutch localization is dd-MM-yyyy and in English we have MM\dd\yyyy.

Technology used

Now I want to write a new post that uses all the latest technology in the MVC world at this moment. At this moment the latest version of Visual Studio is Visual Studio 2013 Update 3. The latest version of MVC is: 5.2.2. This is also the version that we use in combination with .NET Framework 4.5.1.

Setup MVC localization validation

New project

Create a new MVC 5 ASP.NET Web Application in Visual Studio with the use of the .NET Framework 4.5.1. When it is created, update all your Nuget packages about MVC.

Web.config

Some people say that you have to alter the web.config to use localization. This is true when you create a website for a particular localization. In this tutorial I want to create a website that is compatible with multiple cultures from all over the world. Of course you can create a website in English but some people prefer their own language. In this tutorial I will create a website in English and Dutch (I’m from the Netherlands).

So we don’t edit the web.config. We don’t set any culture or UI culture in the web.config. In that way, the default culture is the culture of the pc or (if set) the culture of the browser.

Culture selector

The user should be able to overwrite the default culture from his browser or pc. Maybe the user wants to use another culture than his default culture for your website. So we create some code to create a list with the cultures that you have setup to support in your website.

Code for creating the list of cultures and select a culture different to your browser culture. Add this code in your “_Layout” page in example your menu or footer:

@{
	System.Globalization.CultureInfo currentCulture;
	var supportedCultures = Website.Helpers.CultureHelper.GetSwitchCultures(out currentCulture);
	string currentCultureDisplayName = currentCulture.Parent.NativeName;
}

	<ul>
		@foreach (var culture in supportedCultures)
		{
            string url = Url.Action("SetPreferredCulture", "Culture", new { culture = culture.Name, returnUrl = Request.RawUrl });
            string urlName = culture.Parent.NativeName;
            
			if (culture.Name == currentCulture.Name)
			{
				<li class="active"><a href="@url">@urlName <i class="fa fa-check"></i></a></li>
            }
            else
            {
                <li><a href="@url">@urlName</a></li>
            }
		}
	</ul>

Create a static class called CultureHelper and past the following code:

using System;
using System.Collections.Generic;
using System.Collections.Specialized;
using System.Diagnostics;
using System.Globalization;
using System.Linq;
using System.Threading;
using System.Web;

namespace Website.Helpers
{
	/// <summary>
	/// Set the culture of the user for the rest of the application. The culture can be overridden by the user. 
	/// If it is overridden a cookie is set with the selected culture. For testing don't forget to remove the cookie for selecting the default browser language again.
	/// </summary>
	public static class CultureHelper
	{

		#region Constants

		/// <summary>
		/// The cookie name of the selected culture. By default there isn't any cookie but only the culture of the browser. 
		/// If the user selects a specific culture, the cookie is added.
		/// </summary>
		const string CookieName = "PreferredCulture";

		#endregion

		#region Fields

		/// <summary>
		/// The supported cultures of this application. If a new localization file is added to the application, the cultureinfo must be added as well.
		/// </summary>
		public static readonly CultureInfo[] SupportedCultures = new CultureInfo[] 
		{ 
			CultureInfo.GetCultureInfo("en-US"), 
			CultureInfo.GetCultureInfo("nl-NL"),
			//CultureInfo.GetCultureInfo("de-DE"), 
			//CultureInfo.GetCultureInfo("fr-FR"), 
			//CultureInfo.GetCultureInfo("es-ES"), 
		};

		#endregion

		#region Public Methods

		public static void ApplyUserCulture(this HttpRequest request)
		{
			ApplyUserCulture(request.Headers, request.Cookies);
		}

		public static CultureInfo GetMatch(CultureInfo[] acceptedCultures, CultureInfo[] supportedCultures, Func<CultureInfo, CultureInfo, bool> predicate)
		{
			foreach (var acceptedCulture in acceptedCultures)
			{
				var match = supportedCultures
					.Where(supportedCulture => predicate(acceptedCulture, supportedCulture))
					.FirstOrDefault();

				if (match != null)
				{
					return match;
				}
			}

			return null;
		}

		public static CultureInfo GetMatchingCulture(CultureInfo[] acceptedCultures, CultureInfo[] supportedCultures)
		{
			return
				// first pass: exact matches as well as requested neutral matching supported region 
				// supported: en-US, de-DE 
				// requested: de, en-US;q=0.8 
				// => de-DE! (de has precendence over en-US) 
				GetMatch(acceptedCultures, supportedCultures, MatchesCompletely)
				// second pass: look for requested neutral matching supported _neutral_ region 
				// supported: en-US, de-DE 
				// requested: de-AT, en-GB;q=0.8 
				// => de-DE! (no exact match, but de-AT has better fit than en-GB) 
				?? GetMatch(acceptedCultures, supportedCultures, MatchesPartly);
		}

		public static void GetSwitchCultures(out CultureInfo currentCulture, out CultureInfo nextCulture)
		{
			currentCulture = Thread.CurrentThread.CurrentUICulture;
			var currentIndex = Array.IndexOf(SupportedCultures.Select(ci => ci.Name).ToArray(), currentCulture.Name);
			int nextIndex = (currentIndex + 1) % SupportedCultures.Length;
			nextCulture = SupportedCultures[nextIndex];
		}

		public static CultureInfo[] GetSwitchCultures(out CultureInfo currentCulture)
		{
			currentCulture = Thread.CurrentThread.CurrentUICulture;

			return SupportedCultures;
		}

		public static CultureInfo GetUserCulture(NameValueCollection headers)
		{
			var acceptedCultures = GetUserCultures(headers["Accept-Language"]);
			var culture = GetMatchingCulture(acceptedCultures, SupportedCultures);

			return culture;
		}

		public static CultureInfo[] GetUserCultures(string acceptLanguage)
		{
			// Accept-Language: fr-FR , en;q=0.8 , en-us;q=0.5 , de;q=0.3 
			if (string.IsNullOrWhiteSpace(acceptLanguage))
				return new CultureInfo[] { };

			var cultures = acceptLanguage
				.Split(',')
				.Select(s => WeightedLanguage.Parse(s))
				.OrderByDescending(w => w.Weight)
				 .Select(w => GetCultureInfo(w.Language))
				 .Where(ci => ci != null)
				 .ToArray();

			return cultures;
		}

		public static void SetPreferredCulture(this HttpResponseBase response, string cultureName)
		{
			SetPreferredCulture(response.Cookies, cultureName);
		}

		#endregion

		#region Private Methods

		private static void ApplyUserCulture(NameValueCollection headers, HttpCookieCollection cookies)
		{
			var culture = GetPreferredCulture(cookies)
				?? GetUserCulture(headers)
				?? SupportedCultures[0];

			var t = Thread.CurrentThread;
			t.CurrentCulture = culture;
			t.CurrentUICulture = culture;

			Debug.WriteLine("Culture: " + culture.Name);
		}

		private static CultureInfo GetCultureInfo(string language)
		{
			try
			{
				return CultureInfo.GetCultureInfo(language);
			}
			catch (CultureNotFoundException)
			{
				return null;
			}
		}

		private static CultureInfo GetPreferredCulture(HttpCookieCollection cookies)
		{
			var cookie = cookies[CookieName];
			if (cookie == null)
				return null;

			var culture = GetCultureInfo((string)cookie.Value);
			if (culture == null)
				return null;

			if (!SupportedCultures.Where(ci => ci.Name == culture.Name).Any())
				return null;

			return culture;
		}

		private static bool MatchesCompletely(CultureInfo acceptedCulture, CultureInfo supportedCulture)
		{
			if (supportedCulture.Name == acceptedCulture.Name)
			{
				return true;
			}

			// acceptedCulture could be neutral and supportedCulture specific, but this is still a match (de matches de-DE, de-AT, …) 
			if (acceptedCulture.IsNeutralCulture)
			{
				if (supportedCulture.Parent.Name == acceptedCulture.Name)
				{
					return true;
				}
			}

			return false;
		}

		private static bool MatchesPartly(CultureInfo acceptedCulture, CultureInfo supportedCulture)
		{
			supportedCulture = supportedCulture.Parent;
			if (!acceptedCulture.IsNeutralCulture)
			{
				acceptedCulture = acceptedCulture.Parent;
			}

			if (supportedCulture.Name == acceptedCulture.Name)
			{
				return true;
			}

			return false;
		}

		private static void SetPreferredCulture(HttpCookieCollection cookies, string cultureName)
		{
			var cookie = new HttpCookie(CookieName, cultureName)
			{
				Expires = DateTime.Now.AddDays(30)
			};

			cookies.Set(cookie);

			Debug.WriteLine("SetPreferredCulture: " + cultureName);
		}

		#endregion

	}

	[DebuggerDisplay("Language = {Language} Weight = {Weight}")]
	internal class WeightedLanguage
	{
		public string Language { get; set; }

		public double Weight { get; set; }

		public static WeightedLanguage Parse(string weightedLanguageString)
		{
			// de 
			// en;q=0.8 
			var parts = weightedLanguageString.Split(';');
			var result = new WeightedLanguage { Language = parts[0].Trim(), Weight = 1.0 };

			if (parts.Length > 1)
			{
				parts[1] = parts[1].Replace("q=", "").Trim();
				double d;
				if (double.TryParse(parts[1], NumberStyles.AllowDecimalPoint, CultureInfo.InvariantCulture, out d))
					result.Weight = d;
			}

			return result;
		}
	}
}

The “SupportedCultures” field contains the list of supported cultures for your website.

We must also make the Culture of the client available in your project. You have to do this in every request. So go to your Global.asax and add the following event:

/// <summary>
/// Fire on each request.
/// </summary>
protected void Application_OnBeginRequest()
{
    // Get the culture of the client
    CultureHelper.ApplyUserCulture(Request);
}

Create a new CultureController in your project and paste the following code:

using System;
using System.Collections.Generic;
using System.Linq;
using System.Web.Mvc;
using Website.Helpers;

namespace Website.Controllers
{
    public class CultureController : Controller
    {
		// GET: /SetPreferredCulture/de-DE 
		[AllowAnonymous]
		public ActionResult SetPreferredCulture(string culture, string returnUrl)
		{
			Response.SetPreferredCulture(culture);
			
			if (string.IsNullOrEmpty(returnUrl))
				return RedirectToAction("Index", "Home");

			return Redirect(returnUrl);
		}
				
    }
}

Add a new route above the default route in your RouteConfig.cs.

// Set culture route
routes.MapRoute(
    name: "SetPreferredCulture",
    url: "SetPreferredCulture/{culture}",
    defaults: new { controller = "Culture", action = "SetPreferredCulture", culture = UrlParameter.Optional }
);

Create a folder in the root of your project called “Localizations”. Add a Resource file called “Labels.resx” in that folder. This is your English resource file so the default language is the English language. Set the Access Modifier to Public. Copy the Labels resource file for the other languages. For Dutch is this: Labels.nl-NL.resx. So when the user switches from culture or the browser has another culture set, the right resource file is automatically chosen.

DateTime Example

Now we have the right culture of the user, we need an example so we can prove it actually works. So we create an object with a DateTime property. In that way we can display and edit that property in the different cultures. Remember that the Dutch language has a different date format than the English language.

Because all the browser are displaying date textboxes different, we create our own until the HTML 5 specification is finally done. Also, the older browsers don’t support HTML 5 so we must create our own textbox with jQuery UI datepicker.

To do this, we create a new EditorTemplate. If you never done this before, don’t worry it is very easy. Create a new folder called “EditorTemplates” in your “Shared” folder in the “Views” folder. In the EditorTemplates folder, create a new view called “Date”.

Now when a Date field is used for editing, the editortemplate is automatically used. Paste the following code in the Date editortemplate.

@model DateTime?

@if (Model.HasValue)
{
    @Html.TextBox("", Model.Value.ToShortDateString(), new { @class = "date form-control" })
}
else
{
    @Html.TextBox("", Model, new { @class = "date form-control" })
}

Initialize the Datepicker

Now we have created an editor for editing, the jQuery datepicker should be created. Because we also create the datepicker for a specific culture, the right language file of the jQuery datepicker should be selected as well. You can find the url of the language file in the documentation/source code from the jQuery datepicker documentation page.

Add the following code in the _Layout page just after setting up jQuery and jQuery UI.

@if (!string.IsNullOrWhiteSpace(UICulture))
{
	string shortCulture = UICulture.Substring(0, 2);
	if (shortCulture != "en")
	{
		// Only set culture script if it isn't en because en is the default
		string url = string.Format("/Scripts/datepicker-{0}.js", shortCulture);
		<script src="@url"></script>
	}
}

This code finds the right language file and add it to the page for the current (selected) culture.

<script type="text/javascript">
	$(document).ready(function () {
		$('.date').datepicker({
			showOtherMonths: true,
			selectOtherMonths: true,
			changeMonth: true,
			changeYear: true,
			numberOfMonths: 1,
			showButtonPanel: true
		});
	});
</script>

This code creates the datepicker in the right culture.

Test the editor

To test the editor, create an object with a DateTime property. See the following example for the class “Member”:

public class Member
{
    [Key]
    public int Id { get; set; }
		
    [Display(Name = "Voornaam")]
    [Required]
    [StringLength(50)]
    public string FirstName { get; set; }

    [Display(Name = "Achternaam")]
    [Required]
    [StringLength(50)]
    public string LastName { get; set; }
        
    [Display(Name = "Geboortedatum")]
    [Required]
    [DataType(DataType.Date)]
    public DateTime BirthDay { get; set; }
}

The EditorTemplate is selected because we have used the “DataType” attribute with the “DataType.Date” value. You could also use the “UIHint” attribute.

If you generate (scaffold) a new Edit or Create view, change the code for the Birthday property to:

<div class="form-group">
    @Html.LabelFor(model => model.BirthDay, new { @class = "control-label col-md-2" })
    <div class="col-md-10">
        @Html.EditorFor(model => model.BirthDay, new { htmlAttributes = new { @class = "form-control" }, })
        @Html.ValidationMessageFor(model => model.BirthDay)
    </div>
</div>

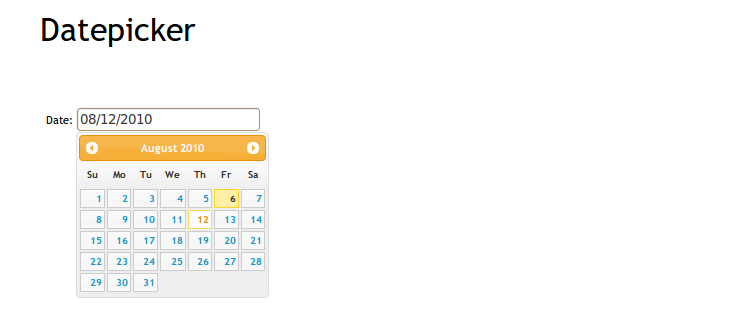
Now run your project and try to edit or create a member object. You now should see a textbox with a jQuery UI datepicker inside. When you select a date from the datepicker, the format of the date should be the format of the culture you requested. Also the validation should be right for the Culture you have selected.

Conclusion

Now you have a culture independent website with a jQuery datepicker in the culture that the user wants. You can upload this website to every server you want. You don’t have to set any culture on the server because this solution is culture independent. This is easy for me in the Netherlands because now I can create a Dutch website that I can upload to Microsoft Azure (in azure you have en-US culture) without any problems.