Trigger a CI build after a gated checkin

We want to trigger a CI build after a gated checkin because we have two builds in our company. One with a gated checkin for fast building and very important test. The other build is for code analysis and long running tests. Because we don’t want to wait very long on our CI build we have created that QM build. The problem is that the QM isn’t triggered anymore after changing the CI build to a Gated checkin build.

I found a blogpost for TFS 2010. Because TFS 2013 is slightly different, I thought I would give it an update.

This is how to fix it for TFS 2013

  1. Create an argument called “NoCIOption” of the type boolean with default True.
    CreateDisableCiArgument
  2. Set the metadata information so you understand the argument in your build definition.
    MetadataDisableCiBuild
  3. Use the argument in the TFS 2013 build template. You can find the property under “Run on agent” and then “Get sources from Team Foundation Version Control”. Go to the properties window and change the hard coded “True” in the NoCIOption property to the argument you just created.
    SetDisableCiArgument

Now checkin your changes of the teamplate and use (if you don’t already have) the template in your CI build (the one with the gated checkin). Change the new argument to “false”.

Now your second build (our QM) is also triggered again.

Add image to sandcastle

I wanted to know how to add image to sandcastle. The documentation of sandcastle is long but I didn’t found a good sample of how to add an image to the welcome page.

I use Sandcastle Help File Builder to generate documentation for my applications. I also have a nice welcome page called “Welcome.aml”.

In the welcome page I have a section of the architecture of the application. I wanted to add an image of the architecture schema. The problem was that I didn’t found anywhere how to do this. The problem was that I didn’t use the id of the image but the name of the image. The solution was just to just use the id.

The solution

So to add an image from the “Media” folder into a new section:

<section>
	<title>Architectuur</title>
	<content>
		<mediaLink>
			<caption>Architectuurschema</caption>
			<image placement="center" xlink:href="Architectuurschema"/>
		</mediaLink>				
	</content>
</section>


Download files from TFS server with PowerShell

If you want to download files from TFS with PowerShell, you will need to write a script that can access the TFS Server and access the folder on your drive.

This script uses a server path in the TFS server and download some files under that server path to the drop folder of your build. If you don’t use a build, you can change then environment variables. This script is created because of an original question on StackOverflow.

# The deploy directory for all the msi, zip etc.
$AutoDeployDir = "Your TFS Directory Server Path"
$deployDirectory = $($Env:TF_BUILD_DROPLOCATION + "\Deploy\" + $Env:TF_BUILD_BUILDNUMBER)

# Add TFS 2013 dlls so we can download some files
Add-Type -AssemblyName 'Microsoft.TeamFoundation.Client, Version=12.0.0.0, Culture=neutral, PublicKeyToken=b03f5f7f11d50a3a'
Add-Type -AssemblyName 'Microsoft.TeamFoundation.VersionControl.Client, Version=12.0.0.0, Culture=neutral, PublicKeyToken=b03f5f7f11d50a3a'
$tfsCollectionUrl = 'http://YourServer:8080/tfs/YourCollection' 
$tfsCollection = New-Object -TypeName Microsoft.TeamFoundation.Client.TfsTeamProjectCollection -ArgumentList $tfsCollectionUrl
$tfsVersionControl = $tfsCollection.GetService([Microsoft.TeamFoundation.VersionControl.Client.VersionControlServer])

# Register PowerShell commands
Add-PSSnapin Microsoft.TeamFoundation.PowerShell

# Get all directories and files in the AutoDeploy directory
$items = Get-TfsChildItem $AutoDeployDir -Recurse

# Download each item to a specific destination
foreach ($item in $items) {
    # Serverpath of the item
    Write-Host "TFS item to download:" $($item.ServerItem) -ForegroundColor Blue

    $destinationPath = $item.ServerItem.Replace($AutoDeployDir, $deployDirectory)
    Write-Host "Download to" $([IO.Path]::GetFullPath($destinationPath)) -ForegroundColor Blue

    if ($item.ItemType -eq "Folder") {
        New-Item $([IO.Path]::GetFullPath($destinationPath)) -ItemType Directory -Force
    }
    else {
        # Download the file (not folder) to destination directory
        $tfsVersionControl.DownloadFile($item.ServerItem, $([IO.Path]::GetFullPath($destinationPath)))
    }
}


TFS Power tools 2013 update 2 are released

The TFS Power tools 2013 update 2 are released a few days ago. Strange that there isn’t any notification in your Visual Studio 2013 environment. This update gives you better support for the new features in TFS 2013 Update 2.

You first have to uninstall the old version before installing the new version. If you want PowerShell support, you have to choose the custom installer in the wizard.

Download

You can download the update in the Visual Studio gallery by following this link:
http://visualstudiogallery.msdn.microsoft.com/f017b10c-02b4-4d6d-9845-58a06545627f

TFS delete build definition timeout

When you do a tfs delete on a build definition and you receive a timeout, you probably have to many builds in your TFS server. Even if you delete all the build for your build definition, tfs still stores all the builds in your TFS Server. Just like your TFS Team projects, you have to delete and then destroy the builds. After that, you could delete the build definition completely.

The only way to do this is, is to delete and destroy the builds in pieces. You can only do that by the command prompt.

I created a PowerShell script that loops through the builds for a specific build definition and deletes all the builds before a specific date. So if your build is maybe a year old, you could start the script a year back from now and loop through all the builds until let’s say two months ago. You could skip the number of days you want. I set the days to skip to 15 because I have a lot of builds each month and otherwise the TFS server has trouble to delete the bigger chunks.

$TfsCollectionUrl = "http://YourTfsServer:8080/tfs/YourTeamCollection"
$teamProject = "YourTeamProject"
$BuildDefinition = "YourTeamBuildDefinitionName"

Function CountForward {
    Param([datetime]$startDate,[int]$daysToSkip,[datetime]$endDate)

    Write-Host "Count forward from:" $startDate.ToString("yyyy-MM-dd") -foregroundcolor "magenta"
    Write-Host "Count forward until:" $endDate.ToString("yyyy-MM-dd")-foregroundcolor "magenta"
    Write-Host "Count every" $daysToSkip "day(s)" -foregroundcolor "magenta"

    while ($startDate -le $endDate) {
        $BuildDefinitionFull = $teamProject + "\" + $BuildDefinition
        $dateToQuery = $startDate.ToString("yyyy-MM-dd")

        Write-Host "Delete and destroy Builds before" $startDate.ToString("yyyy-MM-dd") "for build definition" $BuildDefinitionFull -foregroundcolor "magenta"
        
        tfsbuild.exe delete /server:$TfsCollectionUrl /builddefinition:"$BuildDefinitionFull" /daterange:~$dateToQuery /deleteoptions:All /noprompt /silent
        tfsbuild.exe destroy /server:$TfsCollectionUrl /builddefinition:"$BuildDefinitionFull" /daterange:~$dateToQuery /noprompt /silent
        
        $startDate = $startDate.AddDays($daysToSkip)
    }
}
CountForward -startDate (get-Date).AddDays(-300) -daysToSkip 15 -endDate (get-Date).AddDays(-60)

Save the PowerShell file as “DeleteBuildDefinition.ps1” and execute it in your Visual Studio command prompt. You can execute the PowerShell file in your VS command prompt with the following command:

PowerShell -Command "& {D:\DeleteBuildDefinition.ps1}"

tfs delete build definition timeout

Looping in PowerShell forward and backwards through days

I was searching for a way for looping in PowerShell forward and backwards through days every 15 days. So I thought I would share it with you guys.

I have two different samples. Both samples have the option to specify the number of the days to skip in each loop.

The first one is counting back in days until a specific day and the second is counting forward.

Countback

Function CountBack {
    Param([datetime]$startDate,[int]$daysToSkip,[datetime]$endDate)

    Write-Host "Count back from:" $startDate.ToString("yyyy-MM-dd")    
    Write-Host "Count back until:" $endDate.ToString("yyyy-MM-dd")
    Write-Host "Count every" $daysToSkip "day(s)"

    while ($startDate -ge $endDate) {
        Write-Host $startDate.ToString("yyyy-MM-dd")

        # Execute your code here
        
        $startDate = $startDate.AddDays(-$daysToSkip)
    }
}

Execute the command with:

CountBack -startDate (get-Date).AddDays(-12) -daysToSkip 15 -endDate (get-Date).AddDays(-100)

Countforward

Function CountForward {
    Param([datetime]$startDate,[int]$daysToSkip,[datetime]$endDate)

    Write-Host "Count forward from:" $startDate.ToString("yyyy-MM-dd")    
    Write-Host "Count forward until:" $endDate.ToString("yyyy-MM-dd")
    Write-Host "Count every" $daysToSkip "day(s)"

    while ($startDate -le $endDate) {
        Write-Host $startDate.ToString("yyyy-MM-dd")

        # Execute your code here
        
        $startDate = $startDate.AddDays($daysToSkip)
    }
}

Execute the command with:

CountForward -startDate (get-Date).AddDays(-300) -daysToSkip 15 -endDate (get-Date).AddDays(-40)

Custom domain url in IIS Express with Visual Studio 2013

If your creating a web application in Visual Studio 2013 (VS2013) and run it, your site is hosted in IIS express. Your url is localhost with a random portnumber.

If you want integration with Facebook, other services or just want a custom domain in your browser then you can follow these steps.

  1. Go to the properties of your (MVC) web application
  2. Go to the web tab on the left
  3. Under Servers check the Override application root URL and fill in http://YourSubDomain.YourDomain.com
  4. Hit Create Virutal Directory
  5. Change the start url above under Start Action to http://YourSubDomain.YourDomain.com
  6. Go to your IIS Express settings under C:\Users\Ralph\Documents\IISExpress\config and open the applicationhost.config file.
  7. Find your site and adjust the binding<bindings>
    <binding protocol=”http” bindingInformation=”*:80:YourSubDomain.YourDomain.com” />
    </bindings>
  8. Optionally add the binding for https (443)
  9. Go to your host file under C:\Windows\System32\drivers\etc and add 127.0.0.1 YourSubDomain.YourDomain.com
  10. Run your site

If you get an error. Try to run your Visual Studio instance as Administrator.

Update TypeMock version with AutoDeploy enabled

We use TypeMock in a project. We also use the TypeMock AutoDeploy feature so we can use different versions of TypeMock on one build server. The AutoDeploy feature of TypeMock makes it possible to run your unit tests on the build server without installing TypeMock on the build server. You can read about this feature in my other blog post:


https://www.locktar.nl/programming/embed-typemock-in-your-tfs-build-definition


Because we are using VS2013 now, we had to upgrade the TypeMock version to a new Release Candidate version that I got from TypeMock for testing. When we where testing, we saw that the tests where failing because the old version was referenced in the AutoDeploy folder. So we had to update the TypeMock version in source control to keep the AutoDeploy functionality working on the build server. After some tries, I now have a best practice for update TypeMock.


  1. Uninstall TypeMock (not always necessary but for this Release Candidate they advised me to do it)
  2. Install your new version of TypeMock (you whole team off course)
  3. Search for your AutoDeploy folder in the root of your project and check it out of TFS
  4. Open your solution and go to the TypeMock menu and choose “Fix references…”
  5. Choose the second radio button that says “Copy libraries from installation folder to:” and browse to your AutoDeploy folder of step 3
  6. Hit ok. Now every test project that uses TypeMock will be modified with the new TypeMock version. The TypeMock folder in the AutoDeploy folder now also has the new version of the dll.
  7. If some of the projects have a TypeMock references to your program files, you have to change it. This is needed because otherwise the AutoDeploy feature isn’t working. To fix this, you have to delete the reference and add a new one. Browse for the right dll to the TypeMock folder in the AutoDeploy folder in the root of your project. Repeat this for every reference in every project that has the wrong path.
  8. Browse with Windows Explorer to your TypeMock installation directory in program files. In this installation directory you will also find an AutoDeploy folder. Copy all the files in that folder and overwrite your old TypeMock version files in the AutoDeploy folder in the root of your project. 
  9. Check everything in and test your build

 When you followed these steps, you have the new TypeMock version in your project in minutes. 

How to fix the CA0053 error in Code Analysis in Visual Studio 2012

I upgraded one big Team project with a lot of different solutions (to separate stuff) to Visual Studio 2012. The custom Code Analysis gave me an CA0053 error on the build server. So I searched for the problem and came to this great blog post: How to fix the CA0053 error in Code Analysis in Visual Studio 2012. This solved my problem. I removed all the tags CodeAnalysisRuleDirectories and CodeAnalysisRuleSetDirectories. This was enough. Now Visual Studio 2012 would get the latest Code Analysis dll’s.

When queued another build, I still got the same error. This was not in all solutions so it had something to do with the solution file or with some of the projects inside it. After removing the project one at the time (after each try the build succeeded) I did a reset of the solution file so that was the same. At the end, all projects where the same and I still got the error. I then searched for a difference between solutions files.

There was the solution, the version of the file format was different and the Visual Studio version was different.

image

I think that I know what the cause of the problem is. Because we have a lot of different solution files (with overlapping projects in it), all the upgrades to Visual Studio 2012 where already done. Because they where already done, no file change was done so the format file version wasn’t migrated to the Visual Studio 2012 version. The custom ruleset in the projects where searching for the Visual Studio 2012 dll’s but the solution was build in Visual Studio 2010 on the build server because of the different format version.

Hopefully this fix will help someone. Let me know!


Update 11/06/2013:

We upgraded our solution to VS2013 and the Custom Code Analysis didn’t work again. So I builded the custom rules in VS2013 and used that version of the DLL. Now the clients worked again. When I started a CI build, the build failed with the CA0053 error. It seems that the build server has (in my opinion) a bug that it uses the format version of your solution file -1 to determine the Visual Studio version. Visual Studio 2013 uses the same format version as VS2012 (version 12) so you will end up with VS2012 on the build server. But because we have builded the custom rules against VS2013, the buildserver wont recognize the rules. The solution is to add the /p:VisualStudioVersion=12.0 parameter by the “MSBuild Argurments” in your CI build definition.

Typemock Settings

Embed Typemock in your TFS Build definition

When you want to test your code that uses Typemock, you can use a Team Foundation Server Build Server. The current version of Typemock is 7.4 and this version (introduced in 6.2) has the AutoDeploy feature included. This is very important because now you can use multiple versions of Typemock on one Build server. The reason for that is that you don’t have to install Typemock on you build server anymore. To setup Typemock Autodeploy, you can use the tutorial on their help page in the chapter: Typemock Isolator Integration with Team Foundation Server 2010 (TFS). The only thing that they forgot to mention in the documentation is that there is generated a Typemock directory with a couple of dll’s in it inside your just added AutoDeploy directory. This is done after you fixed the references and restarted Visual Studio. Don’t forget to checkin that directory.

In the help documentation, they say that you have to use the workflow of Typemock to get the AutoDeploy to work. The customer that I now work for already have a custom workflow. I just created that workflow last week with some custom actions for them. So I want to integrate the custom Typemock stuff in the workflow of the customer. The customer works with TFS 2010 (just migrated a few months ago from 2008 so they have a lot of catching up to do) so this blog is aimed at TFS Build 2010. But this will also work for 2012. You can also check the documentation about Typemock with TFS 2012 on their website.


The differences between the build templates

There only 4 differences between the template that are special for Typemock. I will show them beneath. The only thing that you have watch for is the right place to put custom activities on the right place.

First open your own workflow in the designer. In your toolbox, add a new category and choose the TypeMock.TFS2010.dll assembly in the installation directory of your Typemock version on your machine. After that, three custom activities are added to your toolbox. Don’t forget to reference the dll in your project where your custom workflow is located.

image

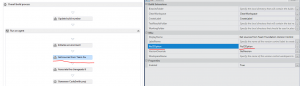
Now add the activities on the right place by dragging them into the workflow. You don’t have to edit any properties. On the left side, you see the default template of TFS 2010. On the right side the template of Typemock. Drag the activities on the same place in your own workflow.

Registreren Typemock

Stoppen Typemock

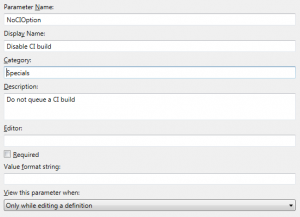
After that, add a workflow argument of the TypemockSettings type. You can optionally edit the Metadata argument to customize the text that you will see in you build definition.

Typemock arguments

Save your workflow and checkin your workflow. Restart Visual Studio and configure the license in your build definition.

That’s it! It’s very easy. It is not more than 10 minutes of work to edit your own template. When you run your build now with the AutoDeploy feature on and with entering the right license info in your build definition, the build will succeed en will test your Typemock tests.