VC 10.0 Runtime file failed verification with installing TFS Test Controller

Yesterday I was creating three virtual servers for a customer of me with the TFS 2010 Testcontroller and test agents installed on it. The virtual servers are all new Windows Server 2008 SP2 versions. The first thing that I had to do was (obviously) installing the TFS test controller software. So I started the ISO that the system administrator had mounted for me and started the setup. After that I clicked installing test controller software because that was needed on the first server. The setup said it would install the VC 10.0 Runtime for me and the test controller so I hit the next button. The installation started but after say 5 seconds the setup failed. I opened the setup log file and saw a weird error:


CMsiComponent::Install() expects the setup file for VC 10.0 Runtime (x86), but the file failed verification.


This was not clear for me what to do so I did a search with my favorite search engine. I saw a lot of post with a corrupted version of the Visual Studio 2010 ISO. But this was not the case because this was TFS software. So I downloaded the ISO myself again and extracted all the files. This gave me also the same error.

Then I remembered that I had this error one time before. It took me 2,5 hours of searching and trying before I remembered that… I downloaded Daemon Tools lite (mounting software) and mounted my new downloaded ISO on my new virutal DVD player. Started the setup again and now it installed within a minute. Very strange but you have to mount the ISO directly on the Windows Server 2008 server and not from a network share. I tried the solution on the other two servers (they where giving me the same error) and there the solution worked also instantly.

Hopefully I help someone with this problem or a related problem so your not searching 2,5 hours for a solution (a second time).

Use Config Transforms when Debugging your web application

Config Transforms are a great way to adjust your publish strategy. You just right click your web.config file and click “Add Config Transforms”. In that way you get the transform files of your configuration options.

In our company, we are working with a website that has multiple versions for different customers. So it is the same website only the config is changed. The config includes all kind of security settings. When we are developing we want to use the config of the specific “brand” of the website. How to accomplish this without?

SlowCheetah is a nice extension for visual studio that gives that option for WinForms projects but not (yet) for Web Applications. See the issue for this feature:
https://github.com/sayedihashimi/slow-cheetah/issues/39


For now I found this solution:

  1. Create your transforms as you want.
  2. Create a new config file with the name web.template.config
  3. Copy everything from your web.config file to the new web.template.config
  4. Create new config files for temp for your transforms. So if you have the transforms Debug and Release, you should create temp files for them. Call them web.dev.{Configuration}.config. So this would be web.dev.debug.config and web.dev.release.config. Place the config files in the root of your project just like your standard web.config.
  5. Copy everything from your transform files to the temp files.
  6. Add a target file to the root of your project location. Don’t do this in Visual Studio but just in Windows Explorer. Give it the following name: {Projectname}.wpp.targets
  7. Past the code beneath in the targets file.
  8. Delete your “old” web.config in Windows Explorer (not in Visual Studio)
  9. Restart Visual Studio and open your project. The solution explorer says now that you don’t have a web.config but you see the config transforms as childs. Ignore the alert that the file is missing.
  10. Rebuild your project and your done. The new web.config is generated on your drive. (if you hit refresh in the solution explorer, the alert is gone). Just change your Configuration at the top of Visual Studio and your config is changed.

Notes
Remove your web.config file from source control otherwise you will get check outs.

Screenshots
Config transforms for F5

SlowCheetah targets files


Contents of targets file

<?xml version="1.0" encoding="utf-8"?>
<Project ToolsVersion="4.0" xmlns="http://schemas.microsoft.com/developer/msbuild/2003">

  <PropertyGroup>
    <PrepareForBuildDependsOn>
      $(PrepareForBuildDependsOn);
      UpdateWebConfigBeforeBuild;
    </PrepareForBuildDependsOn>
  </PropertyGroup>

  <!-- This target will run right before you run your app in Visual Studio -->
  <Target Name="UpdateWebConfigBeforeBuild">
    <Message Text="Configuration: $(Configuration): web.dev.$(Configuration).config"/>
    <TransformXml Source="web.template.config"
              Transform="web.dev.$(Configuration).config"
              Destination="web.config" />
  </Target>

  <!-- Exclude the config template files from the created package -->
  <Target Name="ExcludeCustomConfigTransformFiles" BeforeTargets="ExcludeFilesFromPackage">
    <ItemGroup>
      <ExcludeFromPackageFiles Include="web.template.config;web.dev.*.config"/>
    </ItemGroup>
    <Message Text="ExcludeFromPackageFiles: @(ExcludeFromPackageFiles)" Importance="high"/>
  </Target>
</Project>


Update
An optional thing that you can do is, grouping your config files beneath the template config just like that standard web.config and his transforms. The dev configs are dependent upon the template so let’s place them there. To do this is easy. Unload your project and find your dev configs. You will see something like this:

<Content Include="web.dev.{your configuration}.config" />

Change this in:

<Content Include="web.dev.{your configuration}.config">
  <DependentUpon>web.template.config</DependentUpon>
</Content>

Repeat this for all your dev transforms. After that, save the file and reload your project.
You can also use the Visual Studio extension VSCommands. right click the files that you want to group, hit group items and select your base config file.

Internet Explorer cannot display SharePoint 2013 ODATA feed

When your starting developing in SharePoint 2013 you can use the Client Object Model (CSOM). Well this is the “old” approach of developing against SharePoint. Starting from SP 2013 you can use ODATA to develop againt SP 2013. The only thing that you have to do is to go to your SharePoint 2013 site and add _api to it. Example: http://Servername/_api

When you want to see the list available in your site you just enter lists behind it. Example: http://Servername/_api/lists

When you do that in Internet Explorer you would get the screen rendered as below.
Atom SP13

The data is there but it isn’t shown as you want. To fix this follow the steps below.

Go to internet options and change:
IE options content
IE feed render settings

When you navigate again to that page (F5 won’t work), the ODATA is shown like this now:
ODATA SP13

TFS 2010 Build server with TFS 2012 Update 2

TFS 2012 Update 2 is released last week. I’m working in a large company with a lot of TFS 2010 build servers. With Update 2, TFS 2012 supports the build server of TFS 2010. This is a huge advantage because now we don’t have to upgrade all the build server at the same moment.

When I was testing my TFS 2010 build server (a clone of the production) the build server wasn’t working. I got the message “The device is not ready”.

I checked the ALM blogs about the new feature from Update 2 and saw that the build server needed Service Pack 1. I downloaded, installed it and after 15 minutes everything was done. I rebooted and installed 3 critical updates for SP1. I rebooted again and tested my build again. It was still not working. The strange error with no information about it was still there.

I checked all the settings of the build server and everything seemed to be right. I unregistered the build server from my collection and deleted the controller and agent. After registering the build server to the collection, I created a new controller and agent with the same settings as before. I tested the Build definition again and everything was working right this time!

What really was the problem is not clear but it could be the case that registering tot TFS 2012 without SP 1 for the TFS 2010 build server could be the problem or the controller and agent should alway be recreated.

We also tested a newly created TFS 2010 SP1 Build server connecting to TFS 2012 and then everything was working the first time we tried.

Multiple select listbox in MVC 4

This post will be in Dutch because I based this on a discussion with someone else.

Vandaag gaf ik al weer voor de vierde keer les op de Hogeschool van Rotterdam. Daar geef ik les aan een groep studenten in het vak Microsoft ASP .NET MVC 4 met alle standaard tools als Entity Framework en Web API er om heen.

Bob Joziasse sprak ik vandaag over een multiple select in een listbox voor zijn laatste blog Eggplication die in het leuke paas thema is geschreven. Ik ben er even ingedoken aangezien ik zelf de listbox in HTML nooit gebruik. Op zich is het een standaard control en het is al snel duidelijk voor een gebruiker wat hij er mee kan doen. Ik zelf gebruik hem nooit omdat de styling van het control niet voor elke browser gelijk is. Maarja, terug naar het onderwerp.

In zijn blog heeft Bob een kleine applicatie gemaakt om aan het te geven hoe een meer op meer relatie werkt door middel van Code First in het wel bekende Entity Framework. In de applicatie kan je een ei maken en die verschillende templates geven voor het beschilderen. Ik heb de applicatie hetzelfde genoemd maar de properties van de objecten een beetje mijn eigen gang laten gaan. Zo heb ik ook een meer op meer relatie en kan ik dus templates koppelen aan een ei en eieren koppelen aan (schilder)templates.

De objecten zien er als volgt uit:

Egg:

Template:

Simpele ViewModel voor de Create van de Egg:

De database wordt dan als volgt gegenereerd:

De controller met de Create Get en Post functies zien er dan als volgt uit:

Om dit werkend te krijgen hebben we natuurlijk ook een View nodig. Dit ziet er bij mij zo uit:

Als we dit draaien ziet dat er als volt uit:

Om vervolgens dit weer te kunnen bekijken heb ik het als volgt gemaakt:

Wat resulteert in onderstaande om het ei met de gekozen templates te kunnen weergeven:

Een simpele applicatie maar wel handig om snel een meer op meer relatie te maken met een listbox.

TFS connection Value cannot be null

In our company, we are upgrading from TFS 2010 to TFS 2012. So to test everything we have a clone of the TFS server.

To test the clone I had to switch my connection to the different servers. After hitting the “Connect” button I got a “Value cannot be null.” exception. It said that also that: “Parameter name: baseUri” was the problem. After contacting a colleague of me, he said to delete the cache of the TFS server on my computer. After doing that, the connection worked as it suppose to work.

You can find the cache in the following folder: C:Users<yourusername>Local SettingsApplication DataMicrosoftTeam Foundation2.0Cache

Localization validation in MVC

Edit 10\15\2014: I created a new version of this blogpost. It is called MVC localization validation.


Last week I was working on a bug for my website SeeTings. The bug was the validation of a DateTime not working in Firefox and Chrome. In Internet Explorer (even version 9) was working correct.

After hours searching and hundreds of form posts further, I finally found the solution. I thought the problem was in implementing the jQuery UI Date picker with the Dutch Format of a date (dd-MM-yyyy) in it but that wasn’t true.

The problem was the client validation of the jQuery Validation plugin. ASP .NET MVC 3 and 4 are shipped with an installed version of jQuery. And the internet template (the one that I was using) creates a login and register process.

To test the bug, I created a new project and added a DateTime field called Birthday to the register login form. I deleted all other fields except the UserName field because then I could test if the Required validation still worked if I might fined a solution for the validation problem.

After long searching, I saw this post http://stackoverflow.com/a/511670 on Stackoverflow. There was another script file called “additional-methods.js” that I didn’t heard of. After long searching, I found the official website of jQuery validation http://bassistance.de/jquery-plugins/jquery-plugin-validation/ and saw the CDN of all the jQuery instances.

It seemed not necessary to link the additional-methods.js file because that would only add extra validation like credit card or url TLD and email TLD etc. checking.  I found out that jQuery validation had multiple localization files. One for the messages and one for one other thing and that was my problem, the date validation.

When you go to the CDN of Microsoft, you will see in version 1.6 (current version is 1.9) a long list of localization files.

imageimage

The files ending with messages_xxx.js are the error messages localized. The files ending with methods_xx.js (like for me methods_nl.js) are the localized versions of some script. In this case only the date.

So reference on your page where you need to do the validation, the standard validation scripts of jQuery and after that you need to reference you localization file. Only do this if the browser is that language. So I only reference the script file if I know that the browser is Dutch. You can find the current language settings of the browser with JavaScript as well. You can change the url of the CDN from 1.6 to 1.9 and it will still work. Why the files are not listed on the 1.9 page, I don’t know.

After completing this above, you can after that implementing the jQuery Datepicker. Don’t forget that the Datepicker of jQuery UI also needs a localization reference file. See the last part of the documentation on this page http://jqueryui.com/demos/datepicker/. Just reference the file and everything is working.

Good luck and hopefully you guys aren’t that long busy figuring out why the validation isn’t working.

Creating a TFS Build definition with deploying

This week I was busy to give our environment more quality by adding a deployment of the newly checked in work. This was a quite more difficult then I imagined before I started. This is because the environment that we have is off course not completely the same as the standard demos of Microsoft and the documentation for this is… not available?


Team project setup

We have a Team project with 3 different branches.image

  1. Production (Release)
  2. Staging
  3. Development (Debug)

Off course we develop in the Development branch. When the iteration is finished, we merge everything to the staging environment where we and the customer could test everything. When testing (and bug fixing if you made bugs) is done we merge everything to production. In that way we can do bug fixes directly on every version of the project.


Build definitions

We wanted to have a build definition for development that:

  1. Builded the solution;
  2. Deploys the multiple projects to the different locations.

I created for each branch a different build definition with different needs to get to the result. I will explain the Development because this build definition will publish multiple ASP .NET Web Applications to different IIS websites.


Creating the build definition for development

imageCreate a new build definition and give it the name that you want. I called it Development because I want to use it only on my Development branch in the team project.

I set the trigger to go off on each check-in. In that way, the build will also publish all new versions of the web applications to the desired environments on the server(s).

image

Set the workspace to the workspace of your branch.

Define a drop location and which build controller you like to use of your build server. Maybe you have a dedicated build controller for particular solutions that have many check-ins.

Setup deployment to the server

The last part is the part where we setup the deployment to the server.

image

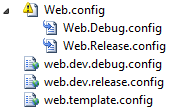
Define on step 1 the Configurations that you want to build. With config transformations you could setup the different build environments. See for a tutorial this following link:

http://www.asp.net/mvc/tutorials/deployment/deployment-to-a-hosting-provider/Deployment-to-a-Hosting-Provider-Web-Config-File-Transformations-3-of-12

Because it is a development environment, we use the default Debug config with all the links to the test database and test web services. Set the projects to build to the solution file.


Note for building only one project
When you set the projects to build to only one project, you could get an error when you are building. The error will say something about your output path that is not right.

c:WindowsMicrosoft.NETFramework64v4.0.30319Microsoft.Common.targets (484): The OutputPath property is not set for project ‘UI.Web.Mvc.csproj’.  Please check to make sure that you have specified a valid combination of Configuration and Platform for this project.  Configuration=’Debug’  Platform=’Any CPU’.  You may be seeing this message because you are trying to build a project without a solution file, and have specified a non-default Configuration or Platform that doesn’t exist for this project.

image

This isn’t really the cause why you would get that error. When you open your project file (unload your project and right click to edit) you will see that the build platform is AnyCPU and not Any CPU. You will have to change the “Configurations to Build” in your build definition to AnyCPU. You can just type it in the dialog.

imageWhen you have a whole solution to build, you don’t need to do this.


Setup deployment for only one web application

When you have only one web application, you can add the “MSBuild Arguments” in your build definition directly.

See for a large explanation for each build argument the following blog:

http://vishaljoshi.blogspot.nl/2010/11/team-build-web-deployment-web-deploy-vs.html

The arguments that you typically have to use are the following:

/p:DeployOnBuild=True
/p:DeployTarget=MsDeployPublish
/p:MSDeployServiceURL=http://servername
/p:DeployIISAppPath=”Default Web Site”
/p:CreatePackageOnPublish=False
/p:MsDeployPublishMethod=RemoteAgent
/p:AllowUntrustedCertificate=True
/p:UserName=username
/p:Password=password


Setup deployment for multiple web applications

If you have multiple web applications in a solution (like we have), you can’t use the build arguments like above because then every application would be publishing to the same website on the same server. This will fail your build definition eventually. Maybe not the first time but it will fail sometime. For me it failed every second time I tried it.

Well stop the complaining and tell me how to fix this!

Change the build arguments that you have setup above. Only use the following build arguments:

/p:DeployOnBuild=True
/p:CreatePackageOnPublish=False

image


Now unload your projects that you want to publish and edit every project file to their specific needs. Go to the PropertyGroup of your build configuration that you are using in your build definition. I use Debug so will change that PropertyGroup.

image

Use the same name as the build arguments and enter your values.


Note for exposing your publish username and password
When you setup your deployment, you have to enter your username and password. Otherwise you will get an error that your not authenticated.

C:Program Files (x86)MSBuildMicrosoftVisualStudiov10.0WebMicrosoft.Web.Publishing.targets (3588): Web deployment task failed.(Remote agent (URL http://servername/MSDEPLOYAGENTSERVICE) could not be contacted.  Make sure the remote agent service is installed and started on the target computer.) Make sure the site name, user name, and password are correct. If the issue is not resolved, please contact your local or server administrator. Error details: Remote agent (URL http://servername/MSDEPLOYAGENTSERVICE) could not be contacted.  Make sure the remote agent service is installed and started on the target computer. An unsupported response was received. The response header ‘MSDeploy.Response’ was ” but ‘v1’ was expected. The remote server returned an error: (401) Unauthorized.

For security reasons, you should not enter your username and password in your build definition. So, how to fix this?

The first thing you must do is give your TFS build service account rights to the server that your publishing to. I added it for now to the local Administrators group of my old (but still working) Windows  Server 2003 server.

The second thing that you have to do depends on which way you have setup your arguments. Use the following syntax for the build arguments in your build definition:
/p:UserName=

And for in your project file:
image

This will indicate that the username and password that will be used for deploying is the same as your build controller on your build server.

Hopefully I gave you enough information about deploying your applications. If you have any questions, don’t hesitate to contact me.


Update:
When you deployed your project and see the zip with your project in it, you should check your connectionstring in your config. It could be the case that the connectionstring is using parameters to generate the full connectionstring. This is an option that is on by default. If it is using parameters, you will see something like “$(Replaceable Token…)”.

You can simple disable this (so it will use the connectionstring that you have set in your config transform) by adding the <AutoParameterizationWebConfigConnectionStrings>False</AutoParameterizationWebConfigConnectionStrings> tag in your project file on the same place where you placed the rest of the properties.

OutputCache explanation

Why should we use caching?

The reason why we should use caching is to increase the performance for the end user and to decrease the traffic on the server. There are multiple kind of caching. In this post, I will explain the OutputCache attribute of MVC 3 (and 4).

Using the OutputCache Attribute

To cache a page or image in ASP .NET MVC 3 we only have to set the OutputCache attribute above the action.

image

The Duration property is the timespan you want to cache the action in seconds. So above, the page will be cached for 10 seconds. When you run the application, the page is showing the ViewBag.Time on your screen. If you hit F5 (refresh), the page is refreshed but your action isn’t. The time is still the same if you did refresh the page within the 10 seconds. When you hit F5 after 10 seconds, the new time is shown.

Use fiddler to see if the caching is working.

Caching the action for different result

When you have an action for different results, like asking for an image for a given imageId you use a parameter in your action. The OutputCache attribute will automatically use the parameter for caching the result for that specific item.

image

So when you ask for example image 3 and 24, the caching will work on both images.

Use fiddler to see if the caching is working.

Caching of private items

By default, the cache is saved on the server and client. But when you have private data the cache should only be used on the client (the browser). Otherwise, private data could be accessed by anyone.

We could use the location property for this.

image

Set the location property to Client to only store the image in the browser.

When you run the page now and see the image or page, the image or page is cached only in your browser. When you hit F5, the caching won’t work. This is because client caching will not work for browser refreshing. If you use a hyperlink to the same page or image the caching will work.

Again use fiddler to see the results.

How to disable caching of an action

To disable caching for an action, use the code as shown below.

image

Caching profiles

When you have a lot of actions with the same settings, you could implement caching profiles. In this way, you only have to change the settings on one place.

In the web.config, add the following section.

image

You then could use the caching profile in the following way.

image